Resident Evil: Village tosses Ethan quickly into the action. After blacking out and waking up in a strange area, he's confronted by a towering castle in the distance. It's here that players will find themselves scrambling around dark hallways and avoiding enemies to grab a quartet of beautiful masks, all four of which are needed to escape the massive iron doors of Castle Dimitrescu. Finding the masks is much easier said than done, and players will have to crawl through four distinct areas of the foreboding estate to grab them. The quest marks the first major puzzle to overcome in Resident Evil: Village and you'll find yourself tearing through enemies and mini-puzzles alike to get it done.
Some of it can be a bit ambiguous too, with side-trips and small brainteasers sprinkled throughout the semi-linear journey. This is the first large-scale puzzle you'll face in Resident Evil: Village and it can be a bit overwhelming at first. That's why we've gone through the paces and braved Lady Dimitrescu and her daughters to give you a fighting chance at escaping unscathed. If you're having trouble locating any of the four Angel Masks, here's each one of them, where they're located, and how you can get there to snag them.
Note: Before we start, one important side-note is to save as much Lei as you can through this section, amassing 10,000 by the time you snag the Mask of Joy is suggested to avoid a headache later on. Selling the Crystal Torsos that you receive from defeating the sisters is great for some extra cash and there are a lot of items and Lei lying around the areas you'll explore.
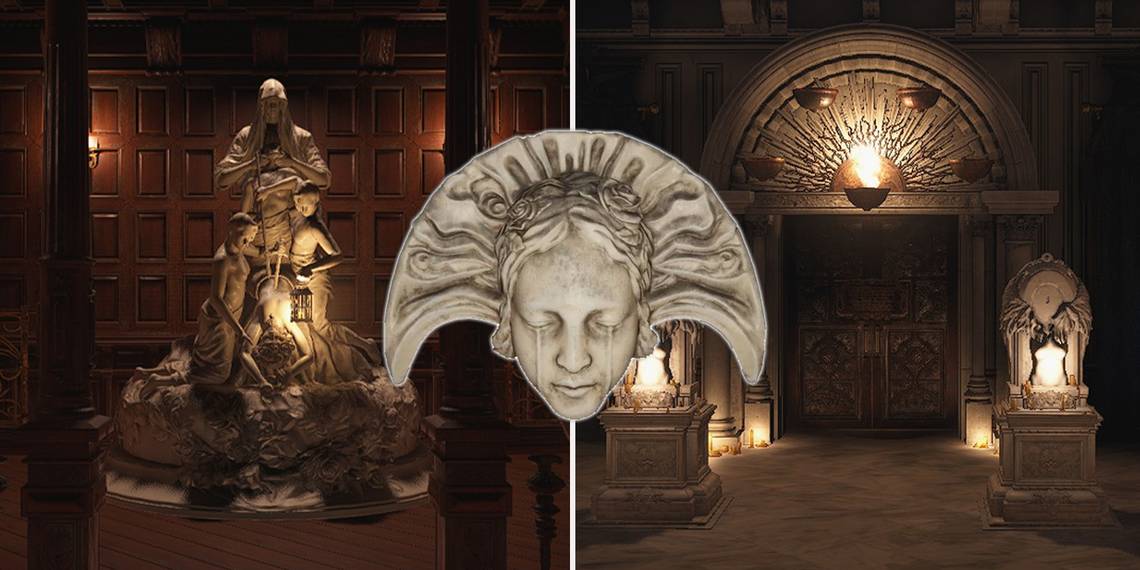
Finding The Mask Of Sorrow

You won't be able to find your first mask until after you've progressed enough to have a very up-close-and-personal meeting with Lady Dimitrescu. This means moving through the castle, having a standoff with her daughter Bela, and retrieving the large bottle of Sanguis Virginis wine from the Kitchen. Once you have the Wine in hand, you can proceed through the Kitchen and back into the Main Hall. From there, climb the staircase and enter the Wine Door directly in front of you. Inside the Wine Room is a statue with a perfectly-sized slot for the Sanguis Virginis bottle. Placing the bottle will open a small room and give you access to the ever-important Courtyard Key.
- Retrieve the Sanguis Virginis wine from the Kitchen.
- Place the Sanguis Virginis wine bottle in the holder in the Wine Room.
- Obtain the Courtyard Key.
- Go to the Hall of Ablution.
- Go through the Wine Cellars.
- Get Lady Dimitrescu's Key.
- Get The Mask of Sorrow.
From the Wine Room, head back to the Main Hall and back down the stairs, making your way towards the Kitchen area you came from earlier. This time, instead of going back into the Kitchen, head to the large metal doors that lead to the Courtyard. Once outside, you'll want to head in a straight line (making your way around the small gazebo-like structure in the center and proceeding to the back portion of the Courtyard. Hooking a right will lead you down a small hallway and into some large double doors. You'll catch a glimpse of Lady Dimitrescu ascending a large staircase and you'll want to follow behind her soon after.
There is only one room you can enter upstairs and it will take you to into the Hall of Ablution, where you'll find four statues and a pit filled with what we hope is wine. Reading the plaque at the back of the room will give you a hint as to how to solve this puzzle, but if you're struggling check out our solution guide here. Once the pit is drained, you can make your way down into the Wine Cellars and proceed through the flooded mess until you reach dry ground once more. The cellar is big and filled with enemies, but the path is quite linear so you won't need to worry about getting lost.

The end of the path leads to an elevator and riding it upward will bring you to a balcony outside of Lady Dimitrescu's Chambers. Enter the nearby door and save your game before proceeding back outside and across the wooden gap. After a short cutscene, enter the bedroom from the terrace and look near the Lady's desk for a key that's perched on a wall-mounted hanger. Now that you have Lady Dimitrescu's Key, you can escape from her locked room. After opening the door, and one dizzying cutscene later, you'll find yourself in a storage area a few floors down.
Proceed through the storage area to the end, where you'll have your first proper encounter with Lady Dimitrescu. There's a gate nearby leading to the next area and you'll want to pull the switch. After a gruesome cutscene, you'll find yourself pursued by the boss. This isn't like the other instances in which the towering vampiress will toy with Ethan or put him in an exceedingly painful situation. The lady of the house is rather annoyed by you at this point and if she gets close enough she'll tear Ethan to shreds. It's pointless to try and fight her here and the only way to make it past her is to escape the room.
Return to the gate, retrieve the item you left behind, and wait for the gate to slowly open. Kiting Lady Dimitrescu is incredibly easy here, thanks to the abundance of small rooms and pillars nearby. Once the gate is open, sprint to the end of the hallway, open the door, and secure your prize from the ornate statue in front of you. You now have the Mask of Sorrow and will ride the triggered elevator back up to the Courtyard.
Finding The Mask Of Joy

It's probably a good idea to backtrack to the Hall of the Four and enter the Merchant's Room to save your game. The path to the Mask of Joy isn't as taxing as the one you just took but a boss battle sits between you and your prize. Now that you have Lady Dimitrescu's key, head back out to the Courtyard and open the door to the left of the newly risen elevator. You're now inside the Castle Annex and you can find a map of the area on a wall at the back of the room. Once you snag the map, ascend the staircase, hook a left at the top, and enter into the Opera Hall. Make your way through the pair of enemies upstairs, looting what you can before descending the staircase in the back corner to reach the main floor. Here, you'll spot a Grand Piano, fitted with a small puzzle lock. If you find yourself stuck on how to unlock the compartment on the Piano, check out our guide here.
- Go to the Castle Annex.
- Go to the Opera Hall.
- Solve the Piano Puzzle.
- Get the Iron Insignia Key.
- Go to the Library.
- Defeat Daniela.
- Get the Mask of Joy.

Once the puzzle is solved, the Piano will open a small hidden tray and reward you with the Iron Insignia Key. From here, head to the door in the corner and unlock it to find yourself back at the start of the Castle Annex. Now you can race back up the stairs and turn right this time, opening the Iron Insignia Door which leads to the Library. Here, you'll need to fight against Daniela, one of Lady Dimitrescu's daughters. If you're struggling to put her down, check out our guide on how to defeat the sisters here. After the boss fight, you can progress through the opposite side of the Library where you'll find the next ornate statue and be able to grab the Mask of Joy.
Finding The Mask Of Rage

We'll start this section off with a pro-tip that will save you a bit of frustration and backtracking. Before heading into the Atelier, go through the door opposite of the statue and proceed back downstairs to the Hall of the Four and enter the Merchant's Room. It's a good idea to save but the real reason you came down here is to purchase the Inventory Upgrade from the merchant. It has a hefty 10,000 Lei price tag but it's worth it. Make sure you're stocked up on ammo too.
- Go to the Atelier.
- Solve the Five Bells Puzzle.
- Go to the Rooftops.
- Zipline to the Belfry.
- Grab the Mask of Rage.
Once you have the upgrade, head back up to the room where you grabbed the Mask of Joy and proceed through the door to the left and into the Atelier. You'll be stopped by another puzzle, requiring you to ring five bells. If you find yourself stuck on this part, we have a handy guide on where to find each of the bells. Once the puzzle is solved, a special pathway will open up behind the massive portrait of Lady Dimitrescu. Follow the new passage and climb up the ladder at the end. From here, progress through the attic-like area until you come to a chair sitting next to a suit of armor. This is the exact reason we snagged the Inventory Upgrade earlier. With the extra space, you can now easily store the F2 Rifle without sacrificing healing items, ammo, and explosives.

The F2 Rifle comes in handy for the next part. Slipping through the door to the left will put you on the roof of the castle and you'll be tracked by a new enemy. Flying Lycans can be a nuisance but the F2 Rifle puts them down quickly. The path across the roof is pretty linear. Follow it towards an area with an elevator and then proceed around the elevator to continue along the rooftops. The goal is to wind around the area until you find yourself atop a tower-like structure with a nearby zipline.
Grab onto the zipline when you're ready to progress and the short ride will drop you down into an alcove and directly in front of the ornate statue containing the Mask of Rage. With the key item in hand, you can kick down a nearby ladder and climb back down to the elevator you passed earlier. Ride the elevator down and you'll find yourself in familiar territory, a small room connecting to the area you started in when you first entered Castle Dimitrescu. From here, it's a good idea to head back to the Hall of the Four and save your game for the final trek. Keep an eye out though, as Lady Dimestricu is likely to hunt you on your way.
Finding The Mask Of Pleasure

The trip to the Mask of Pleasure isn't nearly as elaborate and convoluted as the rest. From the Hall of the Four, make your way up the stairs of the Main Hall and back through the Prioress Door that you slotted the Maroon Eye into earlier (it's to the right down the hallway at the top of the stairs). Once you open the door, head straight down the hallway and use your Dimitrescu's Key on the door. This will gain you access to the Hall of Pleasure.
- Go to the Hall of Pleasure.
- Go into the Armory.
- Get the Animal Skull.
- Inspect the Animal Skull in Inventory to remove it from the plaque.
- Grab the Mask of Pleasure.
- Put the Animal Skull in it's place.
Stepping into the room, you'll immediately spot the ornate statue holding the Mask of Pleasure. Unfortunately, grabbing it will cause a steel gate to collapse on the exit, sealing you in the room. To escape, you'll need to make your way through the nearby fireplace (there's a hole inside it you can crawl through) and into the Armory. Here you'll have to face off against Cassandra. If you're struggling to crack the code on her mechanic, be sure to check out our guide on defeating the sisters here. Once Cassandra is no more, turn your attention to the wall farthest from the entrance to the room. Up on the wall, near the ceiling, you'll spot an Animal Skull. Grab it and head back into the Hall of Pleasure.

You'll be able to place the Animal Skull where the Mask of Pleasure was, releasing the door lock and giving you a straight shot back to the Hall of the Four. Unfortunately, there is a plaque blocking your ability to seat the Animal Skull, so enter your inventory and examine the skull further. By turning it around and looking at the backside, you'll be able to remove a small bolt and pull the skull from the plaque. Now it can be slotted into the ornate statue, which will open the gate and let you back into the hallway.
Setting The Masks In Their Slots

Head back down to the Hall of the Four (with a side trip to the save point in the Merchant's Room) and stand before the empty busts. You can figure out which masks fit where by examining them in your inventory and turning them around. There will be square pegs on the backside of each mask, signifying which busts that slot into.
If you're looking for a quicker way out without having to examine, the order of masks follows:
- The Mask of Rage fits on the far right bust.
- The Mask of Joy fits on the middle-right bust.
- The Mask of Pleasure fits on the middle-left bust.
- The Mask of Sorrow fits on the far left bust.
Once all four masks are firmly in place, you'll finally be done with this puzzle and able to progress through the large doors behind the completed statues.