Mordhau combat guide - melee fighting like a Mordhau pro, how to win 1v1 and 1vX fights
How to make one fighter feel like a dozen


Okay, this is the really important part of our Mordhau guide series - and how in the world could it not be? Combat is the beating heart of these sorts of games, and Mordhau's system of attacks and parries and feints and drags and chambers and ripostes and morphs is so intricate and hard to master that you'll need all the help you can get if you want to learn how to fight like a pro. This Mordhau combat and fighting guide focuses on simple and advanced melee combat techniques which you can use to build an ironclad defence around yourself and ensure all your strikes land true.
We'll be getting quite in-depth here, so grab a drink and your weapon of choice, and prepare for a read that will hopefully open your eyes just as you'll open up your enemies' torsos.
If you're looking for a more general overview of the wonderful medieval decapitate-'em-up that is Mordhau, look no further than our Mordhau guide, which is filled with beginner-friendly explanations and advanced tips, along with links to other useful areas of our expanding series of guides. You may want to read up on my Mordhau weapons and Mordhau perks guides in particular, so that you enter each fight with the maximum chances of survival.
Mordhau combat guide - pro fighting tips and tricks
First we'll quickly go through the main tenets of melee combat in Mordhau, before moving onto a selection of more in-depth and advanced techniques. Use the links below to skip ahead if you wish; though I'd advise you read through it all from start to finish. I won't dawdle, I promise.
Mordhau combat guide - contents
Mordhau combat basics - a brief overview (which you should not skip)
Let's go over some of the terminology and moves which constitute the Mordhau melee combat system. With each one I'll explain its function and anything else that might be useful to know.
- Health - You have 100 Health. When your Health reaches 0, you'll die. If you don't sprint, parry, or make any kind of attack for a short time, your Health will start to replenish.
- Stamina - You'll use up Stamina by missing attacks, feinting, morphing, jumping, blocking, and kicking - but successful hits upon an enemy will replenish your Stamina by 10. As with Health, you have 100 Stamina and it replenishes quickly after a brief period of inactivity. If you reach zero Stamina, parrying or chambering can disarm you of your weapon. In a duel where neither opponent makes any mistakes, Stamina determines who will win.
- Damage & Armour - Damage is how you deplete your opponent's Health reserves. Different weapons deal different amounts of damage based on the type of attack (strike vs thrust), where you hit your opponent (head, body, or legs), and what Armour your opponent is wearing on that part of their body. Again, check out our Mordhau weapons guide for full damage values for every weapon.
- Strike & Thrust - The two main attack types. Thrusts (or Stabs) are generally a little quicker, but easier to read and to block. You can angle these attacks in multiple ways: thrusts can be left or right, while strikes can be upper left, mid-left, lower left, upper right, mid-right, or lower-right. The angle has no bearing on how much damage you deal, except for the fact that you may hit different areas of your opponent.
- Combo - You can combo together multiple uninterrupted attacks by inputting your next attack while your previous attack is being released. Combos are powerful for quickly following up after a successful hit, but they're fairly predictable unless you mix them up with other elements from this list.
- Feint - Every attack has a wind-up animation, and a release animation. You can cancel any attack (except ripostes) during its wind-up animation by hitting feint. This is a very important part of forcing your opponents to waste their parries so you can get around their defences.
- Morph - A very important aspect of fighting. Like a sneakier but more limited feint. You can morph a strike into a thrust (or vice versa) by making your second attack during the first attack's wind-up animation. Extremely powerful when combined with chambering.
- Accel & Drag - These are considered advanced techniques, but they really ought to be taught as basics because they're so important. Drags and accels are done by manipulating your camera as you strike in order to delay or accelerate your attack. To drag, pull the camera in the opposite direction of your swing. To accel, pull the camera in the same direction as your swing. Turn on Tracers in your game settings to better see how this affects the time it takes for your attacks to land. These tools are very important for prompting an ill-timed parry from your opponent.
- Parry - The most basic form of defence against attacks. Parries (or Blocks) have a very short window where they are in effect, after which there is a significant cooldown (meaning you can't spam parry). Parries need to be timed well, and also aimed at your opponent's attack in order to be consistently effective.
- Riposte & Hyper-Armour - Riposting is when you parry an attack and immediately attack back. This speeds up the wind-up period of your attack, and you'll know if you did it because your reticule at the centre of your screen will turn hollow. You can't feint or morph a riposte, but you can cancel it by parrying. Hyper-Armour is an effect of riposting, and means that during your riposte your attack cannot be interrupted by an opponent's attack landing. Very important for 1vX fighting.
- Clash - Clashing is where you and your opponent time your attacks so they land upon each other's weapons during the release phase. This deals zero damage to either combatant, and also allows both players to immediately attack again.
- Chamber - Another huge part of combat in Mordhau, chambering is when you mirror your opponent's attack instead of parrying (i.e. you have to initiate your attack just as your opponent's attack lands). This acts as both a block and a counterattack, and is very flexible as it can be feinted and (even more deadly) morphed. Very stamina-draining, but very powerful, and essentially a hard counter to feints. To successfully chamber, your strike must mirror your enemy's (left upper strike = right upper strike, etc.) but any kind of thrust can chamber any kind of thrust.
- Kick - Underrated. Risky, but extremely powerful under the right circumstances, particularly against shield-users. Kicking is very short-range, but if it lands it will deal a bit of damage and stun your opponent momentarily. Kicks can only be blocked by other Kicks. Consumes lots of Stamina, and if you miss your kick it leaves you potentially open to attack, but this means you can also intentionally miss your kick in order to bait your opponent into an easy-to-chamber attack.
Mordhau's tutorial does a fairly decent job of introducing these concepts to you, to be fair. But it's important to know the role of each of these attacks, and now that we've covered the basics we can get stuck into the more advanced tips involving specific situations and combinations of techniques.
Getting past the Panic-Parry stage
This is your first big hurdle if you're new to Mordhau and find yourself getting baited and bested constantly. The good news is you're not alone - most of Mordhau' playerbase is currently stuck in the Panic-Parry stage, and even experienced players can sometimes get flustered and start to Panic-Parry, particularly just after they've been dealt a very damaging blow.
In case it's not clear: Panic-Parrying is where you see an incoming attack, and you flinch, panic, and parry far too soon. And then you might just continue to mash the parry button while hoping for the best. Spoiler alert: it never works. You have to remember, parrying gives you a very small window of time where you can block the attack, and you need to be aware of your opponent's potential for feinting, morphing, acceling and dragging in an attempt to force you to time your parry incorrectly. The moment you start to Panic-Parry, the fight is already over.
At the heart of the Panic-Parry stage is a lack of experience (and by extension of confidence). In order to leave this phase behind you as quickly as possible, actively pay attention to the animations of your opponent, and their weapon type. Seriously, forget the enemy themselves. Just look at their weapon. Every single attack has a wind-up animation and a release animation, and once the release animation begins, it can't be stopped. It takes practice, but noticing the point at which a wind-up becomes a release is the core principle behind learning to leave your Panic-Parrying days behind you.
Easier said than done, I know. But if you actively pay attention to the weapon animations then the phase will pass much quicker. And once you get past this stage, you'll be able to best a great many more players than you could previously.
Learning to drag will allow you to best 80% of Mordhau's playerbase
Off the back of this - dragging your attacks is a Panic-Parrier's worst nightmare. Morphing is also pretty evil, but drags in particular are horrifying to newer players who aren't yet used to dealing with these kinds of attacks. Accels are of course very useful as well, but they're better against the more experienced duellists. Drags are extremely powerful against newer players because the newer players tend to parry early.
How do you drag? Simply put, whatever the direction of your swing, you should move your camera in the opposite direction during the attack's release phase. You can drag during the wind-up phase too, but this means you telegraph your intentions to your opponent sooner, lowering your chances of success.
That's not to say you must do absolutely nothing during the wind-up phase except look directly at your opponent. There are all sorts of ways to wrong-foot an enemy by pretending to accel during the wind-up phase, and then turning it into a huge drag during the release phase - or vice versa. But to be honest, this is only necessary against the more dangerous and experienced opponents. Simple drags are all you'll need against most players, particularly in the heat of battle.
If you want to maximise your success as a "dragger" (or "drag-lord", if you like), then choose your weapon carefully. The Maul and Zweihander are popular choices for their stupendous damage and the fact that they're already very slow weapons. But it doesn't have to be slow; the Messer, for example, is renowned for its deceptive nature when combined with drags and accels. Even the Pan can be used to great effect by dragging and acceling your attacks. Experiment with your own weapons of choice, and be confident in your drags. You don't need to keep your opponent on-screen at all times, not as long as you know they're unable to hit you before you hit them.
The power of chambering and chamber-morphing
I mentioned it in the main Mordhau guide, but I'll reiterate here: if you're okay with dying a lot for a little while in order to dramatically improve your skill in the long run, unbind Parry, and rely purely on chambers to block attacks. It's drastic, but that's why it works.
As for why chambering is such a fundamental skill in Mordhau, it all comes down to the flexibility. It's more complex than a riposte, but it's quicker and much more flexible because you can do anything you want with a chamber. You can feint it, you can drag it, you can accel it... Most importantly you can morph it. Morphing chambers is enormously important when it comes to breaking the flow of fights (more on this in a moment), and to explain why, let's take the quick example of an exchange between two good friends of mine: Player A, and Player B.
- Player A thrusts at Player B.
- Player B chambers with a thrust at Player A.
- Player A chambers with a thrust at Player B.
- Player B chambers with a thrust at Player A.
- And so on, until one of them makes a mistake or loses all their Stamina.
These recursive "chamber-offs" are funny, for sure, but they're still inelegant, inefficient, and easily avoided. Now let's have Player A fight the much more experienced Player C:
- Player A thrusts at Player C.
- Player C chambers with a thrust, then morphs into a mid-left strike at Player A.
- Player A, expecting a normal chamber, tries to thrust once more, but is hit by Player C's morph attack.
- Player C now has control over the fight and (depending on their weapon) a sizeable Health advantage.
If you'd like to see it in action in an actual duel, check out the 1v1 gif at the top of this page; my opponent used this exact strategy to land their one successful hit on me. Even experienced players have trouble dealing with chamber-morphs, so you should definitely take time to learn it, and learn it bloody well.
Breaking the flow of fights, and avoiding predictability
I touched on this just now, but it's worth going into more detail here. Besides Panic-Parrying, the downfall of most newer players in 1v1 circumstances is being too predictable. You can know all the moves, you can have an intimate knowledge of your weapon's reach and timing, but if you rely too much on a single type of attack (or even a single combination of attacks) then a decent opponent will quickly adapt and counter you.
To be as unpredictable as possible, not only do you need to mix up your attacks as much as you can, but you also need to learn how to avoid getting locked into certain exchanges. Examples include:
- "Chamber-offs", as detailed in the previous section
- "Riposte-offs", where no one feints or chambers, and each opponent just parries and immediately counterattacks. Very predictable, and very important to break out of this loop by feinting, or chambering, or simply waiting for a beat before your next attack.
- To an extent, simple Combos are rather predictable as well, but it depends on the skill of your opponent. If they're new and inexperienced, by all means keep swinging. But if they're decent fighters, then refrain from a simple Combo because they'll be able to read and parry it even while on the back-foot. Far better to press your advantage by following up with a morph or a feint.
But particularly with "chamber-offs" and "riposte-offs", the advantage will generally go to the person with the wherewithal to break out of the loop first. And in general it's just a really good idea to mix up your attacks, especially if you're using a weapon that specialises in a certain type of attack (spears and rapiers with thrusts, executioner's swords with strikes, etc.). Don't be tempted to overuse your most powerful attack, because against a good opponent you will be punished. It doesn't matter that you can kill them in one hit with that attack. Far better to remain unpredictable.
How to bait attacks like a pro
There are so many different ways to regain the initiative and control in a fight, it doesn't matter so much if you're not the one swinging all the time. Chambers, ripostes, and kicks are all designed to punish players who over-commit. So it's often a good strategy to use specific controlled moves to bait your opponent into a certain, predictable, action.
The idea behind this is to make it look like you're over-committing yourself, or leaving yourself open to an easy attack or counter - but actually you're in full control, and you're looking to prompt a specific response from your opponent. One simple example would be to feint a thrust against a player you know is able to chamber them. As long as you're prepared for it, you can punish them with your own riposte, chamber, or chamber-morph.
Another great bait would be to intentionally miss a kick. It's risky, because it costs a lot of stamina to kick (15 to be exact), and you'll need to have a good knowledge of the timing behind the kick and your opponent's weapon to make sure they can't respond too quickly for you. But this is such a powerful baiting technique, for the simple reason that 99% of players who see a missed kick will go straight for the simple thrust or strike to punish you. Predictable, and easy to counter.
Kick!
While we're on the topic - kicks are incredibly powerful tools to use in fights. The function of the kick is twofold: to stun shield-users for free hits (this is by far the most reliable method of dealing with shield-users), and to punish players with slower weapons who walk into you as they attack. The point of the kick is not its damage, but its ability to stun and interrupt a player. More often than not you'll get a free hit on them, which can be enough to end a fight there and then.
What's more: so few players utilise or expect kicks, even at higher levels. I've been playing Mordhau for a long time now, and I can probably count the number of deliberately blocked kicks on one hand, because it's simply not part of most players' repertoire.
Their loss! The thing is, it's extremely common in Mordhau to move into your opponent's personal space as you attack (to minimise the chances of you missing). It's so ingrained that most people don't even realise they're doing it, not until they're punished with a hefty kick. Just make sure you don't miss - and make double-sure that if you do miss, you don't panic and mash the kick button, because there's a long cooldown on the kick, and I promise you it'll end in disaster.
Manual dodging is the true skill ceiling of Mordhau
I call it "manual dodging" in order to differentiate it from dodging using the "Dodge" perk (for more info see my Mordhau perks guide), even though the idea is the same. Manual Dodging is the act of manipulating your body in order to avoid being hit. This is actually a huge part of more advanced duels, and there's an extremely high skill ceiling to this single system.
Here are the basics. You can manipulate your body in three primary ways: crouching, bending over (drag your mouse backwards), and bending back, or "matrixing" (drag your mouse forwards). Combined with your footwork, with practice and skill you can simple sidestep or limbo under otherwise fatal attacks. The very best players use manual dodging randomly during fights instead of parrying or chambering, and quite honestly it's the very best (albeit hardest) thing to do because it punishes your opponent for missing, and even as you're dodging you can wind up your own attack.
But an intermediate step is to use manual dodging as a last resort if you've messed up and you're about to be hit by an unblockable blow. And by unblockable I mean you've timed your parry wrong so you're about to be hit. In those moments, your only hope is to crouch, sidestep, bend your spine back on itself, or whatever you think would enable you to avoid the incoming damage. Of course, the flipside of this, if you're the attacker, is that you'll need to constantly pay attention to exactly where you opponent is, and follow them as they move so they can't get away. This is easier if you drag your attacks, because it gives you more time to see where they're headed.
You can also use these manipulations more subtly. For example, while backing away to get out of range of your enemy's attack, you can also "matrix" in order to push yourself back just a little bit further to make sure you can't be hit. This won't help if you opponent is aiming for your legs, of course, but most of the time they'll be aiming for your head or torso anyway, so it's a useful little technique to learn.
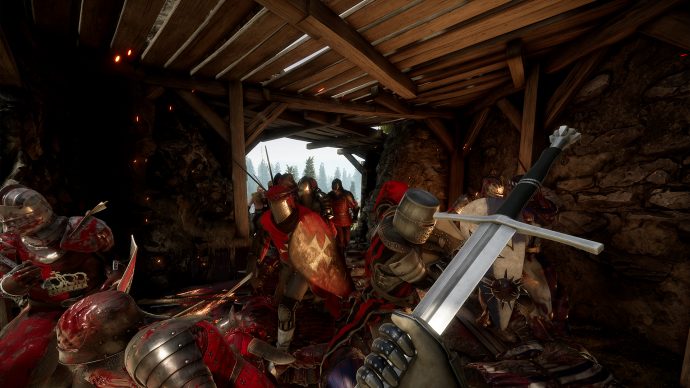
Winning 1v1 and 1vX fights in Mordhau
To be a truly skilled Mordhau fighter, you'll need to recognise the situations you're in, and adapt your playstyle. The most obvious example is the distinction between 1v1 fights and 1vX fights.
In a 1v1, your aim is to learn and then exploit your opponent's weaknesses as quickly as possible using the tips I've outlined above. If they favour a particular attack or combination of attacks, don't sit on that knowledge. Use it. If they have trouble with Panic-Parrying or anticipating chamber-morphs, then exploit that. If they never expect to be kicked, then kick them. But - and here's the really important thing - don't become predictable yourself. If you find your opponent's kryptonite, great; but be wary of overusing it if you know your opponent to be decently skilled, because it'll make it all the easier for them to adapt and turn their weakness into your own.
Also, take advantage of your weapon's alt-attack if it has one. If you're using a Longsword, consider which attack mode to use based on your opponent's Armour. If you're using an Estoc, consider whether you want your strikes or your thrusts to be most damaging. If you're using a Spear, consider whether you should sacrifice your reach in order to make faster attacks (that last one is excellent mid-fight, by the way, because they'll be so used to your standard Spear game that you're likely to get at least one or two good hits in on them as they struggle to adapt to the faster mode).
With 1vXs, the focus shifts. The key now is twofold: first, you have to be aggressive. If you get stuck into a loop of blocking and backing off without making any attacks yourself, you'll die. You need to identify the weaker player(s), then use chambers and ripostes to thin out the herd as quickly as possible. The Bloodlust perk is extremely powerful in 1vX situations, but it's not necessary to win a 1vX.
Second: target-switching is an absolute necessity. You may think that in 1vX fights the X has the advantage (and you'd be right), but they have one big weakness: they're only dangerous when they don't think they're in danger of being hit themselves.
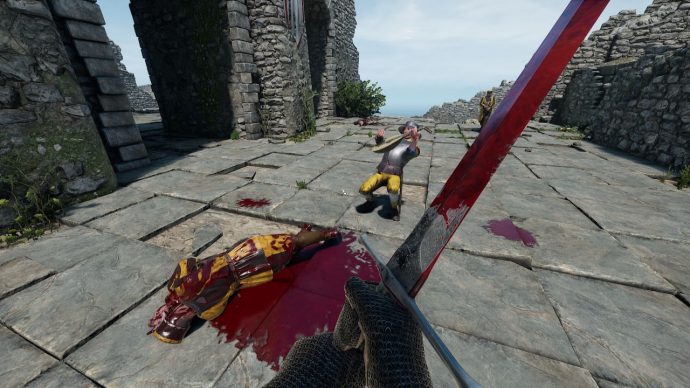
Target-switching is when you riposte or chamber one enemy's attack, then quickly redirect your own attack at a different enemy. Not only will this deal damage to that unsuspecting third party, but the first enemy whose attack you countered will expect themselves to be the target, which often means they'll waste time parrying an attack that never lands. Use this moment to go on the offensive with further attacks, being as unpredictable in your attacks, your timings, your footwork, as you possibly can.
Check the above gif to see this in action. I'm up against two enemies attacking me at once, but I use a chamber to target-switch and hit the unsuspecting enemy while forcing the other to block an attack that never arrives. Then I follow up with lots of aggression and target-switching, forcing my apparent target to waste their block while I get free hits on the other enemy who didn't realise they were the target all along.
From the X's perspective, you need to realise that target-switching is your weakness. Against a decent player, don't let the fact that you're in a group blind you to the danger. You need to think to yourself, "I'm in a 1vX. They're going to target-switch. I need to be prepared for this." Prepare for attacks even if they don't look like they're coming towards you. If you successfully defend against target-switching attacks, this completely nullifies the opponent's one advantage and keeps them on the defensive where they'll quickly be overwhelmed.
I think we'll call it a day there for now. I'll be revisiting this guide as time goes on and I think of more useful tips and techniques to explore, but hopefully this has given you a good basis and a useful set of suggestions and techniques you can use to up your game at a much faster rate than most players. See you on the battlefield, and do also check out our Mordhau archery and Mordhau horseback combat guides if you're interested.