
Fallout 76: A Basic Survival Guide
I’m truly enjoying this game in some of my spare time. It has a huge learning curve to overcome compared to what I’ve played for the past decade. However, the good news is that anyone that has played Fallout 4 will find the curve smaller due to the similarities.
This guide will be based on the PC with keyboard and mouse controls. Due to how controllers may be similar, but different, I will not be talking about those here. The good news is the PC version works well with controllers, other than the social interaction part for adding friends to your list, which requires the PC’s keyboard for typing. There is no ingame text chat channel so you do not need the keyboard for that when using a controller.
This guide is divided into the following subsections:
- A Quick List of Keyboard and Mouse Controls
- First Time Starting the Game and Character Creation
- Photo Shots, the Gallery and Screenshots
- Using the Pipboy
- Using Terminals
- Exploring and Questing
- Fighting for Your Life
- Why Own Workshops
- Building Your Camp and Workshops
- Crafting Basics
- Making Your Character SPECIAL With Perks
- The Social Side of the Game
A Quick List of Keyboard and Mouse Controls
I had to get the game in a box from Amazon when I finally got to buy it, since they were out of digital codes on day one. It came with a handy guide of what keys did what, though it did not have all of them. This helped with the initial learning curve for me, though I still asked my team a lot of noob questions. Further information will be supplied in the related subsections of this guide of how to use these commands.
Moving
- WASD - standard for forward, back, and strafing
- Caps Lock - toggles walk/run
- Left Shift - sprint
- Left Ctrl - crouch, also listed as sneak
- Spacebar - jump
- C - autorun
- X - automove to a selected location
- Mouse moving - when pressing one of the standard movement keys, movement of the mouse will make the character turn.
Attack and Defense
- Left Mouse Button - Attack
- Right Mouse Button - Aim for ranged, Block for melee
- Left Alt - Bash/Power Attack/Grenade - determined by weapon equipped and also a stabilizer for aiming to assist with hitting moving or long range targets
- Mouse Wheel or F - Pops up the favorite wheel with all weapons and helpful items marked as favorite
- 1 through = - fast keys to the items on your favorite wheel - list is in clockwise order with = at the very top of the wheel.
- R - Ready/Reload
- Q - VATS - an assist to seeing your target and its health
Quick Keys
- Tab - Pipboy - opens to where you last were in it
- I - Inventory
- J - Data - your quest listings
- M - Map
- K - Stats
- O - Radio
- E - Activate - also the key for all looting
- F - Favorites Wheel
- G - Emotes Wheel
- H - Healing Items
- V - toggle POV - game has both 1st and 3rd person options. Holding this key in a camp or workshop building zone will bring up the menu for building options.
- Escape - also brings up the Map
Main Menu
By pressing either M or Escape you will bring up the map which has several menu options listed. In the top left will be Z for Menu. Once you press Z or left click on this option, the main menu will open with the following options:
- Resume - returns to the game
- Atomic Shop - the game store. You will gain some of this currency simply by playing the game or you can buy more with real cash.
- Challenges
- Social - add friends, invite/join teams, and a list of recent people on your current world
- Photomode - to take pictures
- Photo Gallery - to see all the pictures you took with Photomode
- Change Appearance - don’t fret if you get tired of your character’s look, you can edit it at any time
- Help - a good list of things to help you out if you forgot how to do something
- Settings - this has all the usual options for video, audio and controls. One of the things I had to do was adjust some of the sound levels due to parts of this game playing louder than others.
- Quit - this has two sub options of going to the character select screen or closing the game to desktop.
Other UI Options
- Most other options will show up in the Pipboy and the Map with the fast key listed next to it. You can also left mouse click any menu option in the game to select it. How to move around in the various menus will be explained further in the appropriate subsections.
First Time Starting the Game and Character Creation
The first time you play the game it will automatically load you to the character builder. Of course, you do have to hit any key to continue on a screen that comes up before it loads you to the character creation for first time or the menu there after.
In the character creation you can move through options using the A and D keys after clicking Menu at the bottom. You can left mouse click to select any item on the menus or to select a body part on the model. The menus give you quite a few base options that you can then tweak.
To apply skin or hair color, have the part selected and then select from the color menu. You can also add highlights to the hair to enhance that further. Most everything for the options are in menus.
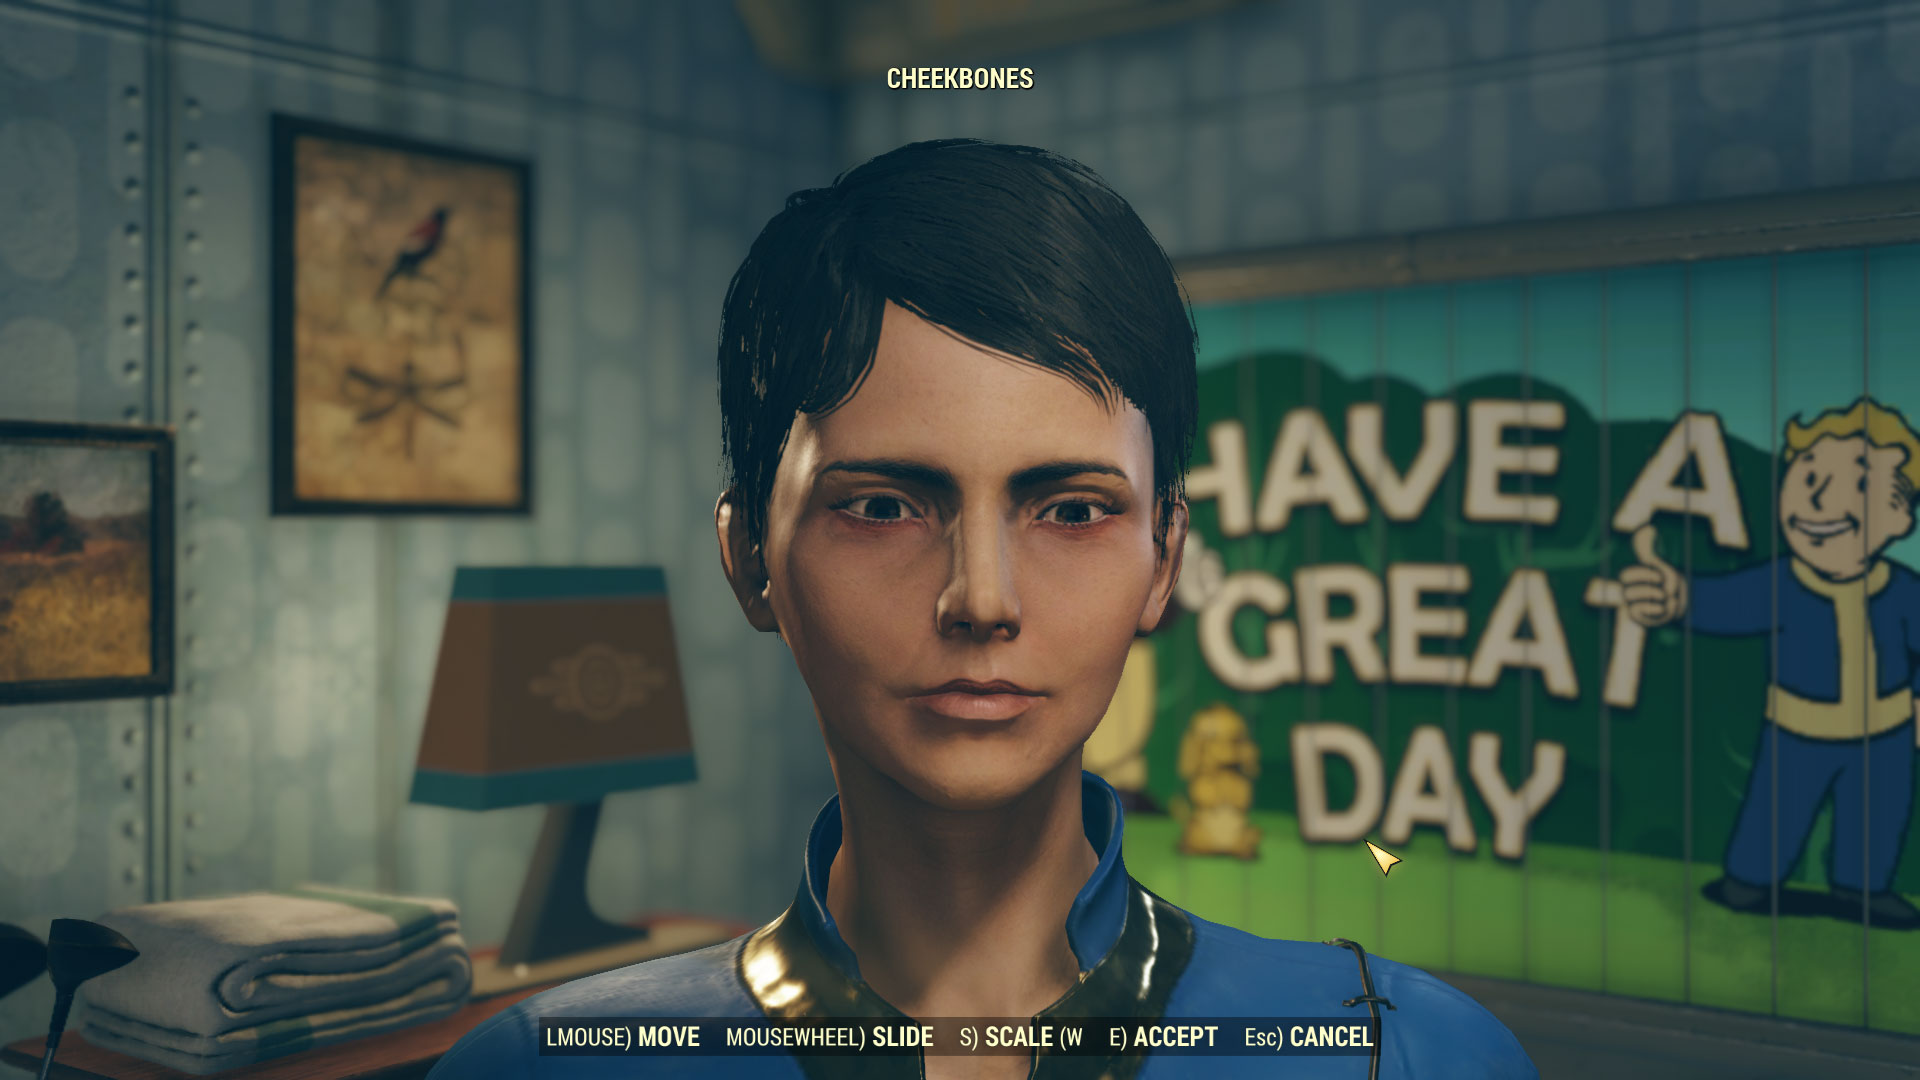
Once you have base shape, coloring and makeup/marking options done, you can click on the body part you want to adjust further, as I did in the above picture. The name of which part you are working on will show above the model. You can do this in detail in the face view and the full body view. With the part selected you can use the the mouse wheel to adjust it to your liking. This allows for a great amount of personalization, due to its versatility of how much you can change the sizing of each area. One of my friends has one character that looks similar to him because of how much adjusting you really can do.
A list of all the things you can add:
- Makeup
- Markings
- Blemishes
- Damage
- Grime
When you are happy with the look, select Done and then choose the name. Once your name is approved it will lead you through the steps of how to take a photo of your character. This will be stored in the ingame photo gallery, accessible from the main menu. I’ll explain that further in another section, but this is where the game teaches you how to do it.
Once you have this completed you will wake up in Vault 76. You can run around in here as long as you like, but once you leave you can never go back. The game will point you to the way out as you go
The first thing you need to do is explore your apartment. You can get some information from a terminal there and you will want your very own Pipboy. The Pipboy your character will wear accesses all your inventory, stats, quest information and other data you will need as you reclaim Appalachia. The Pipboy can be found to the right of the door leading out of your apartment.
In exploring the complex, I suggest interacting with everything you can. An E will pop up telling you if you can activate, pickup, etc. E is how you will loot and work with terminals, camps and workshops throughout the game. You will want to loot everything you can on the way out. You should have a jumpsuit, camp, Pipboy, food, water, medical items, and other sundry pieces by the time you leave. The truly main items you will want are the Pipboy (from your apartment) and the Camp (on a table closer to the exit). Everything else can be found in the world if you miss something, but do learn to scour or you will miss some good stuff out in the world, too.

Again, do not leave the vault until you are sure you have what you need because you will never go back again.
Photo Shots, the Gallery and Screenshots
Every time you make a character you have the opportunity to do a shot of the ID or to change up the view before you progress to the game itself. Once in the game you can take shots anytime you like. I do not suggest doing this when something is attacking you because it takes a bit of time and you won’t be able to respond to an attack without exiting the photo process.
To start the photo process, Hit ESC and then T. Escape takes you to the map, but you will see T as one of the menu items along the bottom. This is also on the main menu reached by Z from the map and is called Photo Mode.

A box will appear on the right with menu icons along the top. The rest of the box below the menu will show the options available for the selected menu item. To move across the icon menu at the top, use C for moving right and Z for moving left. In the categories below you can move up and down with the arrow keys. Any slider can be adjusted with the mouse wheel when it is highlighted or by left clicking and dragging the slider bar.
There are quite a few options to change the look of the picture for how it focuses, the angle, and quality of the shot. You can even frame it. If taking a picture of your character, you can choose the type of look on their face. In my above picture I picked something that made her look somewhat amused. You gain more options as you explore the world.
It is good to play around with this a bit to get used to all the options and find the ones you like the best and will use the most for quicker shots. Again, do this in a place where you are safe so you have time to learn how all the options work. You will gain more options to use as you play.
When ready to take the snapshot, hit Space, or you can left click on the option in the menu at the bottom of the screen. This will save the snapshot to the photo gallery that is only viewable in game. You can open the photo gallery at any time by pressing ESC and then Z for the main menu. Photo gallery is in the middle of the menu list. It will open up and show a small version of all your snapshots. You can see a full screen version by left clicking any of the images.
If you want to share any snapshot you took, or other shots of the game, you must use Print Screen to save a screenshot. To screenshot a photo, have it open to full screen and then press Print Screen. All of your screenshots will be stored directly in the Fallout76 folder, not a subfolder. To find the game folder, go to Program Files (x86) - Bethesda.net Launcher - games - Fallout76. The files will be here with the other game files. Look for ScreenShotX.png. The game will do a short screen splash in the upper left noting the number of the screenshot.
Using the Pipboy
The Pipboy will be used a lot in the game because this is where you will do many things. Some of these areas have hot keys as mentioned in the initial quick list.
This may seem kind of clunky, but it adds to the flavor of the game. I find it interesting that the big war happened in 2076, but everything makes me think of the 1950’s with the tech and buildings you get to explore. Due to this, it feels more like playing with an old mainframe terminal while working with the UI anywhere in the game, especially the Pipboy and actual terminals you can activate in the world. I suggest playing around with this as soon as your first character puts it on to get used to it.
To open the Pipboy at any time when not engaged with another process, press Tab. Tab works as a toggle to open and close it. You can not open it when building, crafting, or interacting with a terminal. If you hold the Tab key long enough, it toggles the Pipboy’s light on or off. This comes in handy when in dark rooms or a particularly dark area outside at night.

The top menu will read: Stat, Item, Data, Radio. The one you are looking at will be noted to look bracketed and its submenu will be listed below. You will not see all of the submenu but you can arrow key through it or left mouse click to make it shift through the list. Item will be where you spend most of your time because this is your inventory, and Aid will be used the most.
Stat is for all your statistical information. It will tell what your strength and other attributes are in the following three categories:
- Stats - overall health, weapon and armor rankings. It also shows your level and how far you are through it. Sometimes the level bar bugs out and the only way to get it unbugged is to actually craft something. I usually cook something fast, even just boiled water, and then the bar will reappear correctly.
- Effects - this will show both good and bad effects from food, diseases, etc. For instance swimming too long can give you parasites. You can remove diseases with a disease cure found in your aid inventory if you have any. Antibiotics are an alternative if you run out of disease cures.
- Special - This is the quick list of how many Perk Cards you have assigned to each attribute. I’ll explain perk cards in their own section.
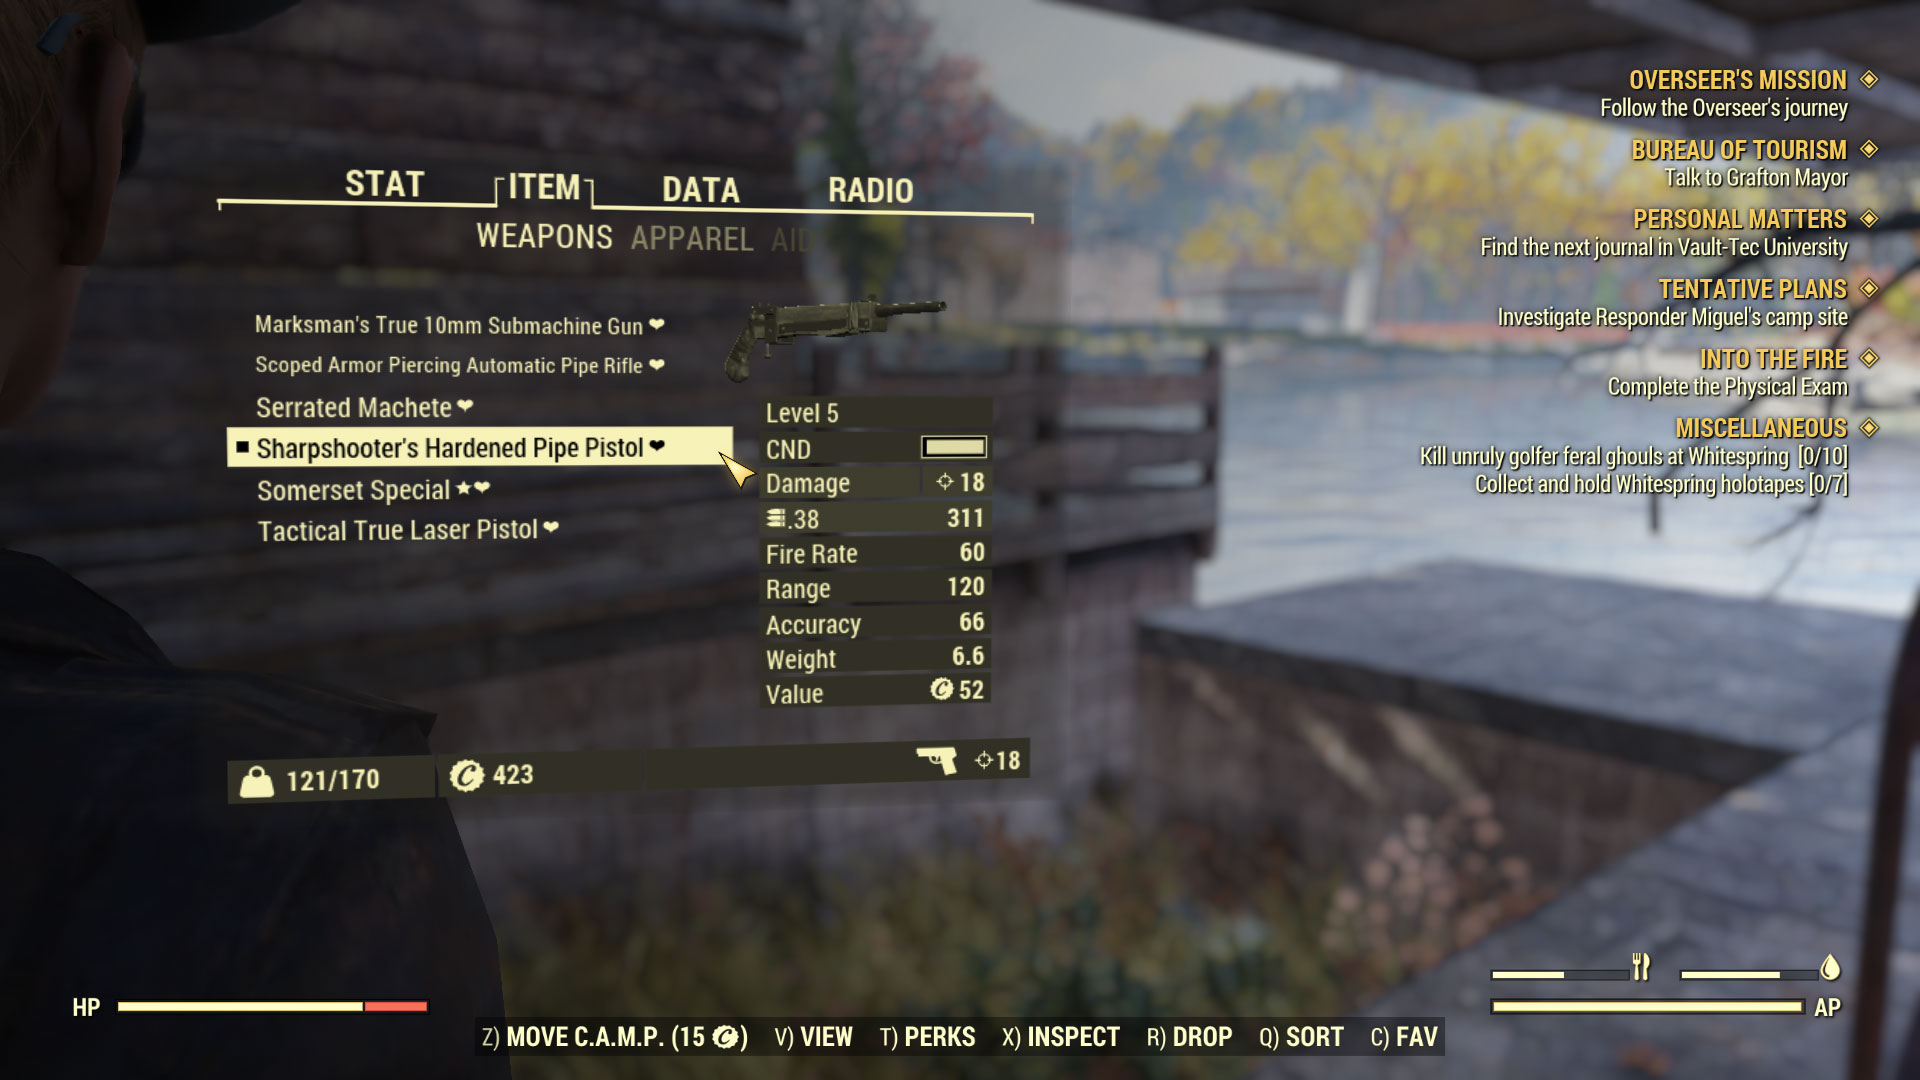
Item is your inventory. One good thing to watch is your weight capacity compared to your weight allowance because once overburdened you burn your action points faster and can’t fast travel. When highlighting any item, the information about it will show on the right of the Pipboy screen. You will find the following subcategories:
- Weapons - shows all weapons in your inventory. To add or remove a weapon from your favorites wheel, select it and press C. A heart appears by all weapons on the favorites list. The weapon equipped will have a filled in square in front of it. Left clicking on an item will toggle the equip/unequip status.
- Apparel - this lists all clothes and armor you have. If it has a filled in square in front of it, it is equipped. Left clicking on an item will toggle the equip/unequip status.
- Aid - This is food, water, buff agents and medical needs. Left clicking on an item will use it so be careful about clicking randomly on this menu. Stimpaks do a good deal of healing while medpacks will do a smaller amount. Rad-X and Radaway will help defend you against or remove radiation, a good thing if you are not trying for mutations in the game. The higher your radiation, the better chance you will mutate your DNA, which may not always be a bad thing either.
- Misc - bobbypins for looting safes and other items will show here.
- Holo - where to go to listen to your holo tapes found as you play.
- Notes - not only does this hold notes you find in the game, but it holds plans and recipes for crafting and building.
- Junk - all items that have no immediate use fall in this category including some of the scrap that is used in crafting. Junk is actually quite useful in this game when properly scrapped, which I will explain further under crafting.
- Mods - This is for any modifications to gear that you may be able to use to help upgrade the related item.
- Ammo - this one is pretty obvious. It is good to check here to verify you are not carrying so much ammo it interferes with your weight.
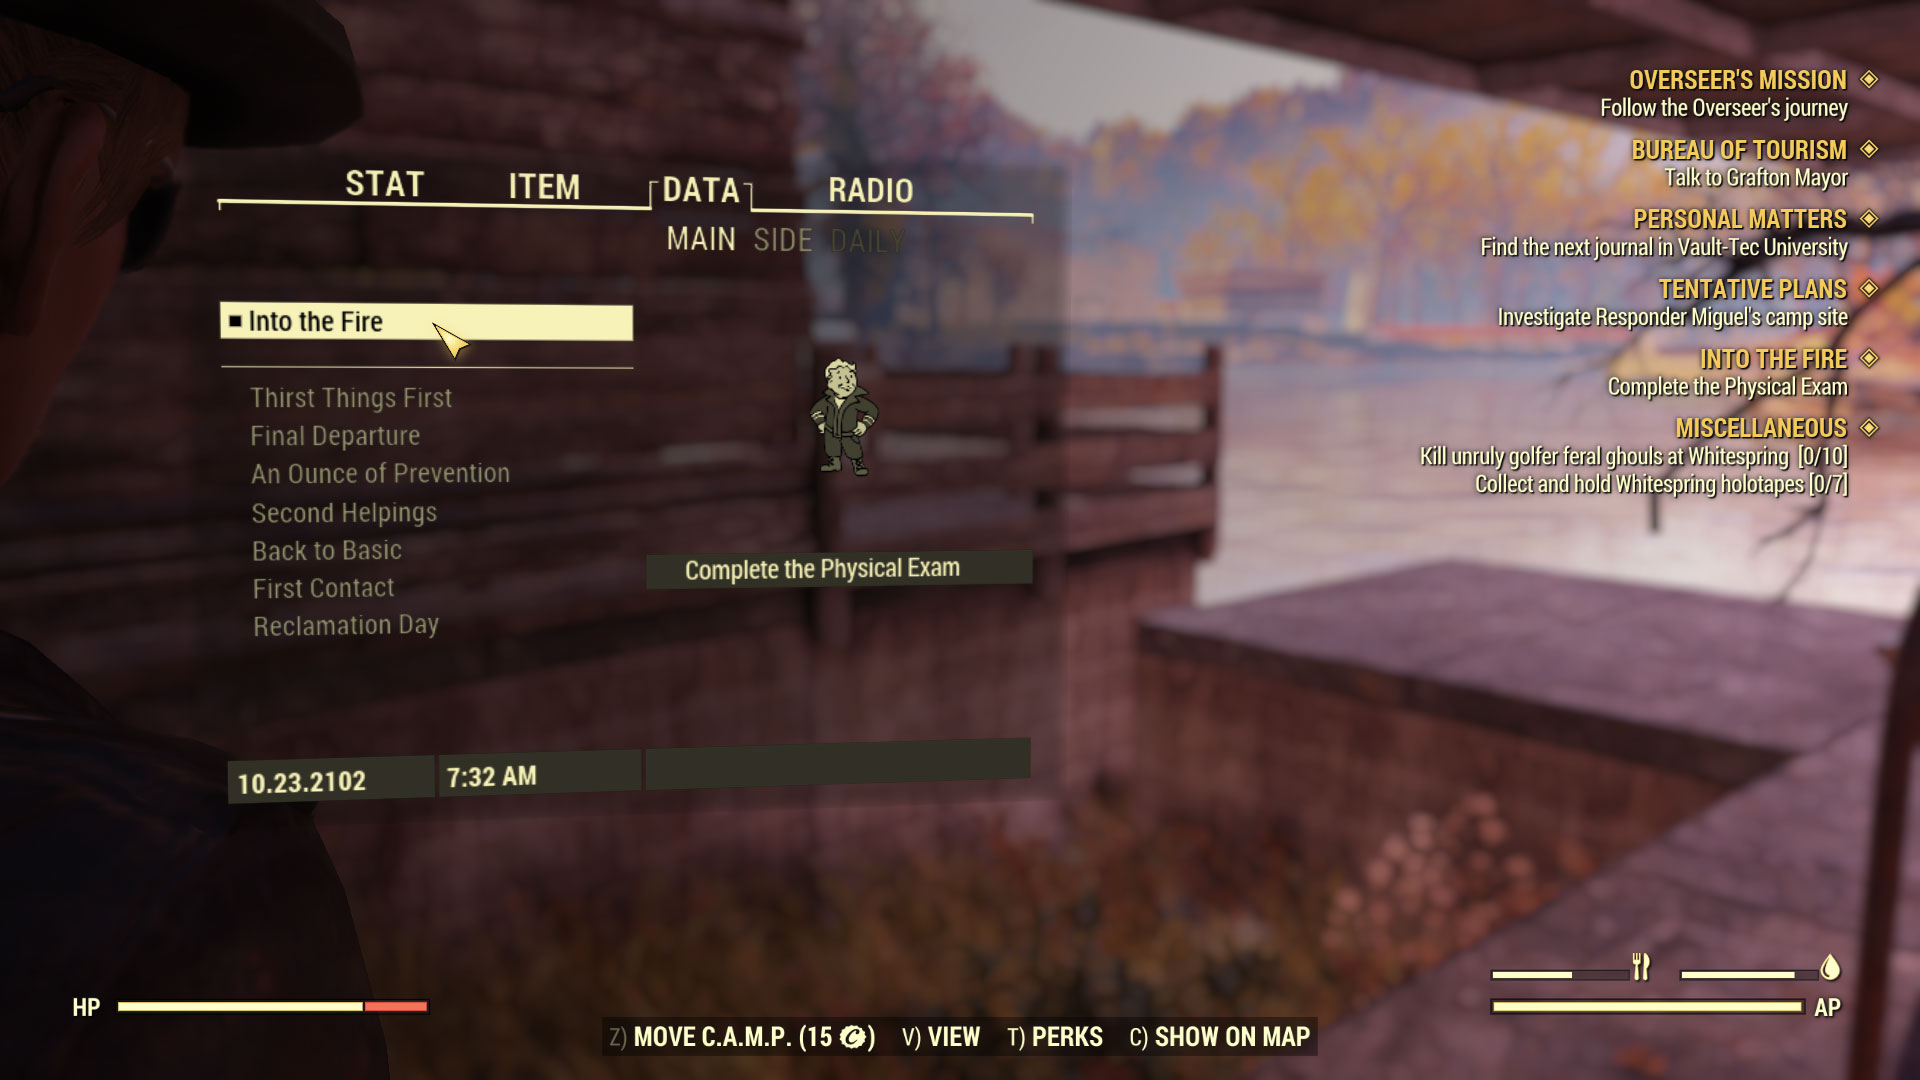
Data is your quest and event list. For Main and Side quests, active quests are above a line and the completed ones are below. There are four categories:
- Main - these will have a story of the area equated to where you found it. It will be a chain of quests most of the time.
- Side - Overseer quests that start when in Vault 76 will be here. Smaller quests found while exploring will occur here, as well.
- Daily - a list of daily quests you know of that you can return to if you like. This list will expand as you explore.
- Event - a list of the events you have completed in the game. This list will expand as you explore.
Radio is where you can tune into a variety of channels that the Pipboy may be able to pick up. Some of these may be music and others may be signals available during events or only in certain areas. If for an event, be sure to listen to the information. Some quests may also ask you to tune into a signal, which in turn advances that quest chain.
You may have noticed two different Pipboy views in my screenshots. If you look at the menu at the bottom of your screen, you will see some other options that you can do with the Pipboy open. One of them is pressing V for View, which will toggle the view from the opaque with tan screen and the view of the Pipboy itself with its green monochrome screen. Use whichever you feel most comfortable with.
Another option from the Pipboy is the ability to move your camp. I will explain camp building later, but whether building the camp for the first time or actually moving it, press Z and the camp placing item will appear on the ground in front of you. Once you decide where to place it, you can start the building of your camp in that location.
T will access your Perk Cards for your SPECIAL setup. I will explain these in their own section. T will also change to the option of Level Up when you reach a new level.
Using Terminals
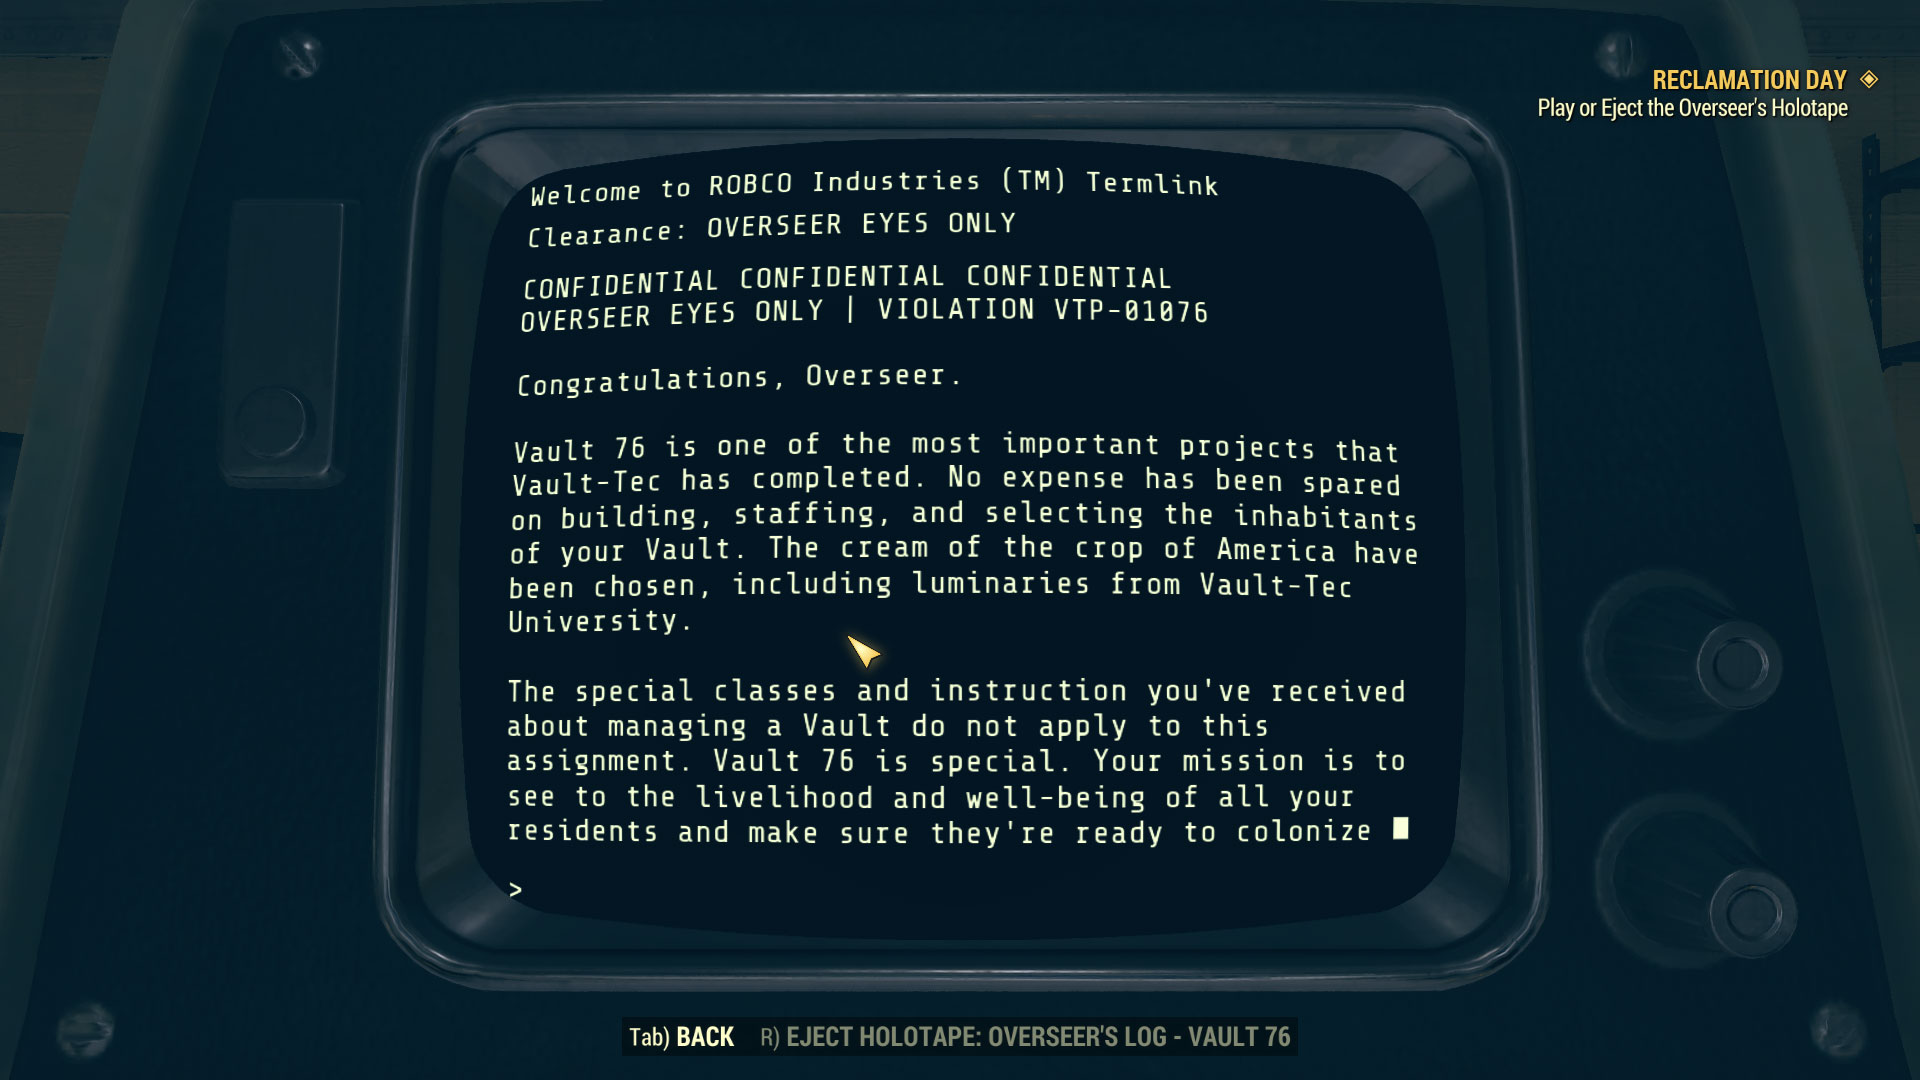
The above is an example of the Overseer’s terminal found not far from the exit in Vault 76. When you are close enough and have your marker in the center of the screen on the terminal, the option to press E to activate should pop up. Once in the terminal, arrow keys will move you around the options on the screen. At the bottom you will see options to use TAB to exit or go back, along with an option to use holo tapes. In the shot above you can eject the Overseer’s holo tape and even take it with you if you like to listen to it again on your Pipboy. Thankfully holo tapes do not add to your inventory weight at all.
The one thing that it does not tell you is that Space will move you to the next screen if the text continues further than what fits on the screen, like in the screenshot above. If there is nothing left to scroll to, it will work like a back button to return you to previous screen with the list of things you can look at or listen too.
To select any item that can be highlighted on the screen, press enter or left click it. Most of the time you will have things to read, but now and then you will come across terminals that may activate a test you have to take as part of the associated quest. Hitting enter to continue to the test will start it and further instructions will follow to answer questions or tell you to move to a checkpoint you must activate.
Exploring and Questing
In this section I would like to do a short explanation of how to view your quests and find them on the map and compass. You will have quests from the start of your journey in Vault 76.
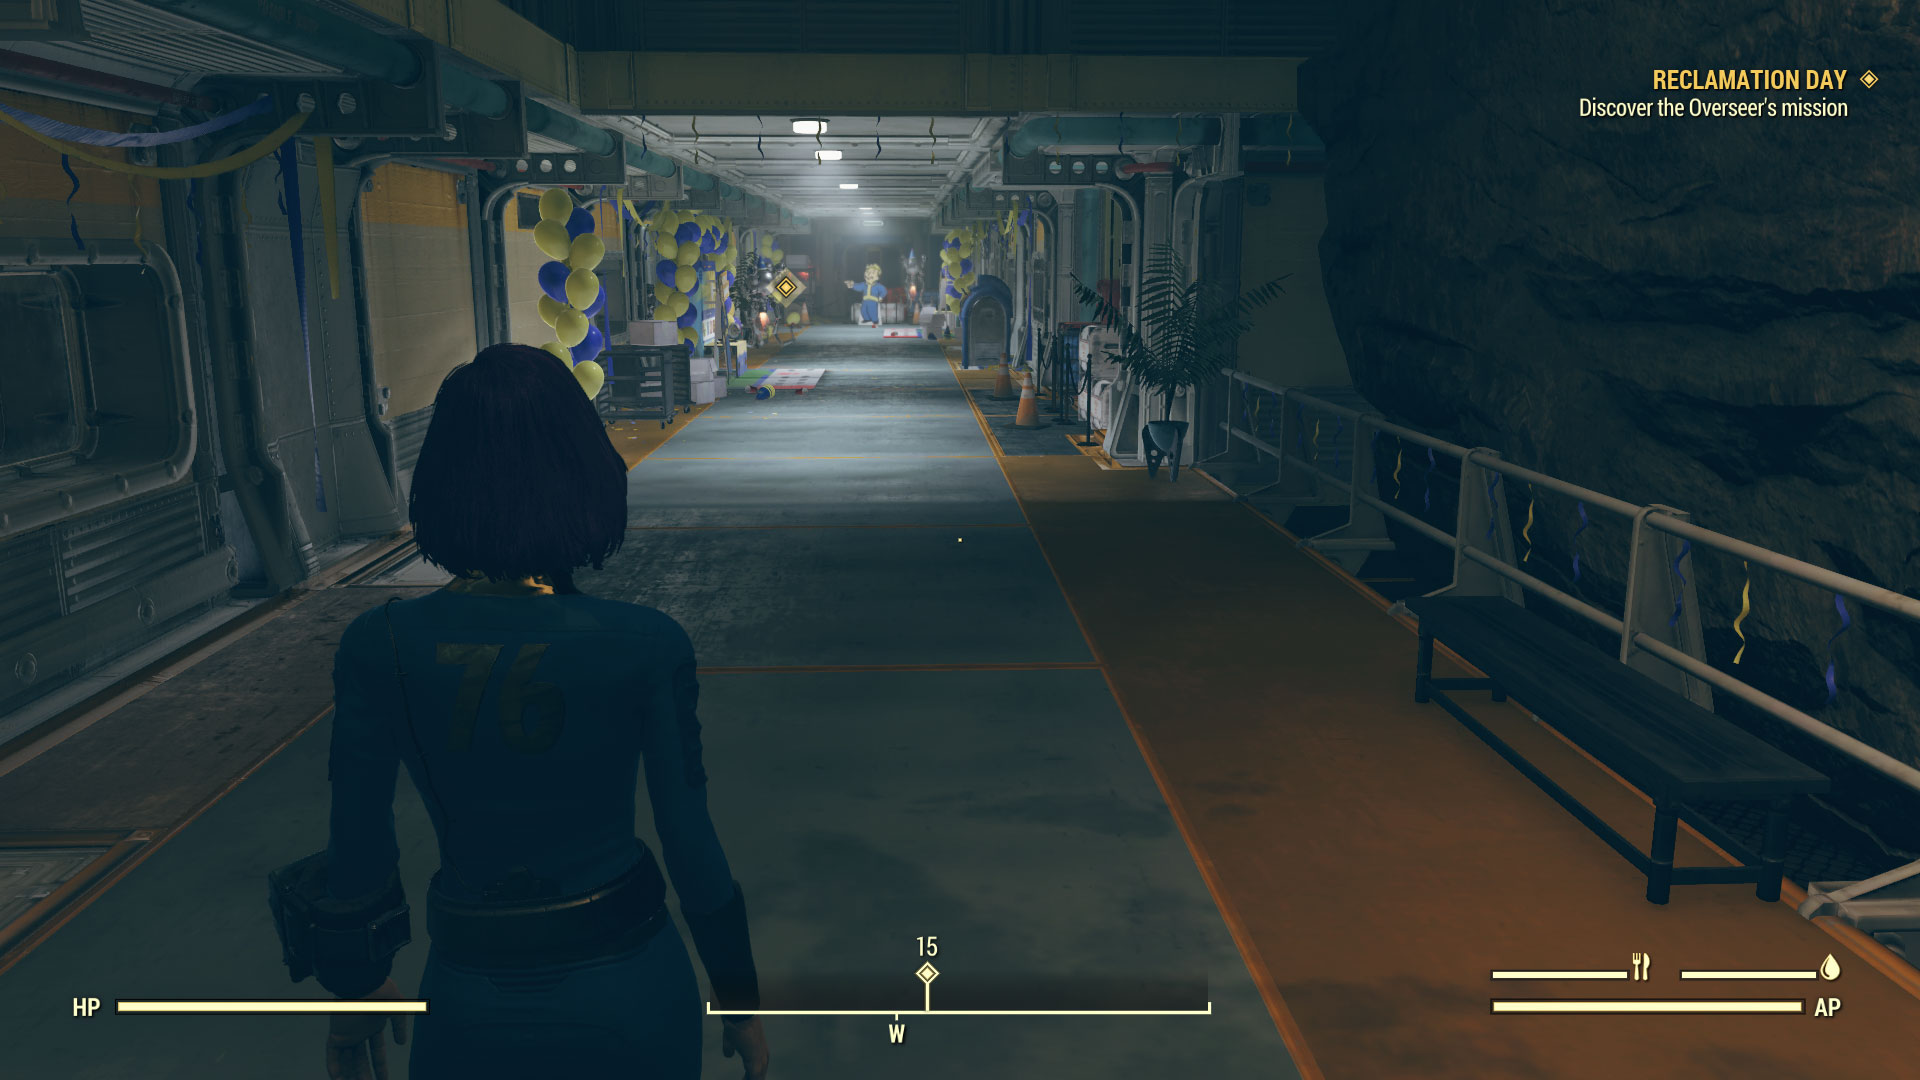
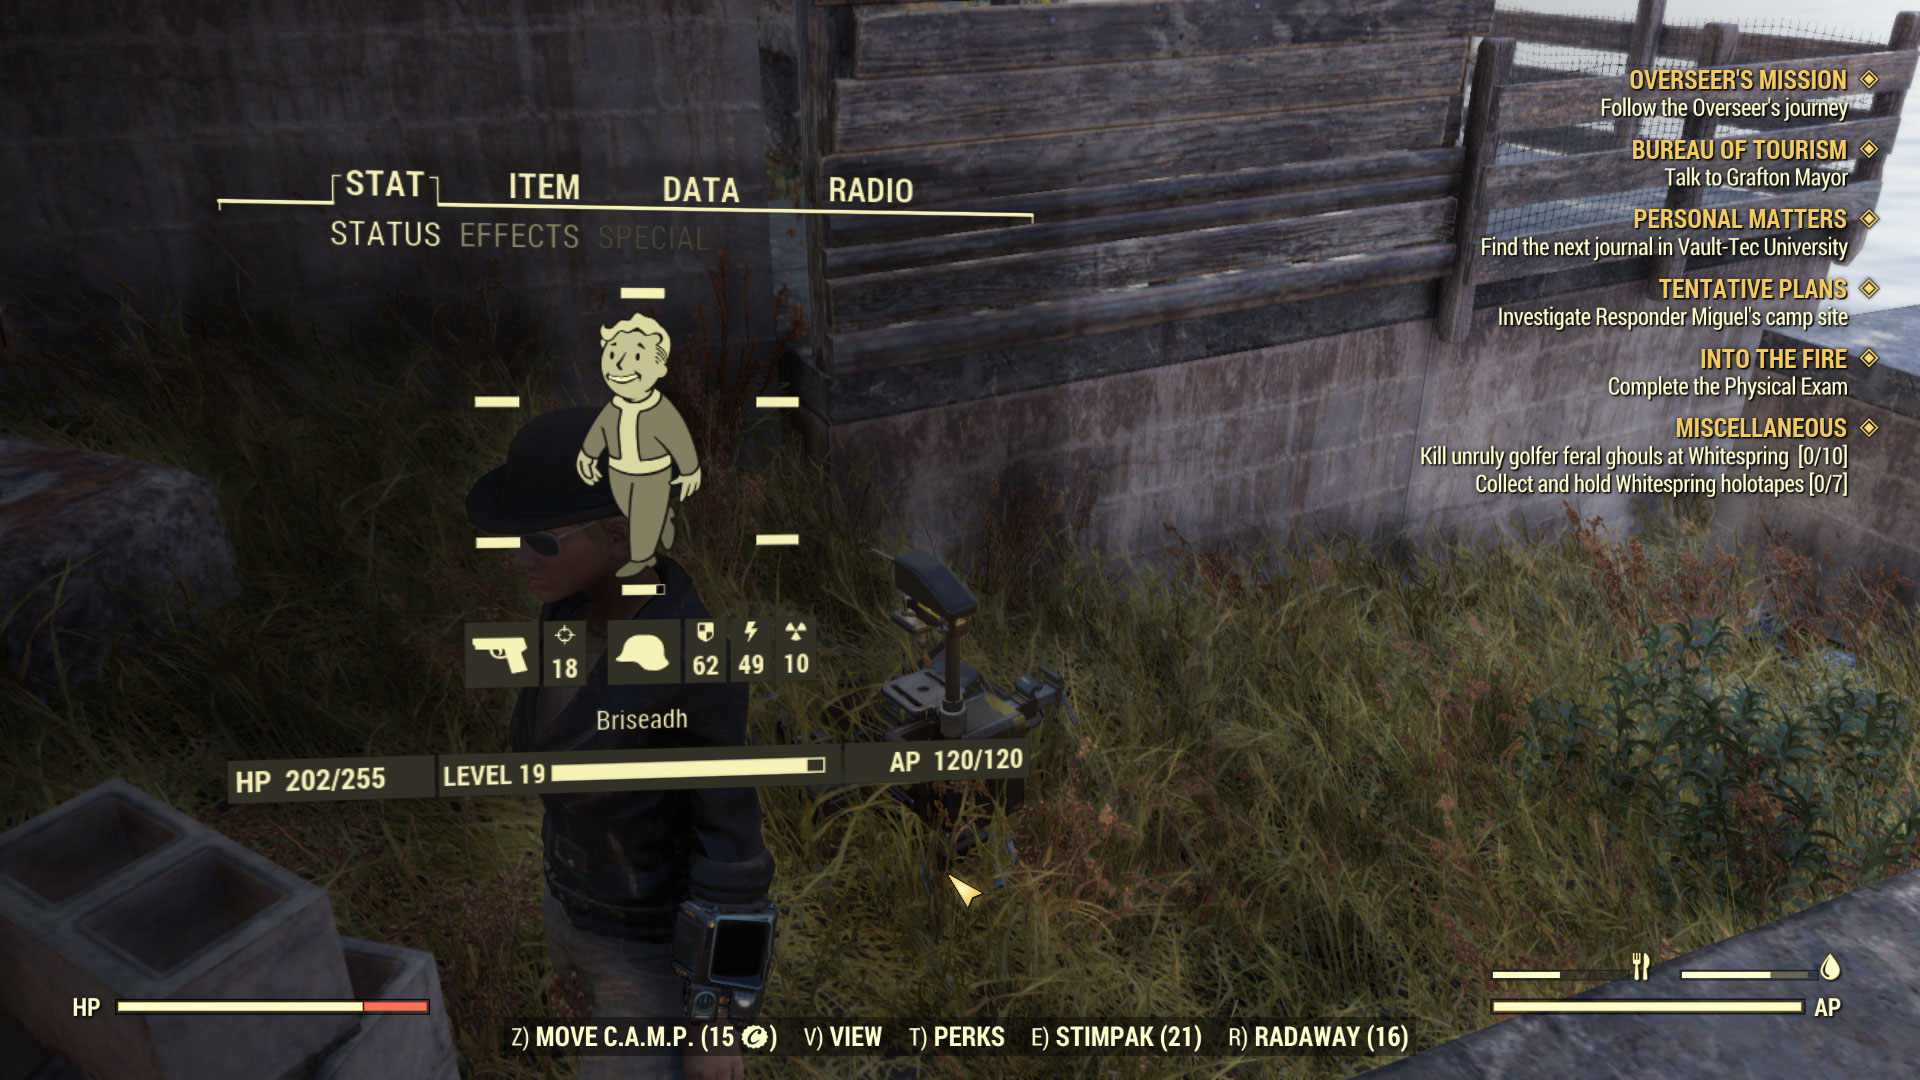
The above pic has several markers to help you as you quest.
All actively watched quests will show on the right, which is one in the shot above, due to this character still finding her way out of the vault. If you are in a team, the team leader’s quests will show here with their name in the front of them.
The middle bar at the bottom is your compass. All quests will show on this when facing the right direction and will include a distance to the location. This can get pretty cluttered when you have several active quests going at once. In the above picture my character is facing mostly west and is 15 meters from the quest item to interact with.
When you have line of sight to the quest item it will show as a diamond on or above what you will interact with. In the picture above the diamond can be seen down the hall over her next stop on the way out of the Vault.
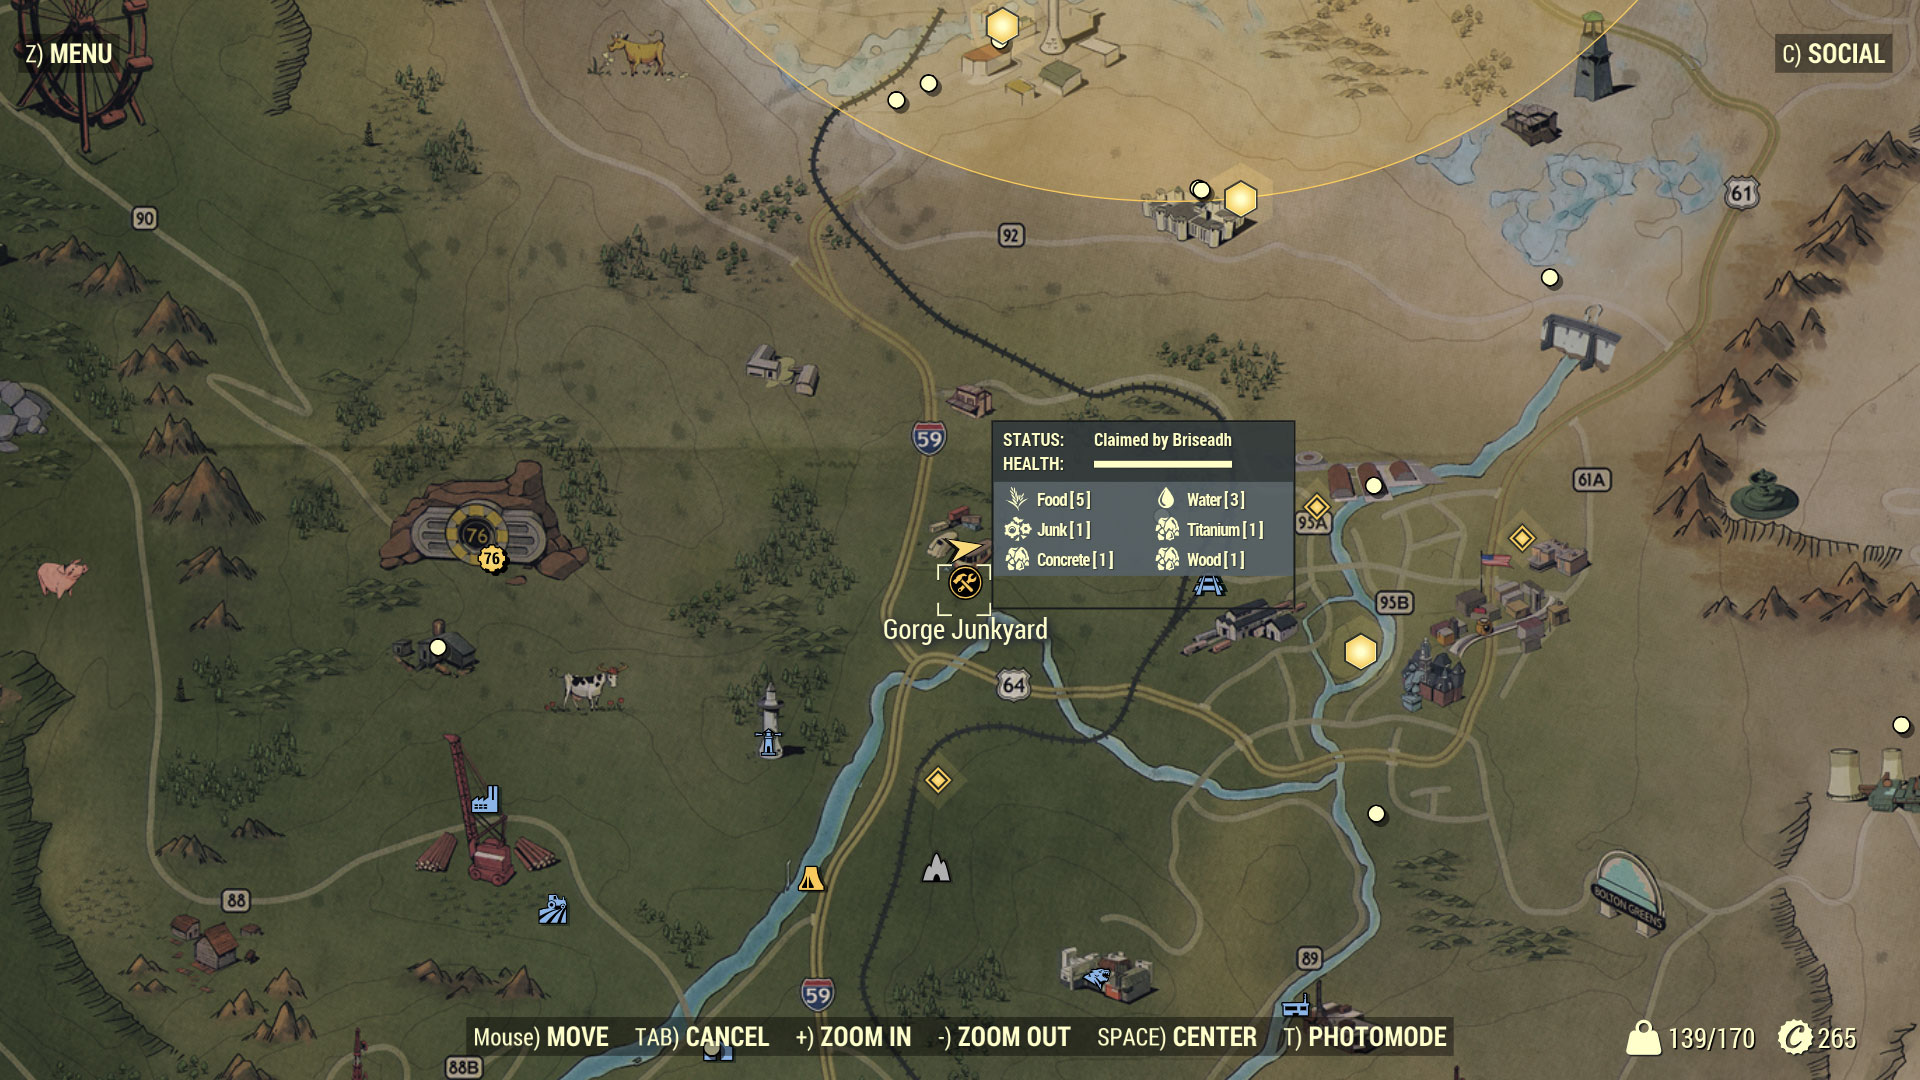
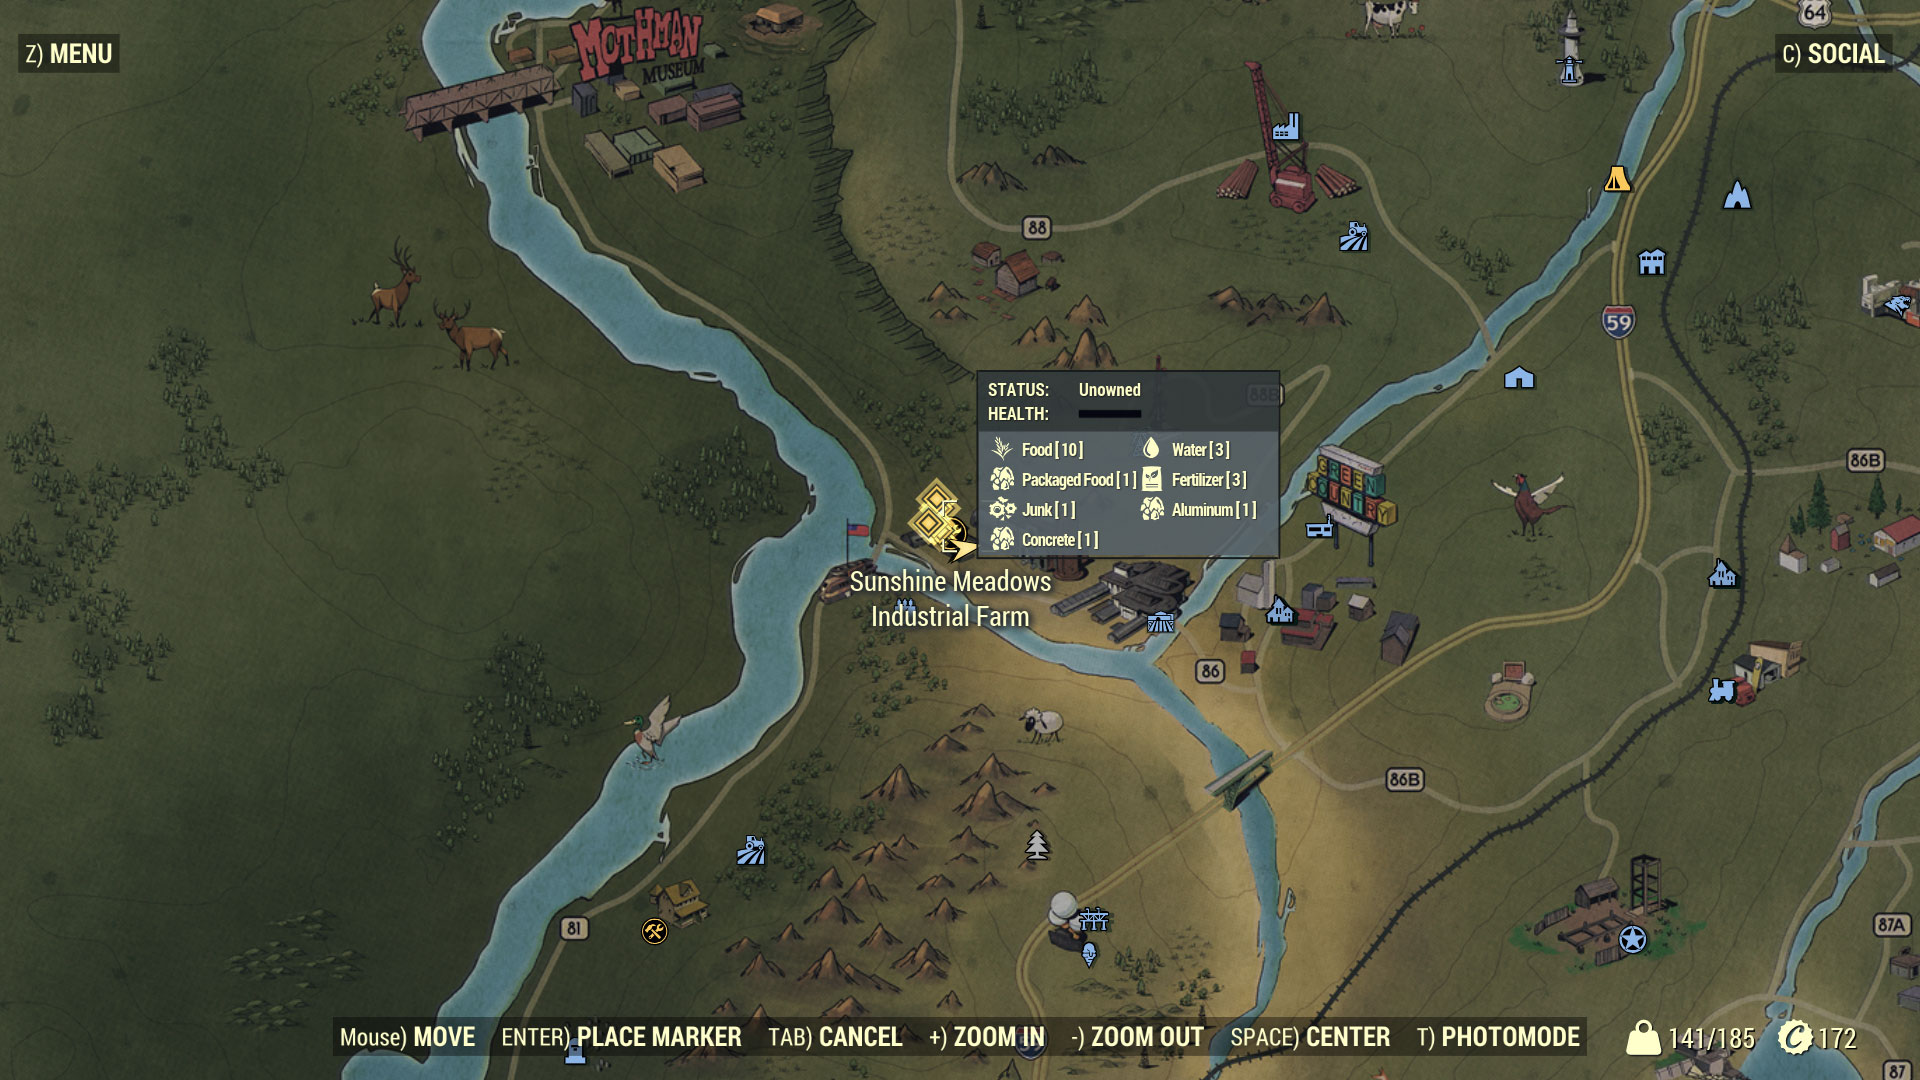
Pressing M or Escape will bring up the map. You cannot see all of the map at once, but there is some play room to zoom in and out of it as needed. You can also make it scroll one way or the other by moving the mouse against the edge of screen. Hovering the mouse pointer over any already explored location, workshop, event or camp will give you a pop up window of information. In this picture I have my mouse pointing at the workshop my character has claimed.
There are pictures across the map of places to go, but you will find no information for these areas until you explore. Once explored and of note, a blue icon will appear. When close enough, an icon that is gray will appear. It will change blue once you do the proper exploring there. You will gain experience as you discover these locations.
Workshops like the one I have targeted with my mouse will only appear once you have discovered them, same as the blue icons. If it is already owned, the information will tell you which player character has it. I will explain Workshops in more detail in their own section. Once you know where they are you can decide which ones to claim for your use.
Events will show up as yellow hexagons. You can right click on any event and fast travel to it if you are not overburdened. This allows you to get there more quickly to get participation credit which includes special loot, event credit, and experience.
Your camp, and those of your teammates, will show up as a yellow tent on the map. You can fast travel for free when not overburdened to any camp of your team. Fast traveling can help save time and allow for your team to meet up for an organized mission.
You can fast travel to any workshop you own for free as well. Any explored point (blue icon) or a teammate’s workshop may cost you Caps to get there, distance adds to the cost.
Some quests will cover an area rather than have a key point to get to. If this is the case they will show as a yellow circle on the map. Your compass will also have a circle to mark them much like the diamond. A distance will show on the compass until you are in the marked quest area. On the map in the picture above, you can see a huge area to the north marked with the yellow.
One of the first places you may explore and mark on the map is the Overseer’s camp along with a couple places you can sidetrack into along the way. The Overseer’s camp has quite a few useful things for you. Be sure to loot any Overseer’s stash that you find. You will also find your first example of a Stash box you can use like a bank in this game. Any Vault-Tec box that activates with ‘E - My Stash’ can be used to access your stored items. These come in handy to acquire more ammo or other goods you stored to keep your weight down. You will also find your first crafting stations at the Overseer’s Camp.
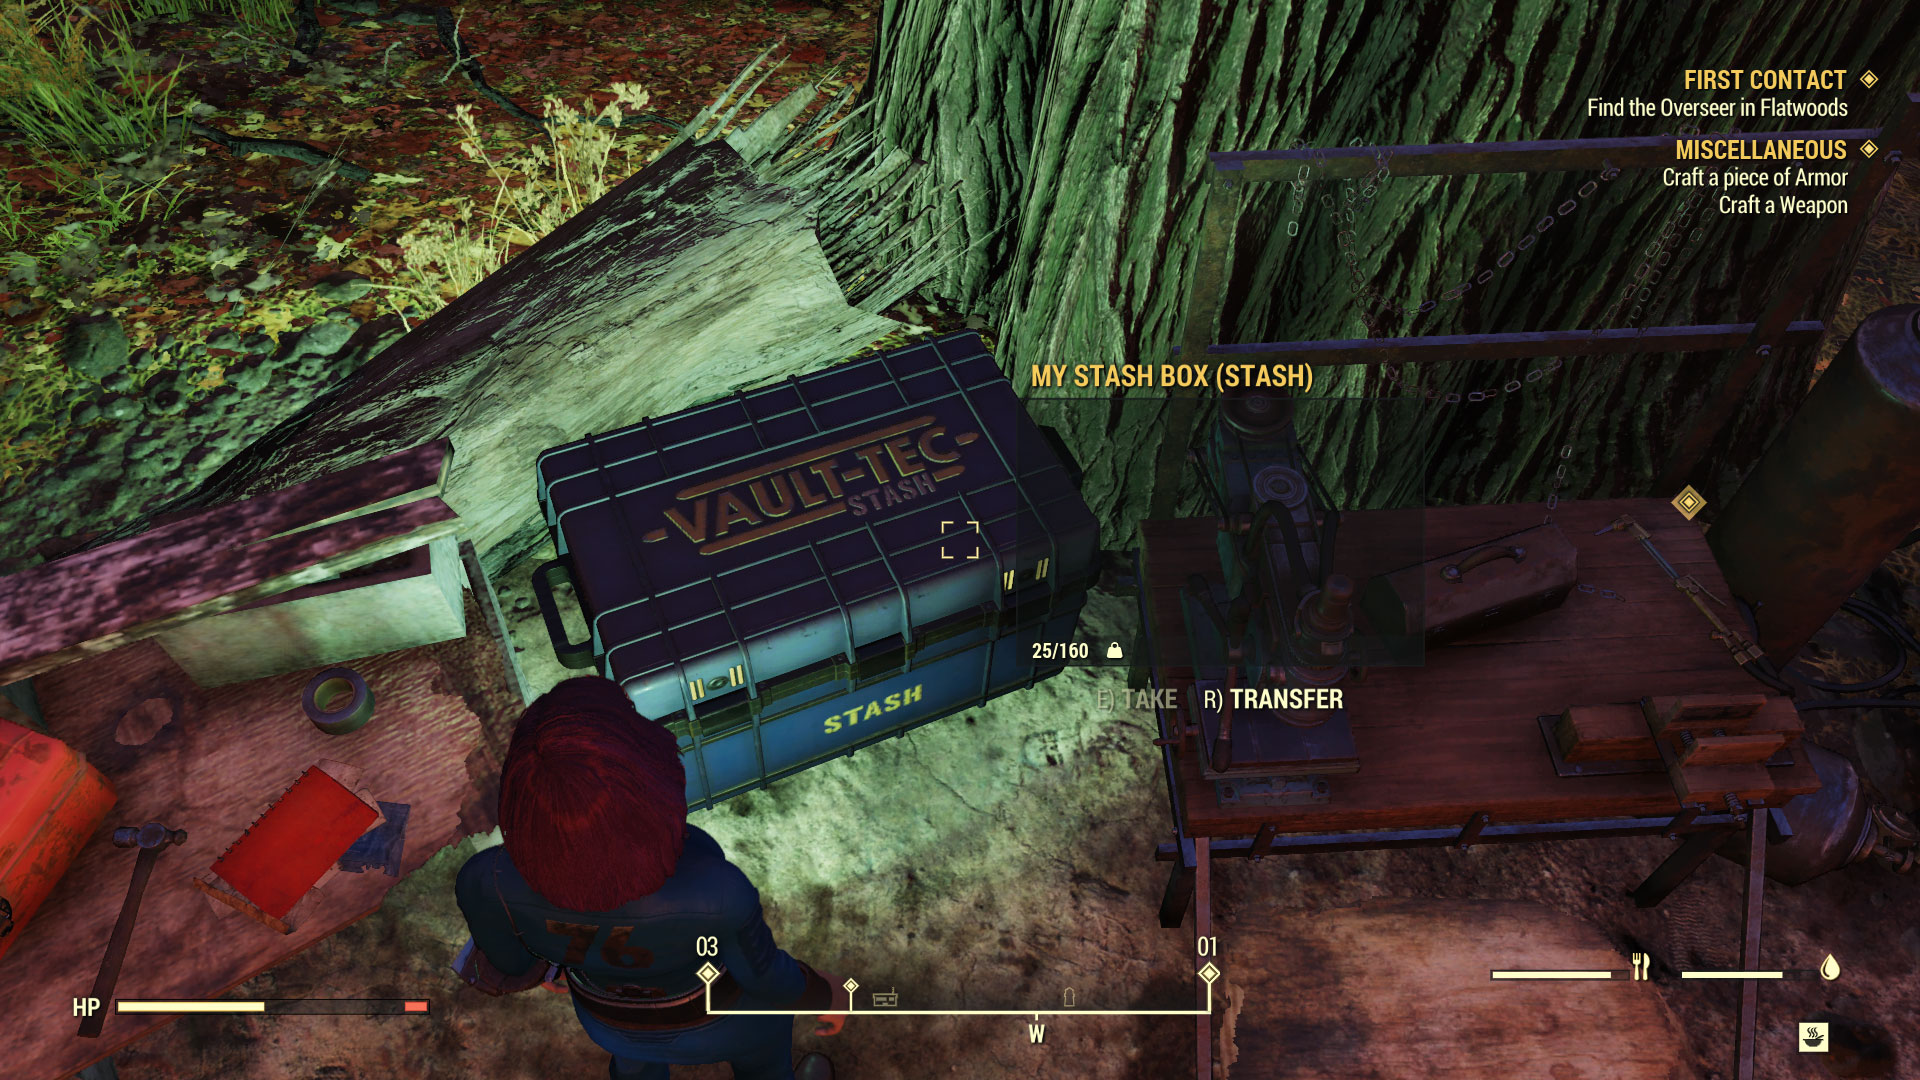
Pressing E will allow you to take any item you highlight on the list from your stash. Of course, this new character has nothing there yet so the option is grayed out.
Pressing R will open the menu that allows you to see your inventory on the left and the Stash items on the right. Left clicking any item will move it from one to the other. If it is a stack, a window with a slide bar will show up so you can slide it for how much you want to move. Anything under 5 in a stack will move one item off the stack per left click, so you will have to click until all are moved if you want all of them. Be sure you are clicking the right item on the correct side to move it properly. You don’t want to have all your ammo in your stash and then try to use your gun while some beast is trying to kill you. You also want to have food, water, and some medical supplies on you at all times.

You can loot many things when you target them. A popup will show what you can loot when you have your central focus pointer (center of screen) on the target. In the case of the following photo, I have the Stimpak targeted and can take it from the table by pressing E. If a container or mob you killed has more than one thing, you must press E multiple times. I’ve learned to mash E pretty quick to loot corpses when I know other enemies are coming my way. I can sort it out later in a safe spot. Pressing E only takes the highlighted item, so you do have the option to highlight by moving through the list with the arrow keys and take only what you want if you have the time to peruse the list.
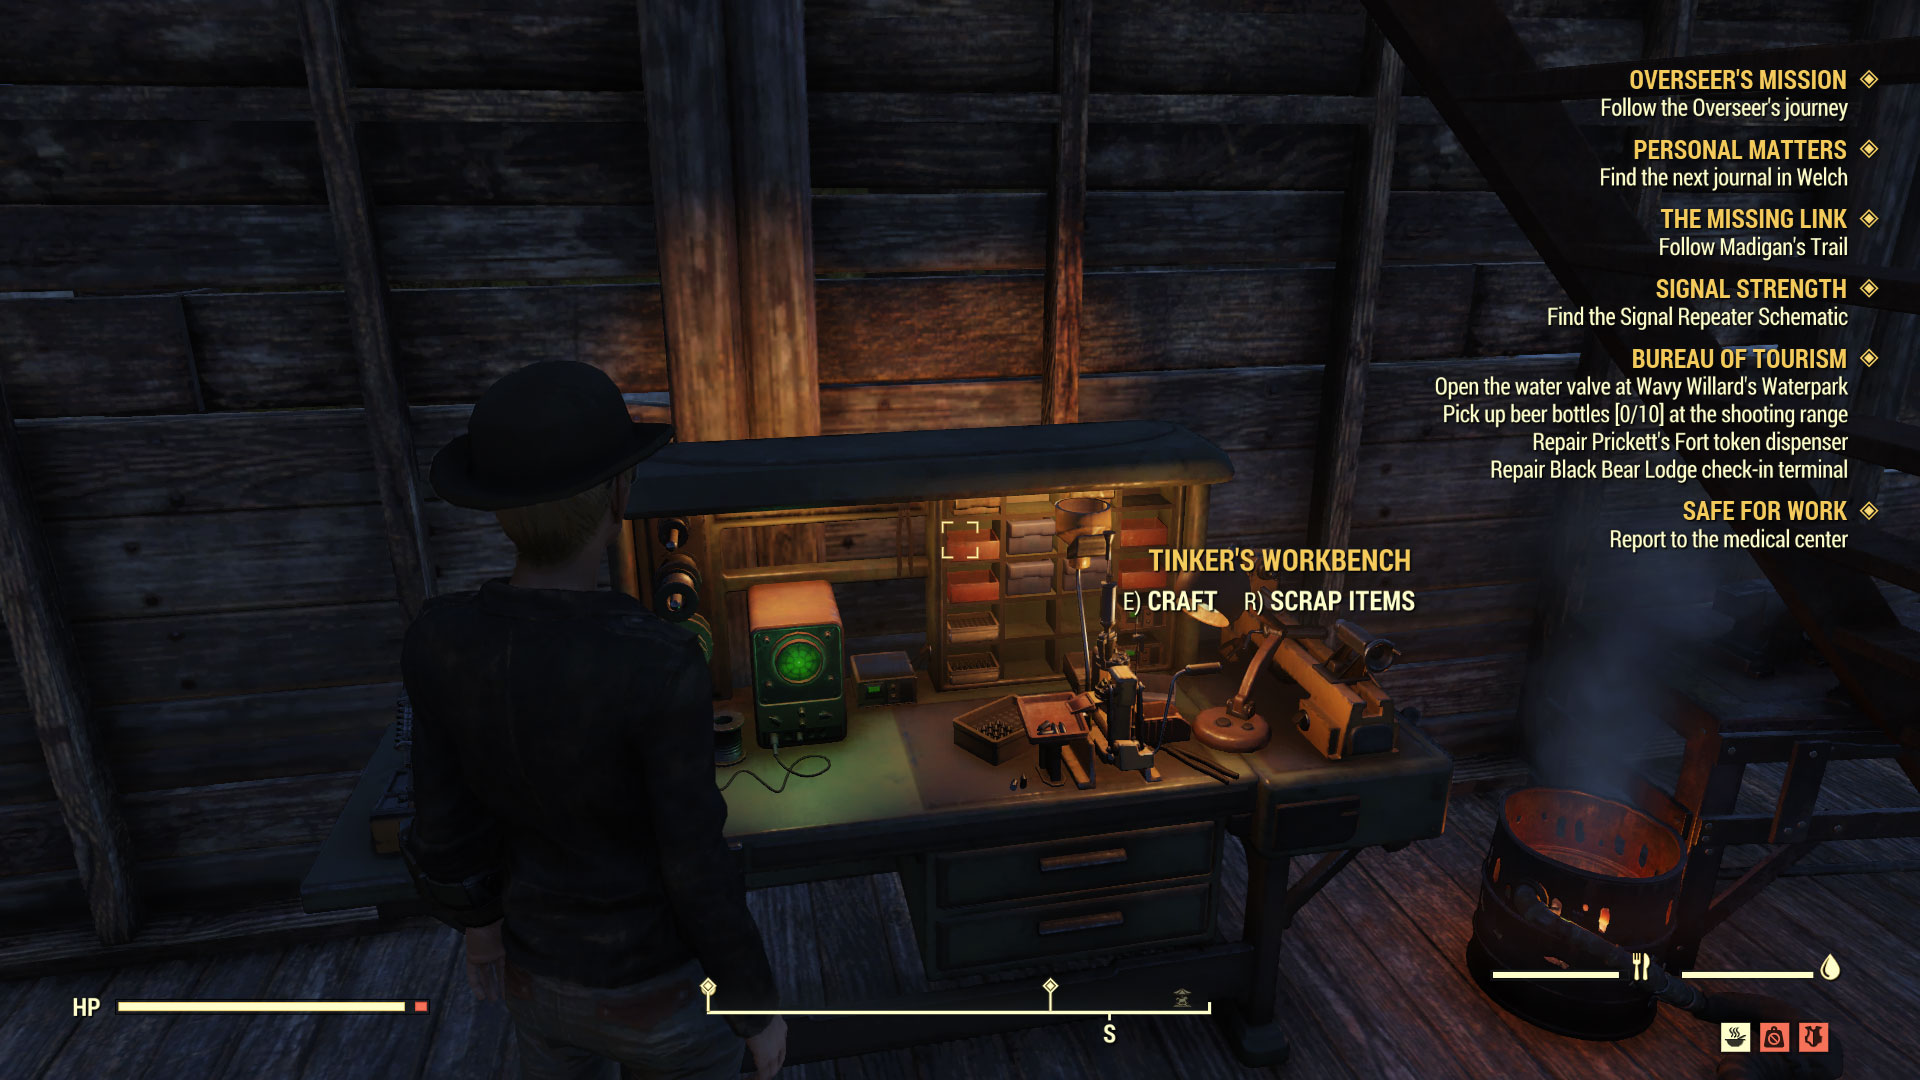
Many things will wind up in your Junk inventory, but they really aren’t junk. Many things can be Scrapped to be turned into useful things for crafting. Scrapping extra weapons and junk at workstations as you explore will help with weight management. I will explain this in more detail in my basic overview of how crafting works in this game.
Some doors and containers, not just safes, will be locked. You will need perks to open safes though initially you will find some that require a 0 skill for you to try lockpicking out. Your rank in the lockpicking perk has to equal or be higher than the lock rank. You will need a bobby pin and it is likely you will break a few learning this skill. When in the view to pick a lock you move the mouse to move the bobby pin and will hold A when ready to attempt an unlock. Every lock works the same, the bobby pin straight up with movement 90 degrees to the right or to the left of this starting point. When pressing A the keyhole will move clockwise, to the left. When it is 90 degrees from start it will open. If it stops before that be sure to release the A key immediately. The longer you hold A when it stops before the opening point, the more likely you will break your bobby pin. Don’t get too frustrated, it does take some practice to do this without breaking a lot of bobby pins.
As I stated before, be sure to scrounge everything because you never know what you might need it for. You will find plants, logs and ores in the wild. Some may be near workshops and others at random gardens. Food, medical items, and drinks can also be found as stand alone or as part of a collection in a box, or on a corpse. Once you get more accomplished with the game you may decide to leave some things behind as you become more familiar with what you need for crafting and essentials of staying alive. Speaking of staying alive, let’s discuss that next.
Fighting for Your Life
Everything wants to kill you, even the water and food. Dead things can give you radiation when walking too close. You will also feel it when thirsty or hungry. All this is without any enemy intervention, but there are plenty of mutant things to run into: radrats, scourged, two headed animals, and they just get stranger the higher level you go.
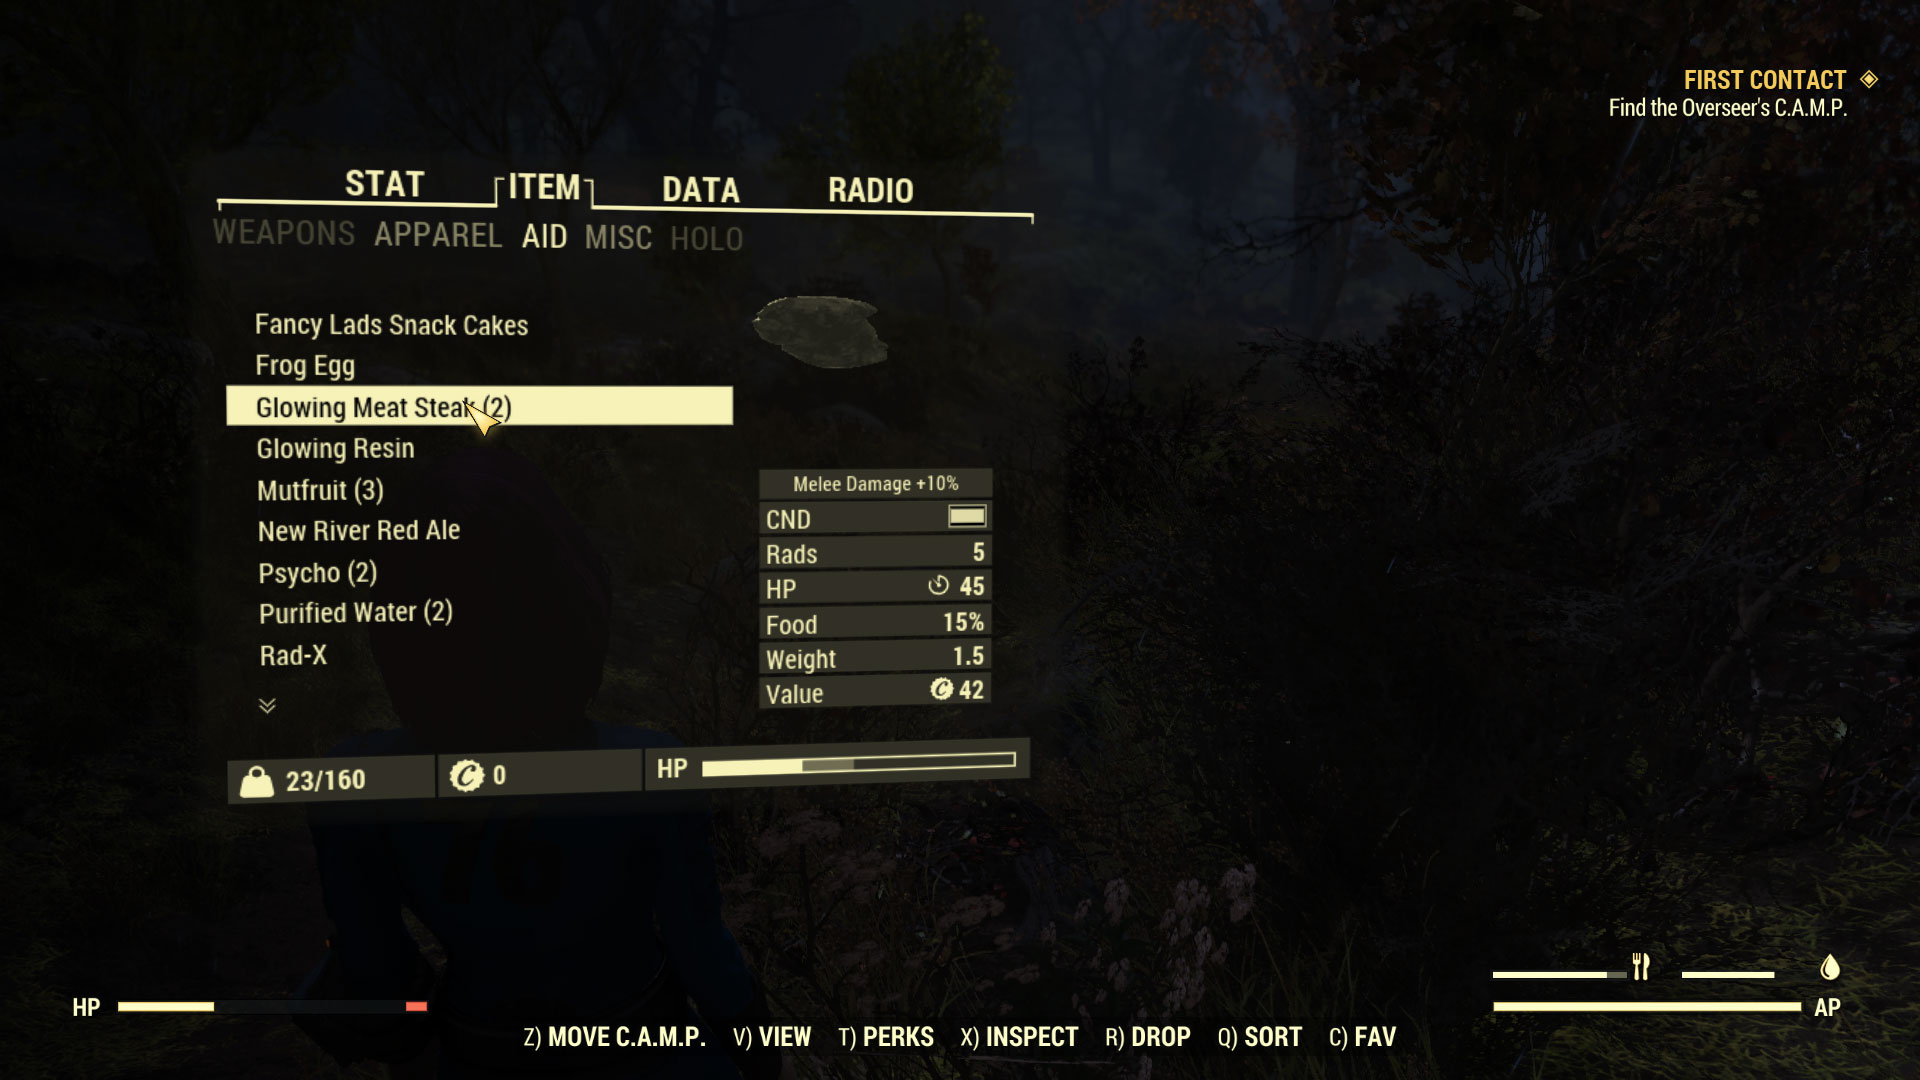
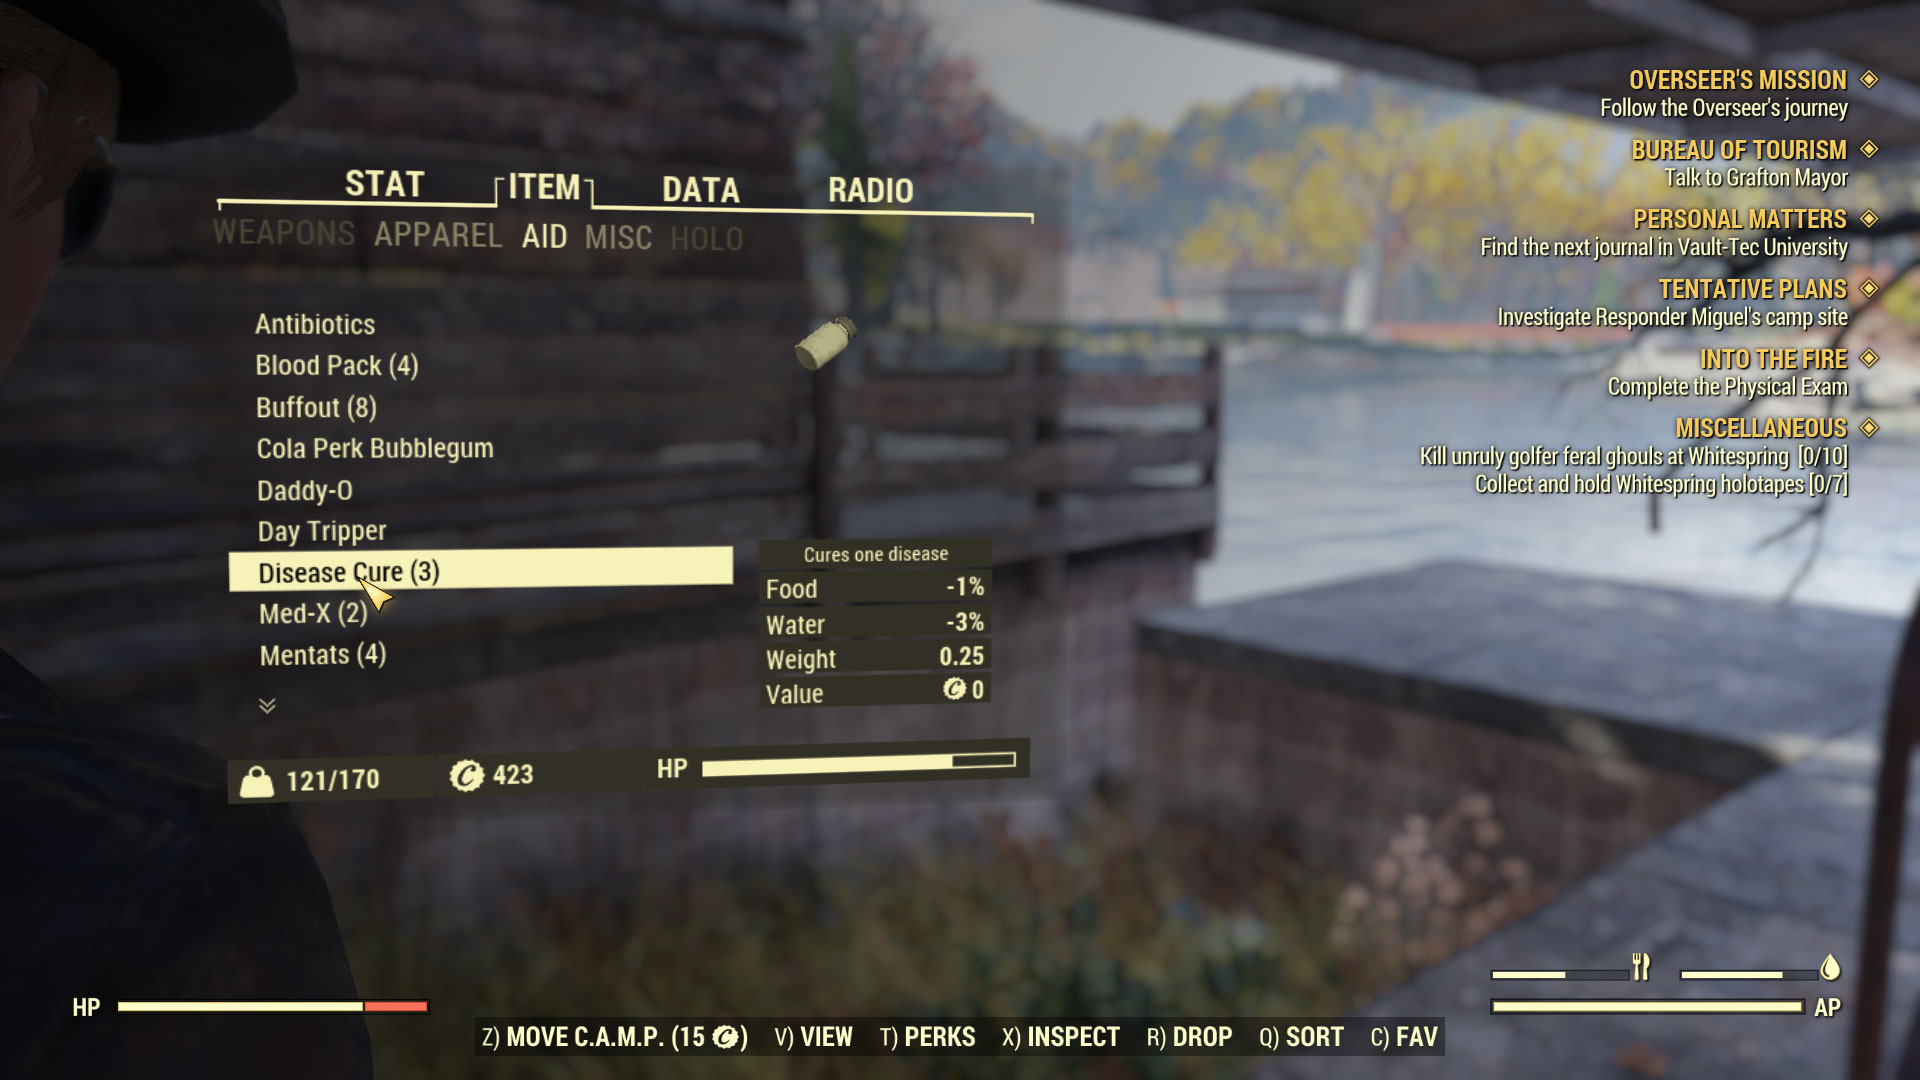
This picture shows the Aid Items of your inventory. This is one of the places you will come in your Pipboy more than the others. When in any screen of the inventory you will see your health bar on the left and your AP(Action Point) bar on the right with the food and drink bars above it.
Your health bar will show your level of health by filling in the bar from left to right. Your radiation level will be red and fill in from right to left. The more radiation you have the less health you can have, and you can acquire mutations. In order to help your health and radiation levels there are med packs, stimpaks, and rad packs. You will also find disease cures and antibiotics as you explore. You can also get recipes to dilute full versions of stimpaks and the radiation packs. You can get a lot further with diluted ones used regularly and only need a few of the full ones for the worse case scenarios.
Eating and drinking will help keep your health up. You will lose action points if you go too long without eating or drinking. The bad part about eating is you will acquire radiation. There are ways to acquire purified water, including installing a water purifier at your camp or at a workshop you own.
To use any medical, food or drink item in the aid inventory all you have to do is left click on it. When you hover the mouse over the item it will give you an indication on the appropriate bars of how much health, food or drink recovery it will give you. Most non purified foods and drinks will not tell you how many rads (radiation points) it will cause until you use it.
The following is a quick list of items and what they will do to help:
- RadX - will suppress how much radiation you take for a specified time.
- Radaway - removes a specified level radiation and its effects.
- MedX - medication to help protect you from various health effects
- Stimpak - a quick healing with a set amount of hit point recovery
- Disease Cure - removes the disease entirely upon use
- Antibiotics - fights infections and diseases.
There are plenty of alcoholic drinks in the game, as well. These have other effects that may actually help your character, depending on the perk cards you selected for your skills and stats. Also, you may want your character to gain radiation poisoning to see what mutations they get. There are plenty of options that you can try out that could be both good or bad for your character over time.
Now that you know the basics of how to survive in a world full of radiation and other unhealthy possibilities, you need to know how to set up your weapons to fight off the obvious enemies that will want to kill you on sight with their ‘natural’ abilities, or with weapons. There are scourged and mutants around that will use weapons against you since they were once human and still retain some of that intelligence. You will even hear some of them talk to you. You can’t trust all the robots either, even if once made to help man.
In your inventory is a weapons list of all the weapons you are currently carrying, including any you may have looted and have not scrapped yet. For quick use of the ones you prefer, there is the Favorites Wheel. When not actively engaged with the Pipboy, building a camp or workshop, or interacting with any terminal or workstation, you can use the middle mouse button to open this up and change your weapon selection by clicking on its icon. You can also use the associated number key assigned to the wheel slot to change to that weapon during a fight. There will be a slight delay in changing weapons much like real life.
What I like to do is put my primary melee weapon in the first slot and my primary gun in the second slot. This way I can use 1 and 2 for my quick change from ranged weapon to melee and back again. I do carry a couple other weapons in order to have more options, since sometimes killing one by one is not an option. My main is set to have advantage with non-automatic pistols, but having something automatic on hand can come in handy at times. There are so many weapons in this game and perk cards to go with them, that you can set up for melee, pistol expert, rifle expert, or play more with explosives.
If at any time you do not like your Favorites Wheel setup, go into your weapon inventory and use C to toggle the heart indicator off to remove it from the favorites. Once all are removed, add the ones you want as your favorites, in the order you wish to assign them, with the first going to slot 1 and in order around the wheel.
You can put some of your aid items on here as well. Stimpaks are automatically added to the last slot that uses the ‘=’ key when you picked up your first Stimpak in Vault 76.
Once set up, you have both the number key row and the use of the middle mouse button to change weapons. It is good to pull up the Favorite Wheel at times because you will run out of ammo. Any weapon out of ammo will be useless. Also, weapons will break over time and become useless. All broken or ammoless weapons will be grayed out on the Favorite Wheel letting you know immediately they are unusable until you can repair or gain more ammo. I’ve run out of ammo or had weapons break in fights. It can prove quite stressful when it happens.
Thankfully if you have no weapons at all, you can try punching your enemy into submission. I managed this with my fresh out of Vault 76 character due to exploring a shack on the way to the Overseer’s Camp. I punched out several level 1 radroaches and one level 8 leader of them.
You will also gain armor pieces to help protect yourself. Be sure to wear the best of what you can find and eventually you will be able to craft and build your own armor and weapons. The armor pieces will let you know if they are a plus or minus to what you are wearing when comparing. They assist in physical, laser and chemical protection. Most of what you find at lower levels are for physical and laser weapon attack protection.
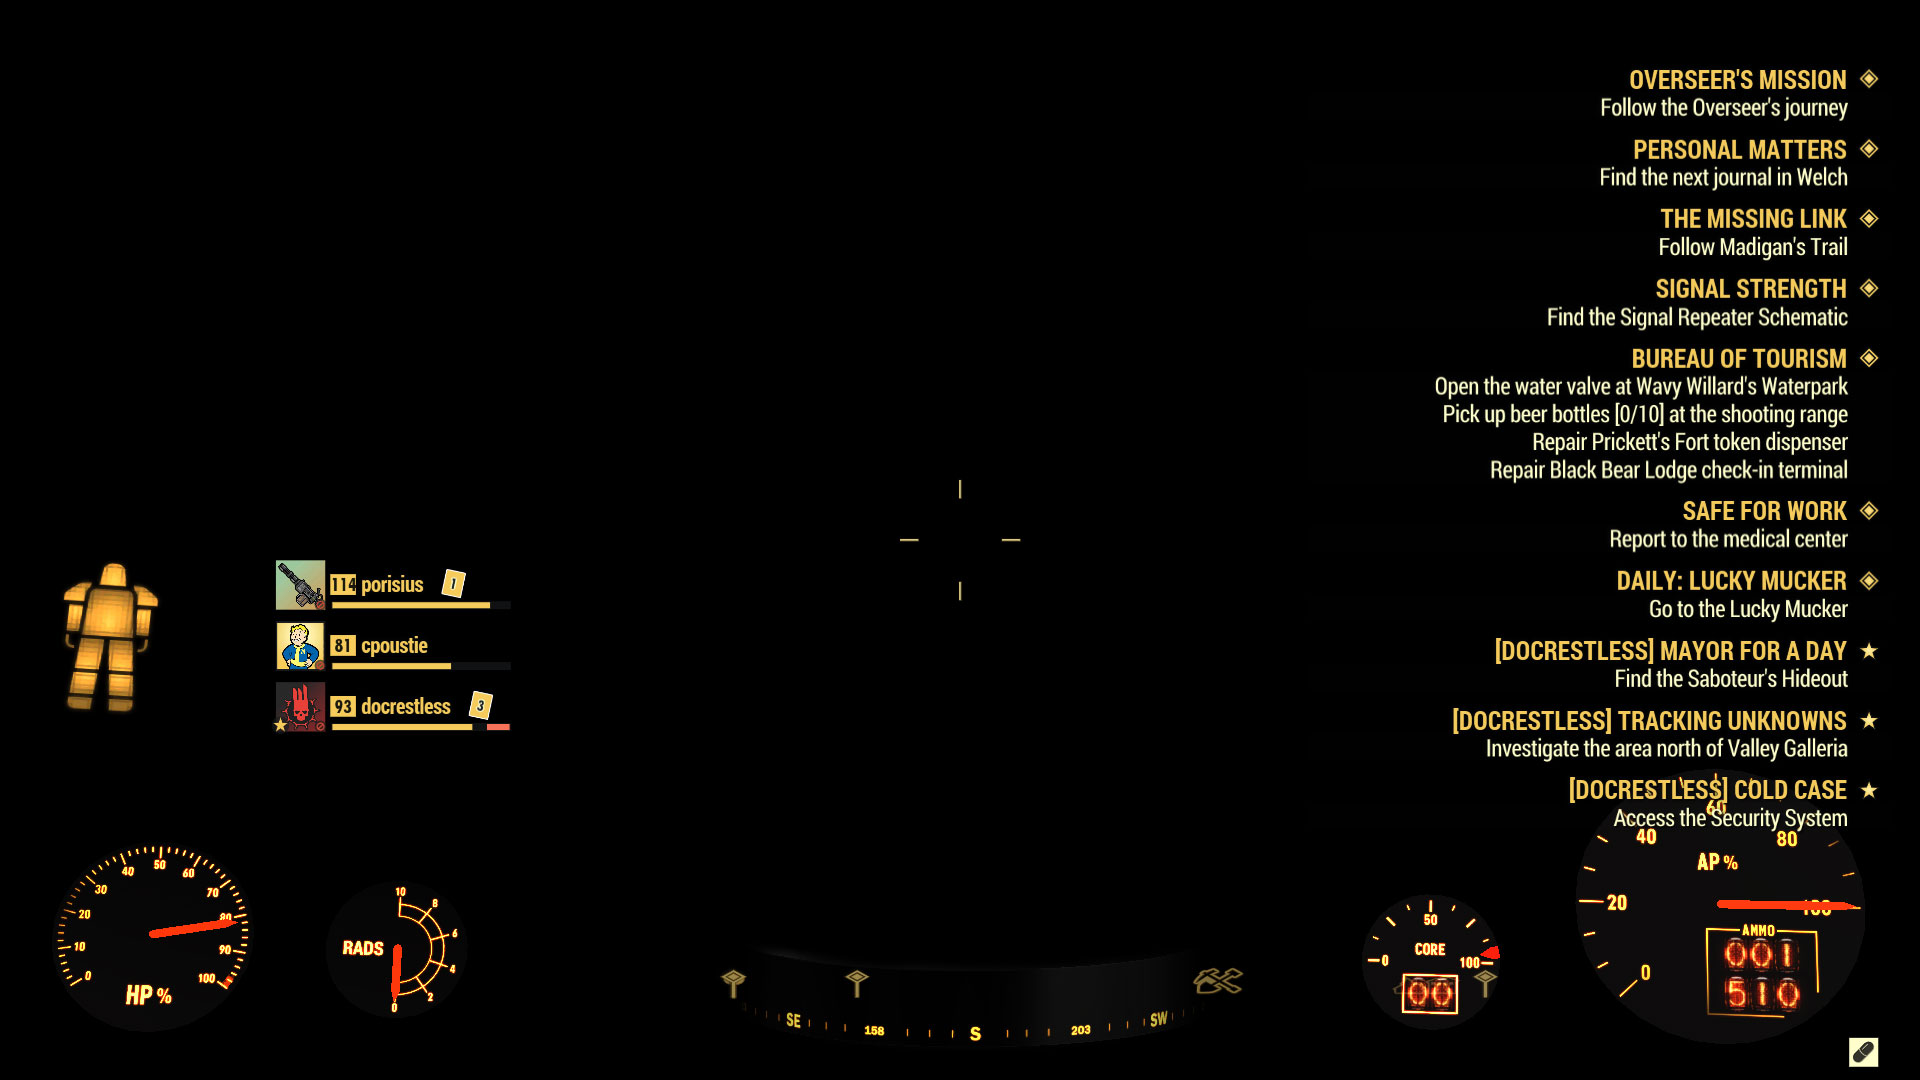
You can also find power armor suits. These protect you in many ways against the elements and enemies of the world. You can also carry a lot more stuff when wearing one of these. However, you do have to climb out of it if you want to use a crafting station for anything other than scrapping. It will also give you an entirely different UI look, as seen pictured here. The only thing I don’t like of this option is you don’t have distance readings to your quest markers and you have to pop into your Pipboy to see your food and water bars. Everything else has an analog style gauge to see how you are doing.
If any part of your power armor is damaged badly it will show up as red in the robot like icon on the left side of the screen. You must use a power armor station in order to repair your power armor. This is something to add to your camp when you finally get the plan and have the budget to do so. Otherwise, you will have to find a station out in the world and hope it doesn’t have an unclaimed suit hanging in it of a level you can’t move. Thankfully the first time I had to do this, one of my high level friends came to move it for me.
This brings me to the last point about staying alive. If there are a group of mobs anywhere, there is a possibility they may have a leader. The leaders will be marked with a crown emblem in front of their name. Most times if the leader is killed, reinforcements won’t show up. Be sure to take out the leader first when it is feasible. Sometimes he is wiley and might be one of the last mobs you find, especially in an area with multiple places to hide, or a building with lots of floors and rooms.
Have fun learning what your weapons can do. Be sure to go melee when things are close, if you can’t back off. Look at my quick key list at the beginning of this guide for the key and mouse controls used for attack and defense besides your Favorite Wheel numbers.
Of course, you will die at times. When this occurs you can put a request for help or simply go straight to the option of reviving in a safe place, per the menu that will pop at the bottom of the screen. If you call for help, you have about 30 seconds or so before you have to revive in a safe spot. I use the help option when I know a friend is nearby and they can come hit me with a Stimpak.
When you have to do the revive option, I suggest going to the closest explored location to where you are, which usually will be a blue discovery icon. I try to make these pop up in areas first if I can manage it, before doing a full enemy engagement. Of course, this is not always an option and you might have to run a little.
Once revived at your safe point, you will see two things: a marker of where you died on the map as well as on your compass when facing the correct way and a miscellaneous quest on the right with a quest marker by your death marker. What happens is your random loot that is not equipped or listed as a favorite can wind up in a paper bag, because you drop it upon dying. This paper bag can be looted by anyone that finds it, so you want to be back there first. Sometimes friends can’t save you in time, but they can protect the area you died in as you run back so you can pick your loot back up. Don’t be too scared by this because most of the time it does not drop any of your aid items, equipped armor and favorites weapons and their ammo. You don’t run back without a way to fight, which happens most times before picking up your paper bag of loot.
Why Own Workshops
In the section about exploring I mentioned that you will find workshops around the world. Each supplies different things that you will use for crafting. Junk is even a good thing because this is how you get a lot of your screws, gears and other items needed to make weapons and armor, or build devices in your camp or to defend the workshop.
Every workshop will have an interactive device that will be used to claim, build and repair it. I suggest not claiming a workshop that is owned by another player, so be sure they are unowned. Of course, you do have the option to take an owned workshop, but it could be costly and will put a bounty on your head, if you survive the attempt.
Once you claim your first workshop you will have new things added to your building abilities for acquiring resources. Some examples are machines that help extract minerals and junk from the deposit area. Most extraction areas you can build on will be holes in the ground and have items you can initially loot. The extractors you can build over these, if you own the workshop, will acquire more items and at a quicker pace. You can also lock down the resource extractors so only you or a teammate has access to them. If you leave them unlocked, anyone can take things from them when passing by and not get flagged with a bounty.
Each workshop lists what you will make from it while owning it. All the items on this pop up window go automatically into your inventory when acquired. Owning several workshops can come in handy, but it will be another way to fill your inventory and become overburdened faster. I suggest adding at least one crafting station to each workshop you own for scrapping purposes. Also, put in a stash box so you can unload the resources from your inventory to help lower your weight. A cooking station is great for the areas with plenty of food to harvest.
Defenses and turrets will help protect the workshop from enemies. Events will occur to defend it after you claim and randomly there after while you own it. You can fast travel back to your workshop any time to use it or defend it. If an event pops at a teammate’s workshop you can fast travel to the event, like any other event.
I like to own some workshops if I know I will be in the game for awhile. The only downside to workshop owning is that when you leave the game, even if disconnected, all your built stuff remains, but it goes to an unowned state. One way to remedy this is to be grouped with friends. When you leave the game one of your teammates will be assigned control of the workshops. When you return to the game after a disconnect, you can usually rejoin your team. There are times though when all get disconnected, but then you have the fun of reclaiming what you want, though you might not find your stuff if put on a new world. The game breaks out new worlds for about every 24 people, for player population control.
Building Your Camps and Workshops
You picked up a camp on your way out of Vault 76 and you will see an example of an open one at the Overseers camp. She left it as an aid to you, but yours will want more fortification and protection. You will not be able to build much of one until you acquire resources and some of the things you can add to a camp will become available by following the Overseer quests. Plans will also be rewarded in quests and events, but can also be found as loot on mobs or in various places within buildings. You only need one plan to be able to build the item at your camp or workshop. The copies you can share with your friends, or with the help of a friend, transfer to an alternate character, if you make one.
The building mode I will explain here works for both camps and workshops. For a camp, you first have to find a place for it. Workshop areas are determined by where the mechanism to claim them is located. The more slope to the area, the harder it will be to build, so look for flatter areas without too much terrain in the way for the camp. The fun thing about building is you can defy gravity by putting a foundation floor down, then a stairway. You can attach upper floors to this stairway without worrying about how big it is. The following picture shows one of my camp builds with an upper area that hangs off a stairway only.

To place or move your camp to a new location, press TAB and then Z. The camp placer will appear on the ground in front of you. Make sure the area around it marked by a green circle for the perimeter allows you building area without a lot of rocks and trees in the way. You want the natural terrain to help, not hinder your camp setup. When the camp placer is outlined in green you can place it, if red you will have to move around to find a usable spot. Sometimes it will be red because you are too close to someone else’s camp.
You need to start with at least one foundational floor to attach things to for building up. You have the choice of wood or cement. The menu at the top of the screen is quite long and you can’t see it all, but you move right by pressing C and left by pressing Z. The icons on the left are the options of everything you can make in the highlighted menu category. You use up and down arrows to go up and down the icon menu. If an item has < or > beside it you can use the left and right arrow keys to move through these options. Example, some walls have options for solid, with doorways, or with windows.
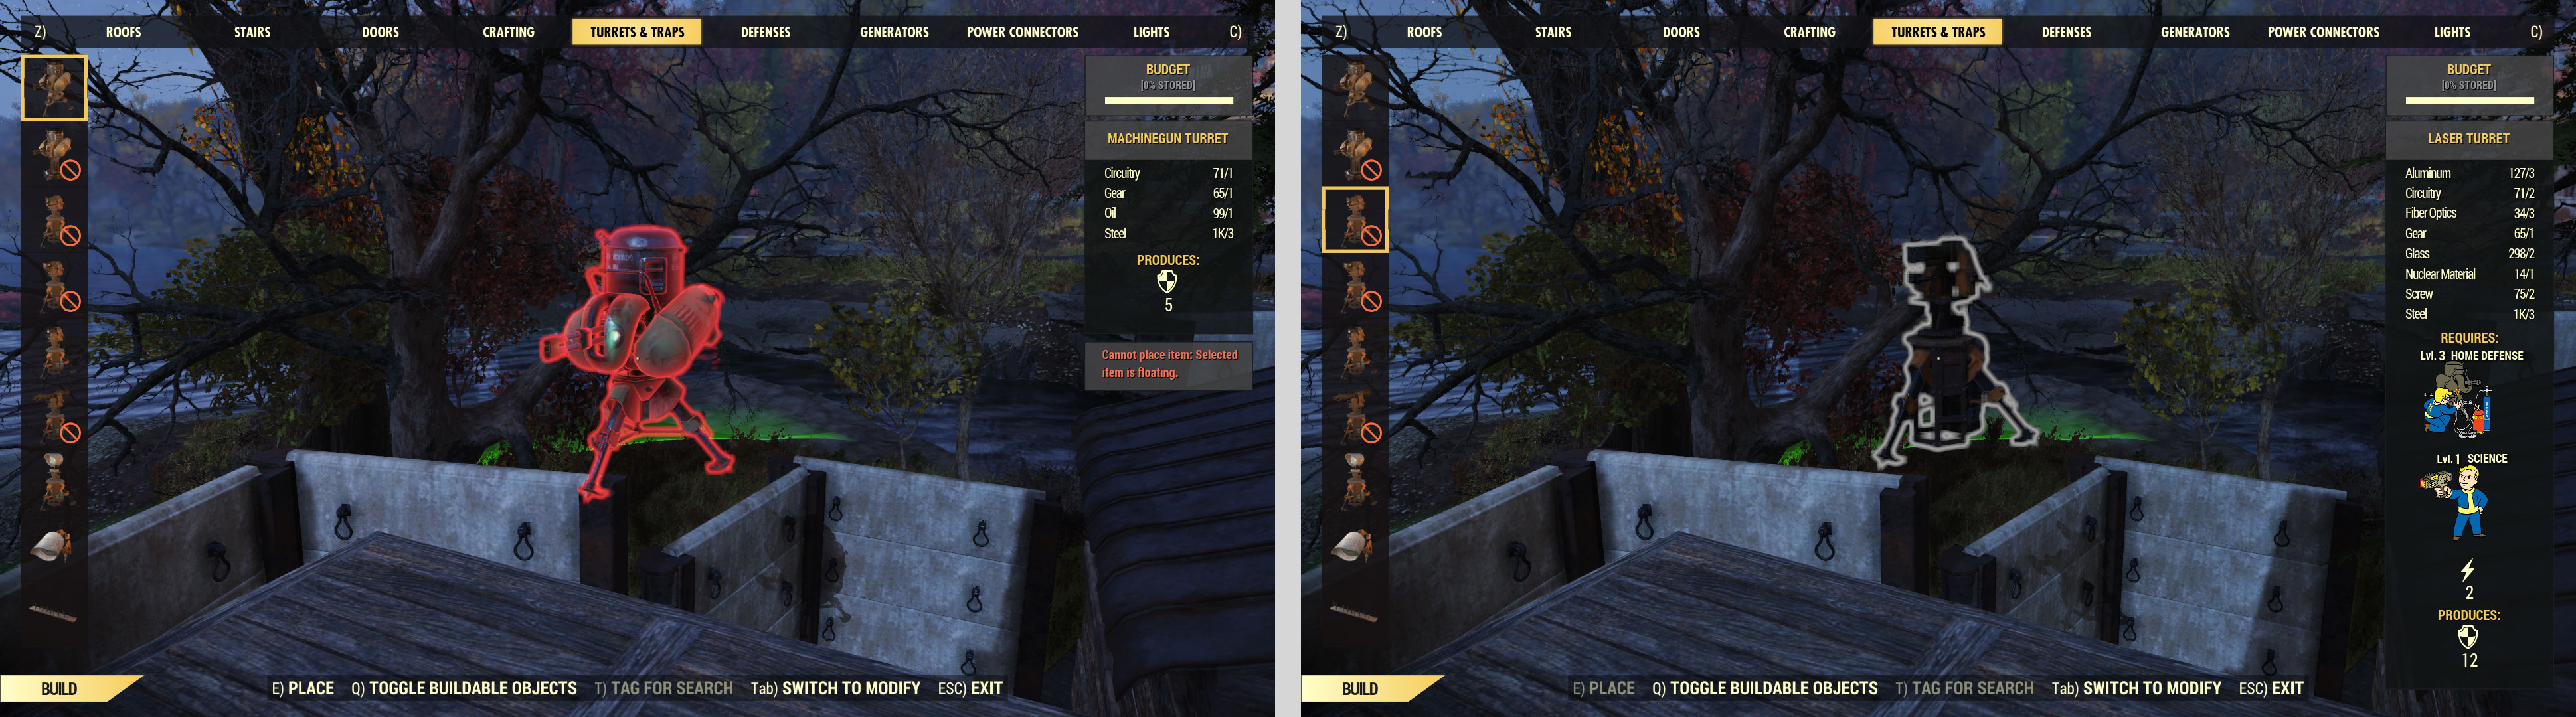
If you do not have the materials for an item it will have a circle with a slash through it on a corner of the icon. If you don’t have the plan for it yet, you will see a lock symbol on a corner.
The item you want to build will be red until you line it up with a location that allows it to build there. It goes green if you can build. If you like the location and it is green, you can accept the location and it will build. If you have trouble finding a spot or don’t like where it wants to put something currently, you can cancel the build to work on building something else first or switch to modify mode to move something around to make your idea work.
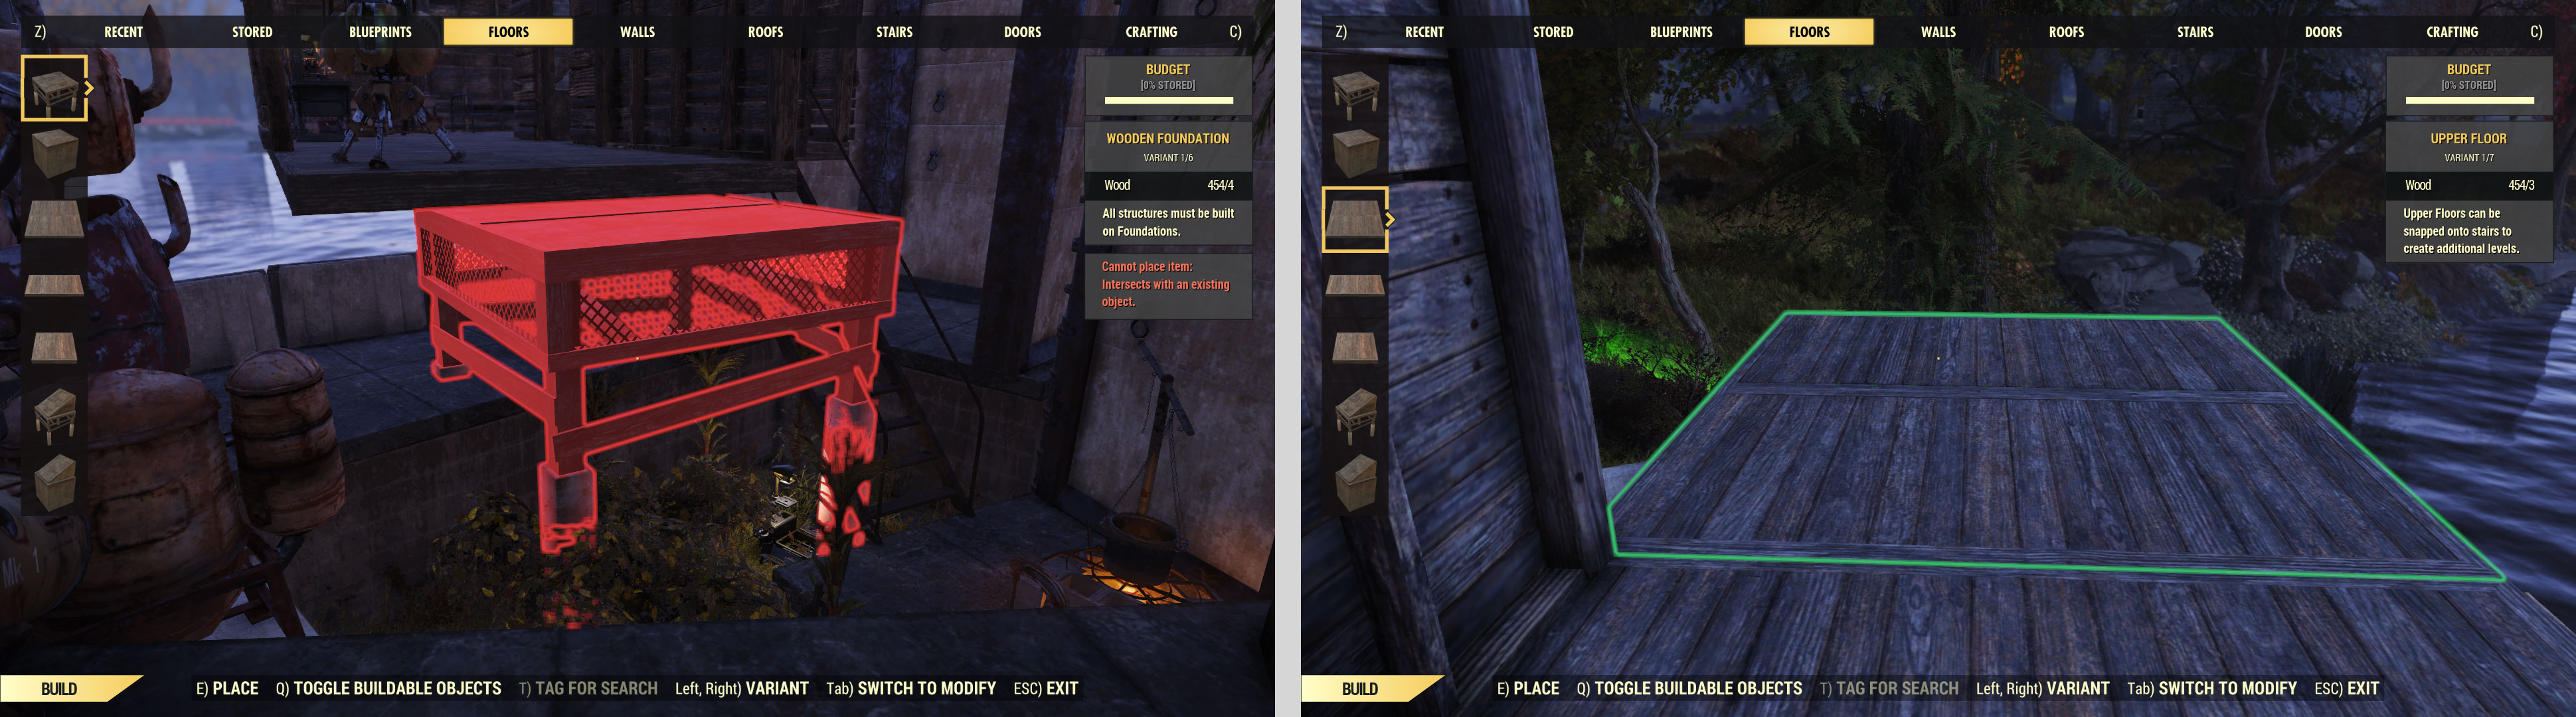
The following shows the menu of the turrets and traps I can build. Several of them have an icon that states I cannot build them at this time. When any item you wish to build is selected a pop up window on the right will tell you what it takes to build it. If you want to know why you can’t build something, this list will show what item is missing by having it grayed out showing the number you have verses what you need to build it.
If you only want to see the items you can build with the plans and materials you currently have, you can press Q to toggle this option on. This will reduce the clutter of the icon list in each category of the building menu making it quicker to pick what you can do now.
If you want to modify any of the already built items, use TAB to change to modify mode. TAB will toggle from build to modify and back again. When in modify mode, the item highlighted in green will be the item you will work with. If you are wanting to remove a roof, wall or floor piece, you may have to remove others first. When removing an item you can store it in order to place it again after fixing something or you can scrap it. Note that when you scrap it you will not get all the materials back, it usually returns 50% or less, depending on your luck and what it is.
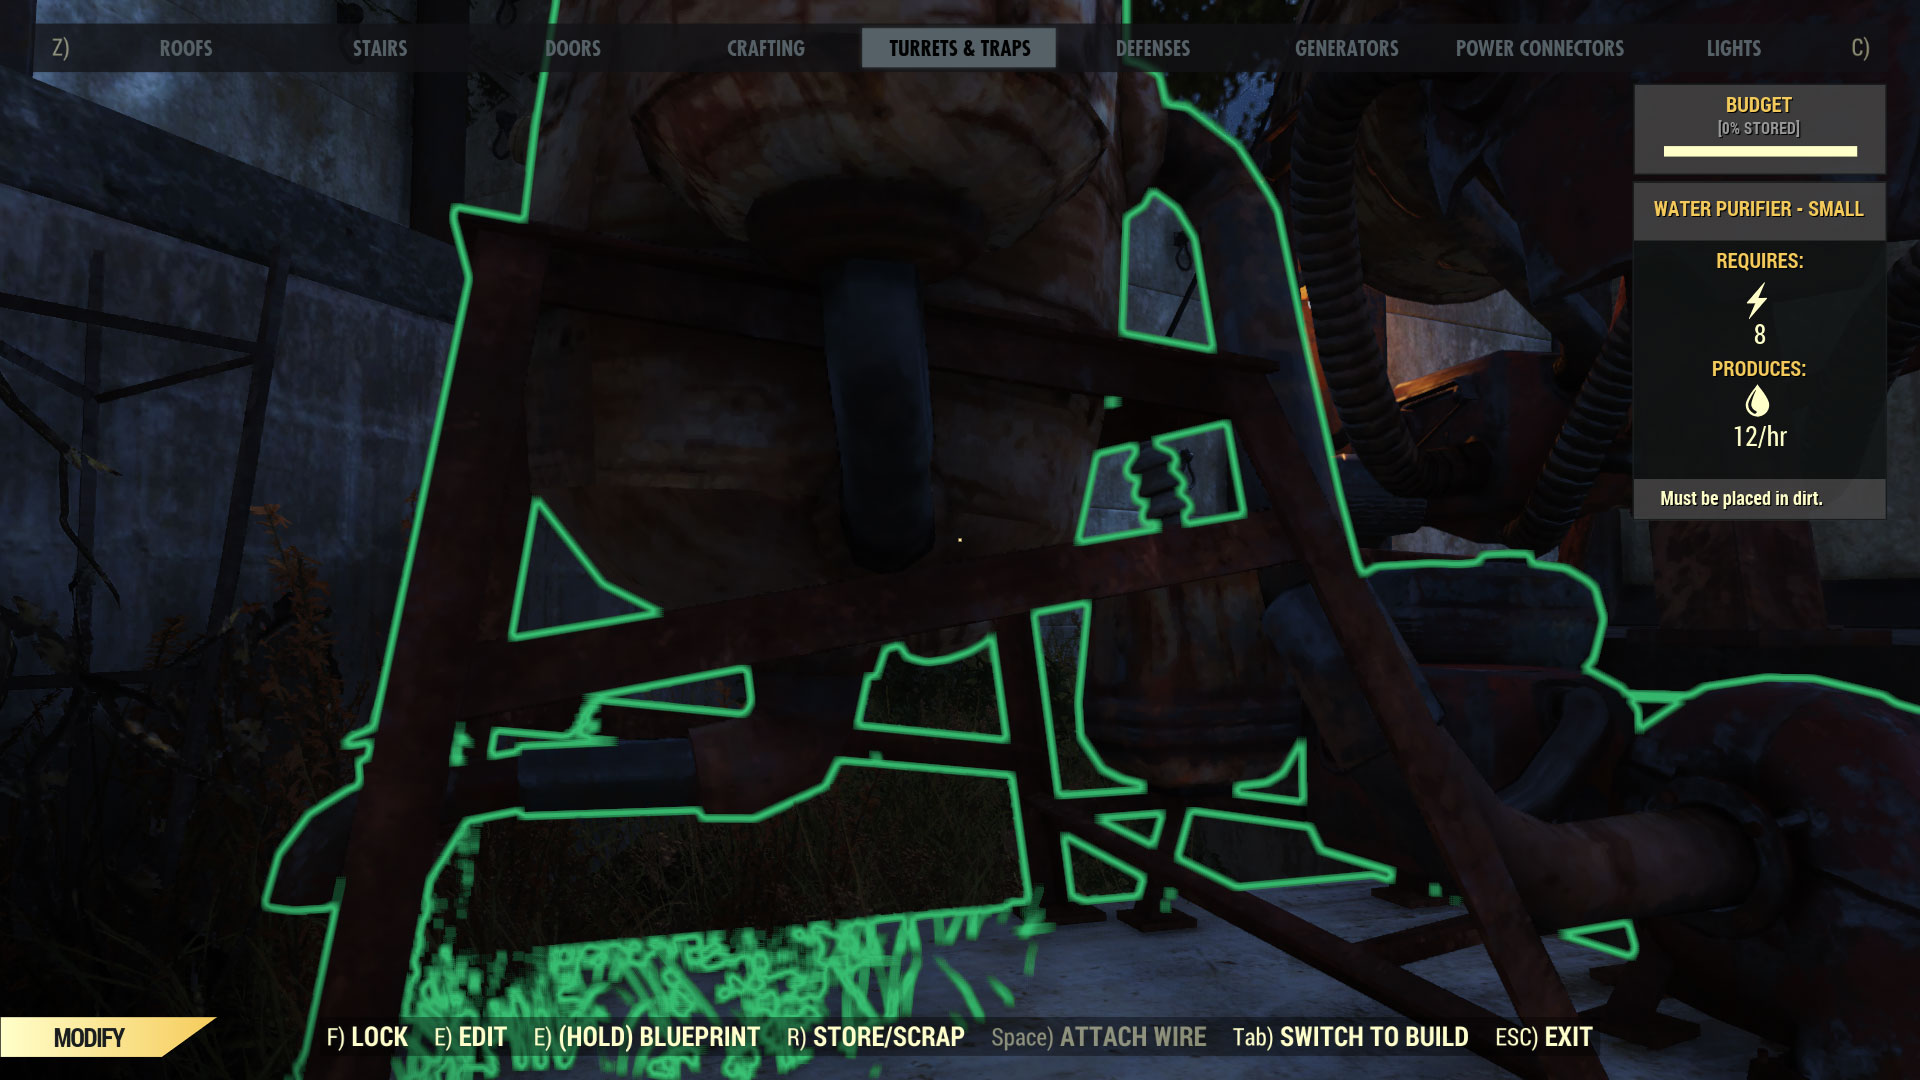
The things you can do in modify are the following:
- F - Lock - good to put on items you do not want other players having access to. When locked and not on your team, they will have to pick the lock causing them to become wanted. If you can use a rank 3 lock, I recommend it.
- E - Edit - allows for editing the item further
- Holding E - puts you into blueprint mode
- R - will pull up a submenu allowing you to store, scrap or cancel the action
- TAB - switch back to build mode
- Escape - leaves the building process completely whether in build or modify mode
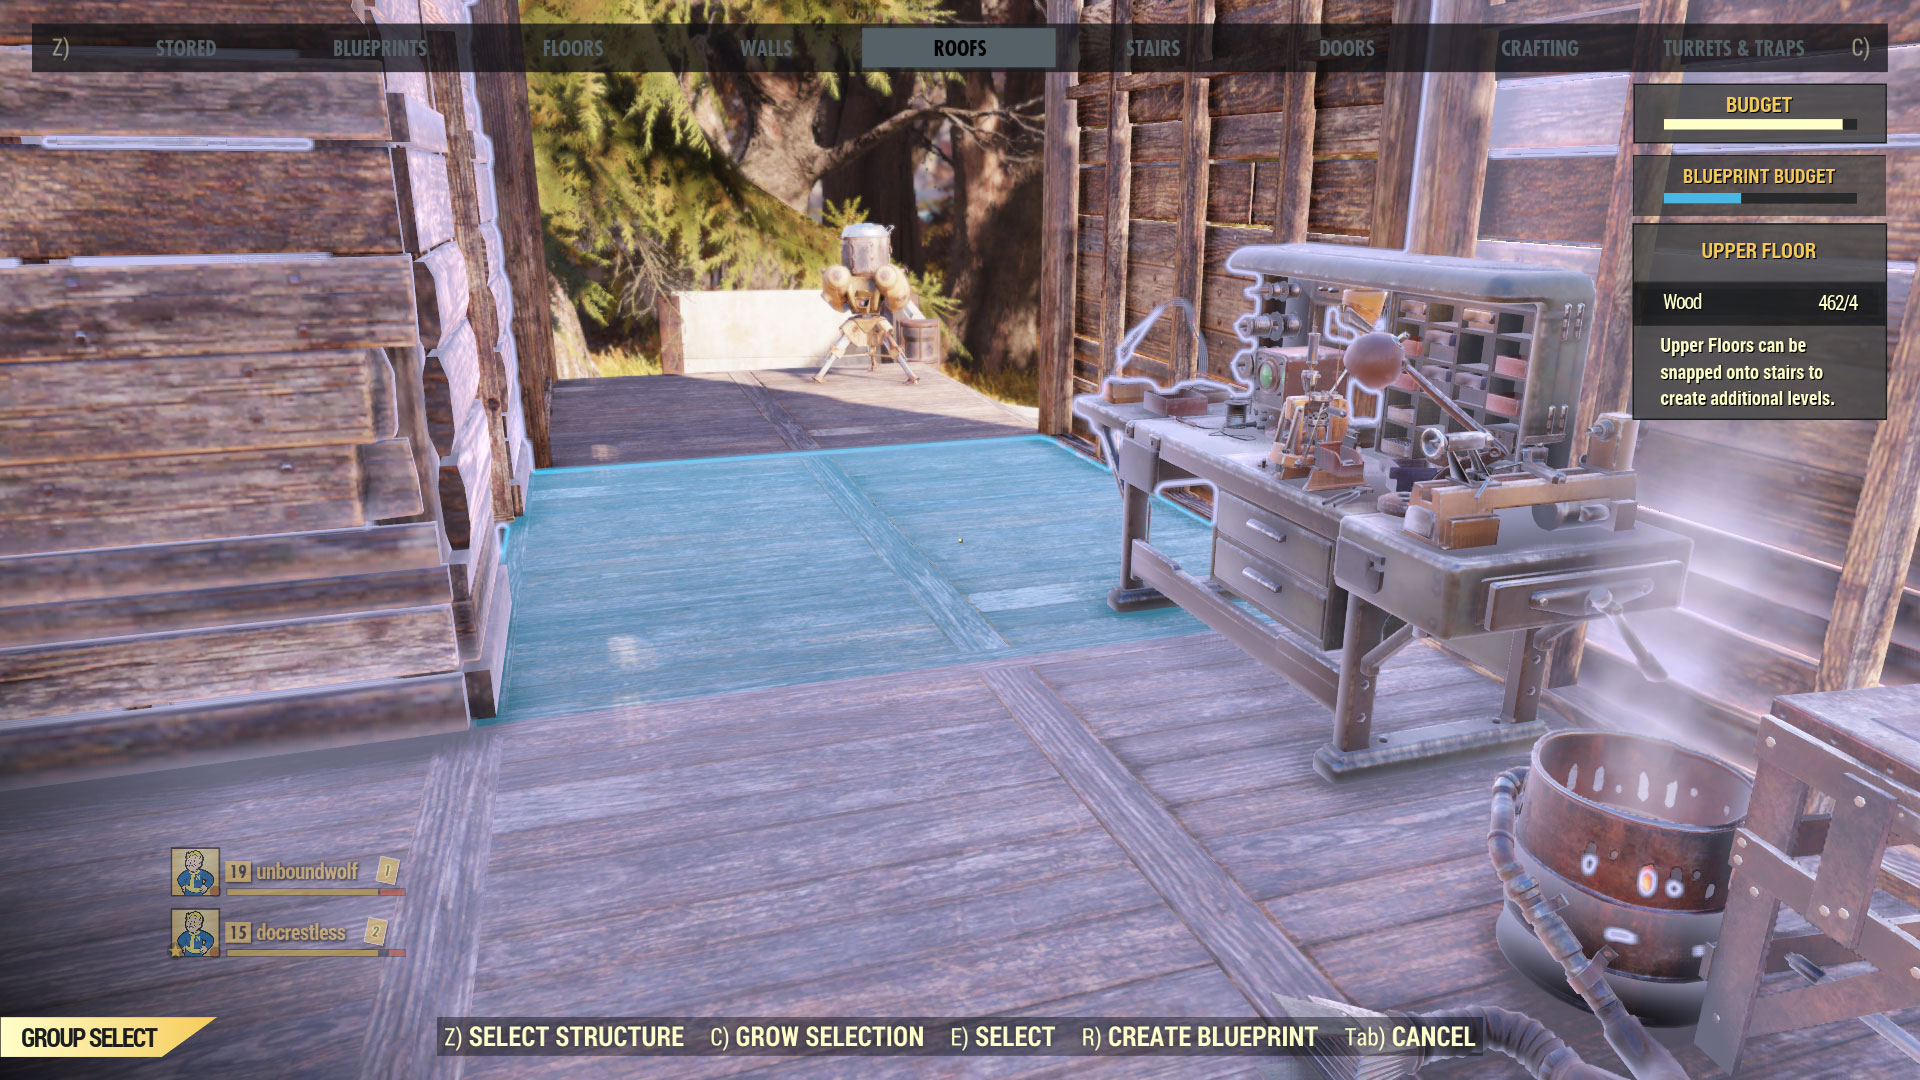
You can make blueprints which are saved in the building menu under the Blueprints category. This can save time when building at a camp or a workshop. When in the modify mode hold down E until you enter blueprint mode. Once in blue print mode you can look at an item to highlight it and a quick press of E will add it to the blueprint. If you change your mind, you can hit E again to remove it from the blueprint you are making. The item will be highlighted in a grayish color if added to the blueprint, and blue if targeted but not added yet. Once everything you want in the blueprint is properly added, press R to create the blueprint
Items you should have in your camp at the least:
- Bed - resting will give you a buff
- Stash - your bank vault access
- Crafting - have all the stations you can make here
- Defensive walls and turrets - to keep out the enemies and kill them if they get too close
- A Locked Door - anything you don’t want easy access to should be inside your camp building
- Water Purifier with Generator - may take a bit to get items to build, but clean water is a must
- Instrument - comes a bit later in game, but you can feel better taking some time to play and be noted as well tuned.
Perk cards will up your defense and budget size for your camp. You do have a decent budget level without extra perks, so don’t rush for these if you need perks to help with your fighting and other things first. Over time it is good to add on to your camp needs.
Some of the issues with building that have driven me and my friends nuts are hard to work around. They will take some getting used to and a lot of patience at times. The biggest one is with fortification walls which love to float. You can spin them around 180 degrees and that might help and other times you might have to be downhill from where you want to place it. Other times things may get confused with multilevel areas when trying to place them under a building you built. I found another way to get around this is building cement foundation flooring, which you can set many of the items on, which stops the floating issue. Most of the time you will just have to adjust the location some so it isn’t intersecting with an already built item.
The great thing is you can modify your camp any time by interacting with the camp placer directly or holding down the V key when standing in it. The same goes with the workshop that has the workshop device to interact with or allows for the holding of V if you are standing in the workshop’s control area.
When you move your camp all items immediately go into the Stored category on the building menu. Some of the items will be automatically made into blueprints that are stored there. You can break the blueprints down to individual stored pieces if they do not work in your new location. All stored items will count to your building budget. If you want to use one of your own blueprints, you will have scrap everything in the stored area that will be rebuilt using the blueprint. This is due to blueprints in the blueprint category making everything from scratch and you will either run out of building budget or you will wind up duplicating things in the stored area that you will have to scrap. This is more of an issue because of budget, but you don’t need duplicate crafting stations or stash boxes in your camp.
I know there may still be some confusion with this, but I’ve covered the basics. Once you play around with the building system, you will find what really works for you. Over time it does get easier to quickly build at your camp or workshops. It is one of the things I really enjoy in the game despite some of the issues you will run into.
Crafting Basics
There are several crafting stations that you will find around the world and would be handy in your camp or workshops. They are the following:
- Cooking - food, drinks and utility items
- Armor - make, modify and repair armor
- Weapon - make, modify and repair weapons
- Tinker - ammo and other useful items
- Chemistry - gunpowder, medical items, and other compounds like fertilizer
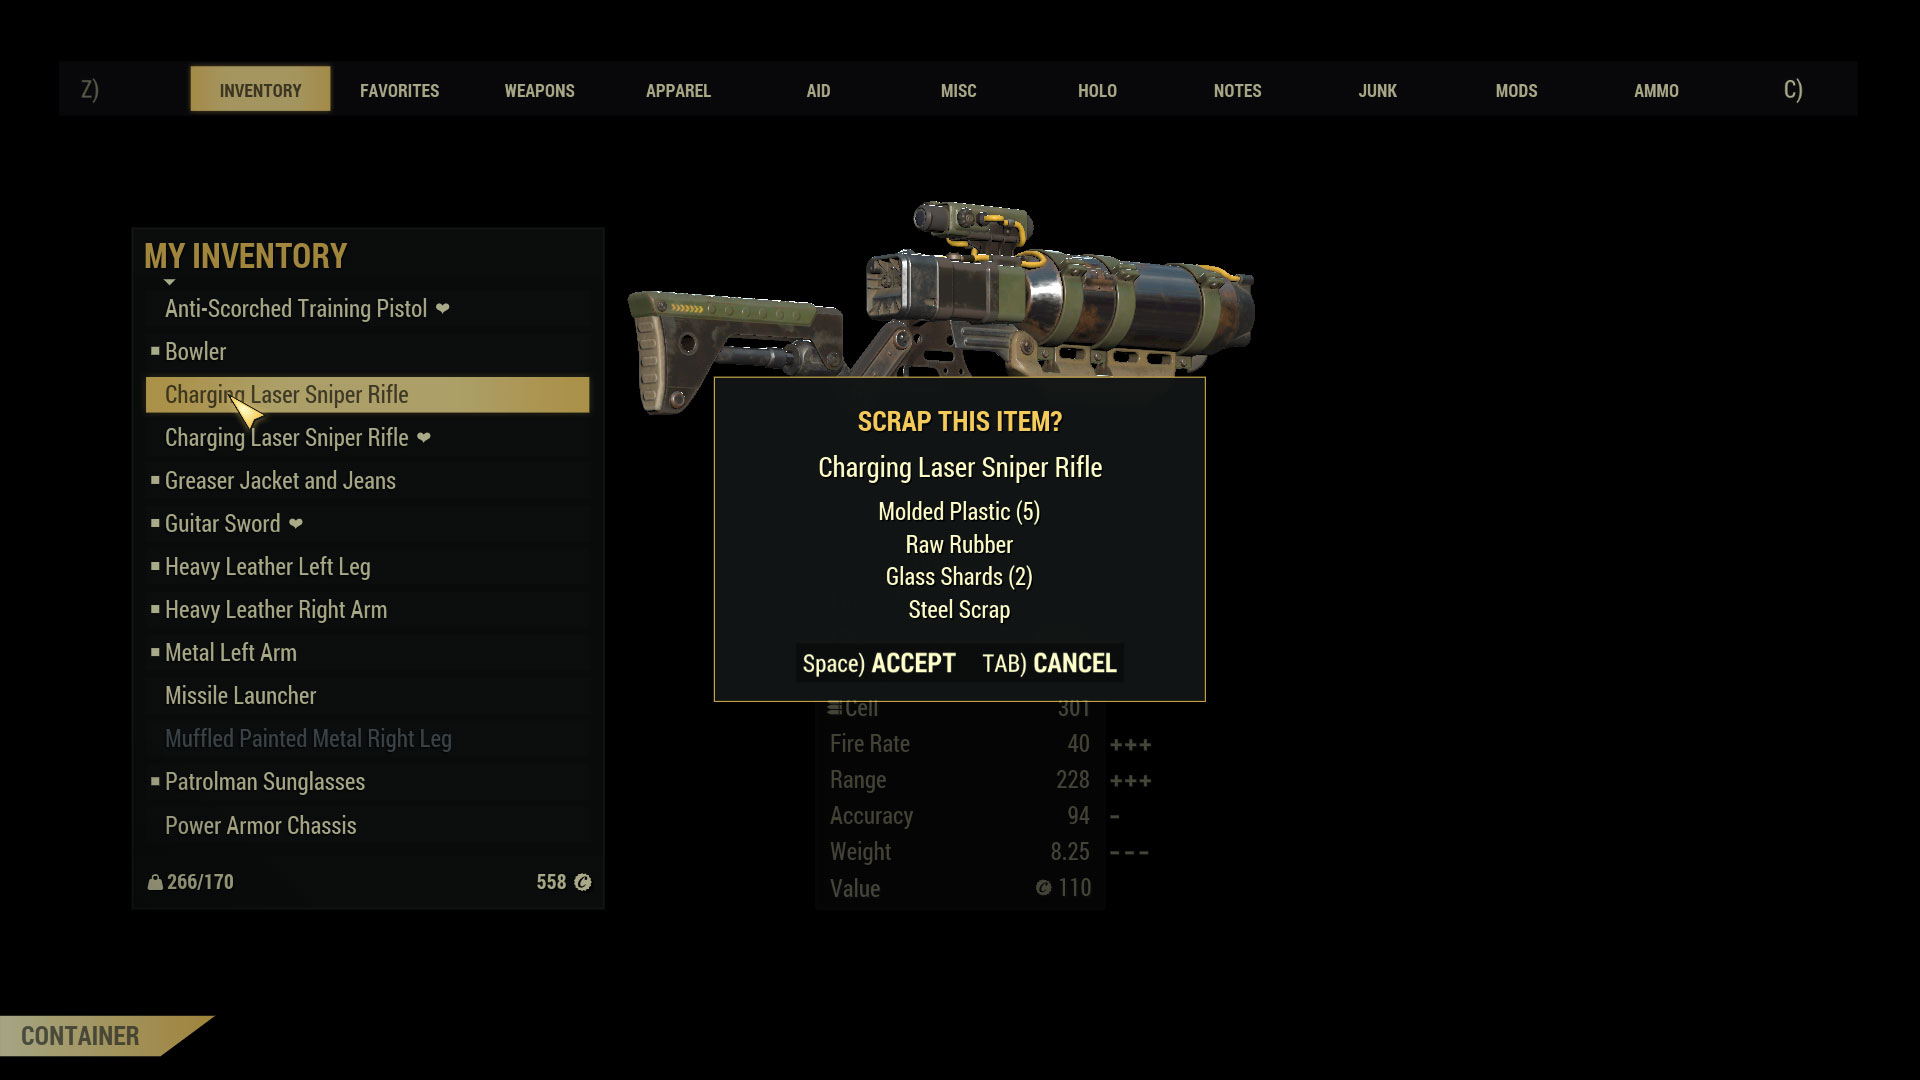
All crafting stations, except for the cooking station, can be used to scrap your junk and any armor or weapons you looted that you do not want to keep. The great thing with scrapping weapons and armor you don’t need is you may learn new ways to modify similar items to improve them. When scrapping, a popup window will appear listing the items you get in the process and the option to confirm or cancel the action. Be very careful when scrapping armor and weapons so you don’t scrap something you are using or want to keep. Thankfully all equipped items have a filled in square in front of them and all your favorite items will have a heart after them to help you out.
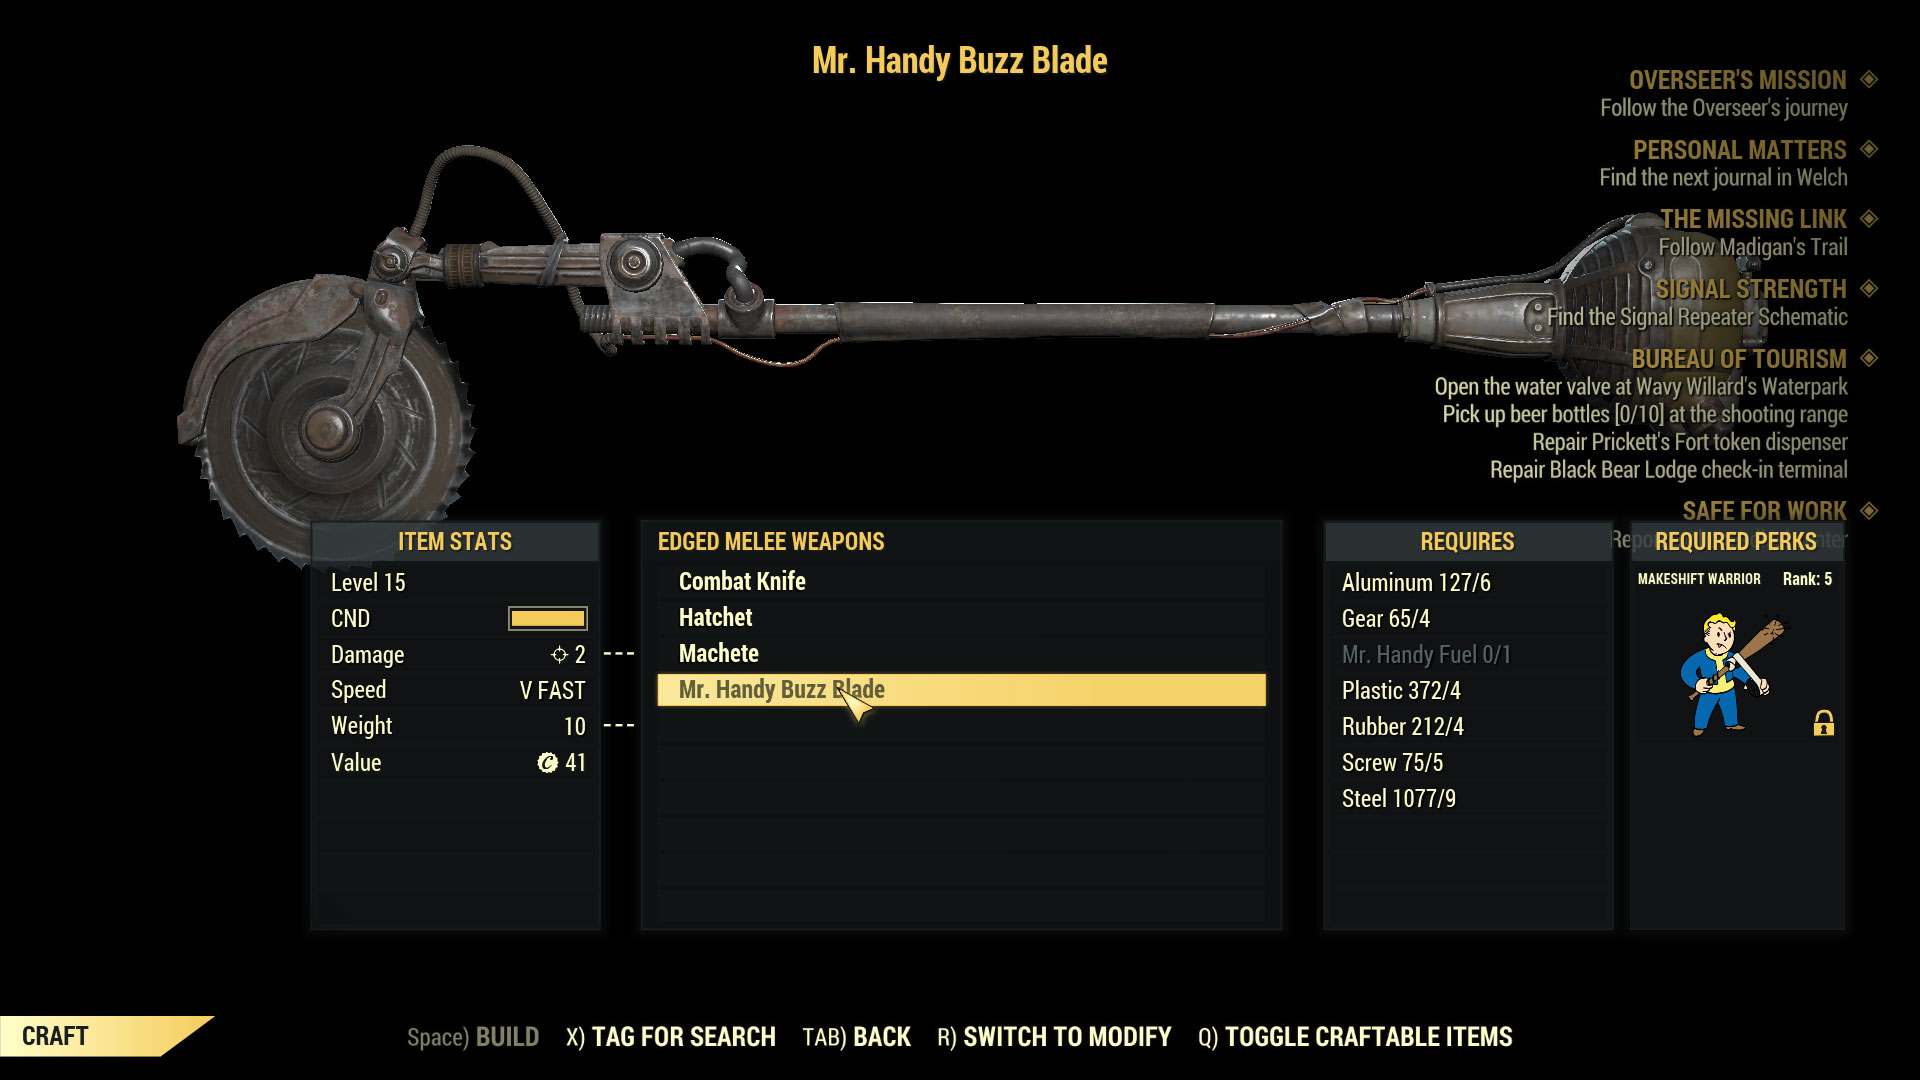
When in build mode you will use the arrow keys to move through the menu of options. When you have the item you wish to build highlighted, a list of what is required to build it will show on the right. If you are missing anything, it will be grayed out and show how many you have versus how many you need in total. You may also need a perk at a certain rank in order to craft an item.
Another great thing you can do is choose the level you want to build the item as. You have levels of 1, 5, 10, etc. This allows you to adjust to what you or your friends need. You cannot make anything above your current character level.
You will have the following menu when in build mode:
- Space - if you have met all the requirements to build the item, otherwise it is grayed out
- X - add a missing part to search - puts a magnifying glass icon in front of all items looted that can be scrapped to acquire it
- TAB - move back to the previous menu
- R - switch from build to modify mode
- Q - is a toggle switch. By default you see everything you have a plan for, but you may want to see only what you can build with your current items and perks
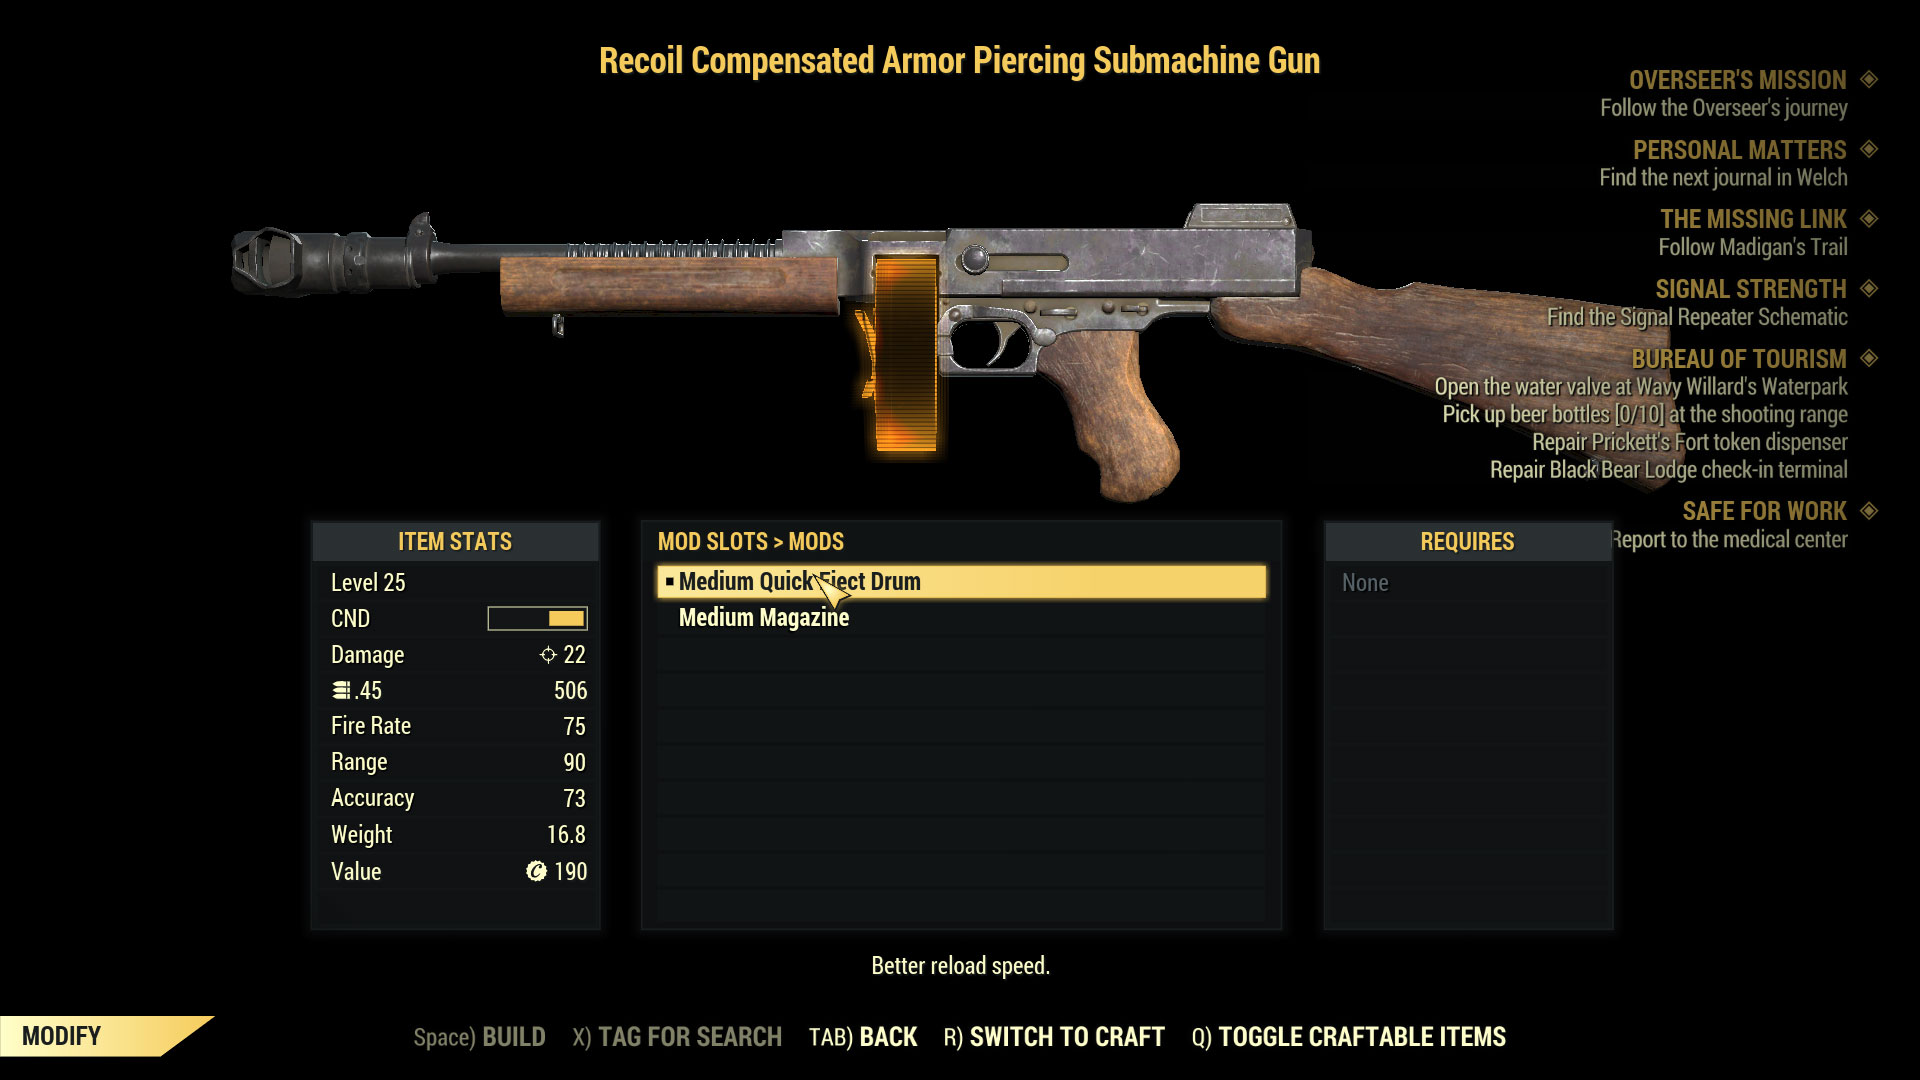
The menu is very similar in modify mode, but instead of building an item, you are changing a part of it. The section you are modifying will be highlighted and the menu will show your options. The current option applied to the weapon will have a filled in square in front of its name on the options list. Each option will list its pros and cons at the bottom of the modification window letting you know if any of them are an improvement over the modification currently applied. You have a safe guard with a pop up window asking you to confirm a modification in case you do change your mind or know you selected the wrong thing in the process.
This is just an overview of what you can do at crafting stations, but once you get playing you will learn what is best for each of your characters and be sure to work on finding plans and modifications to help you improve on what you have.
Making Your Character SPECIAL With Perks
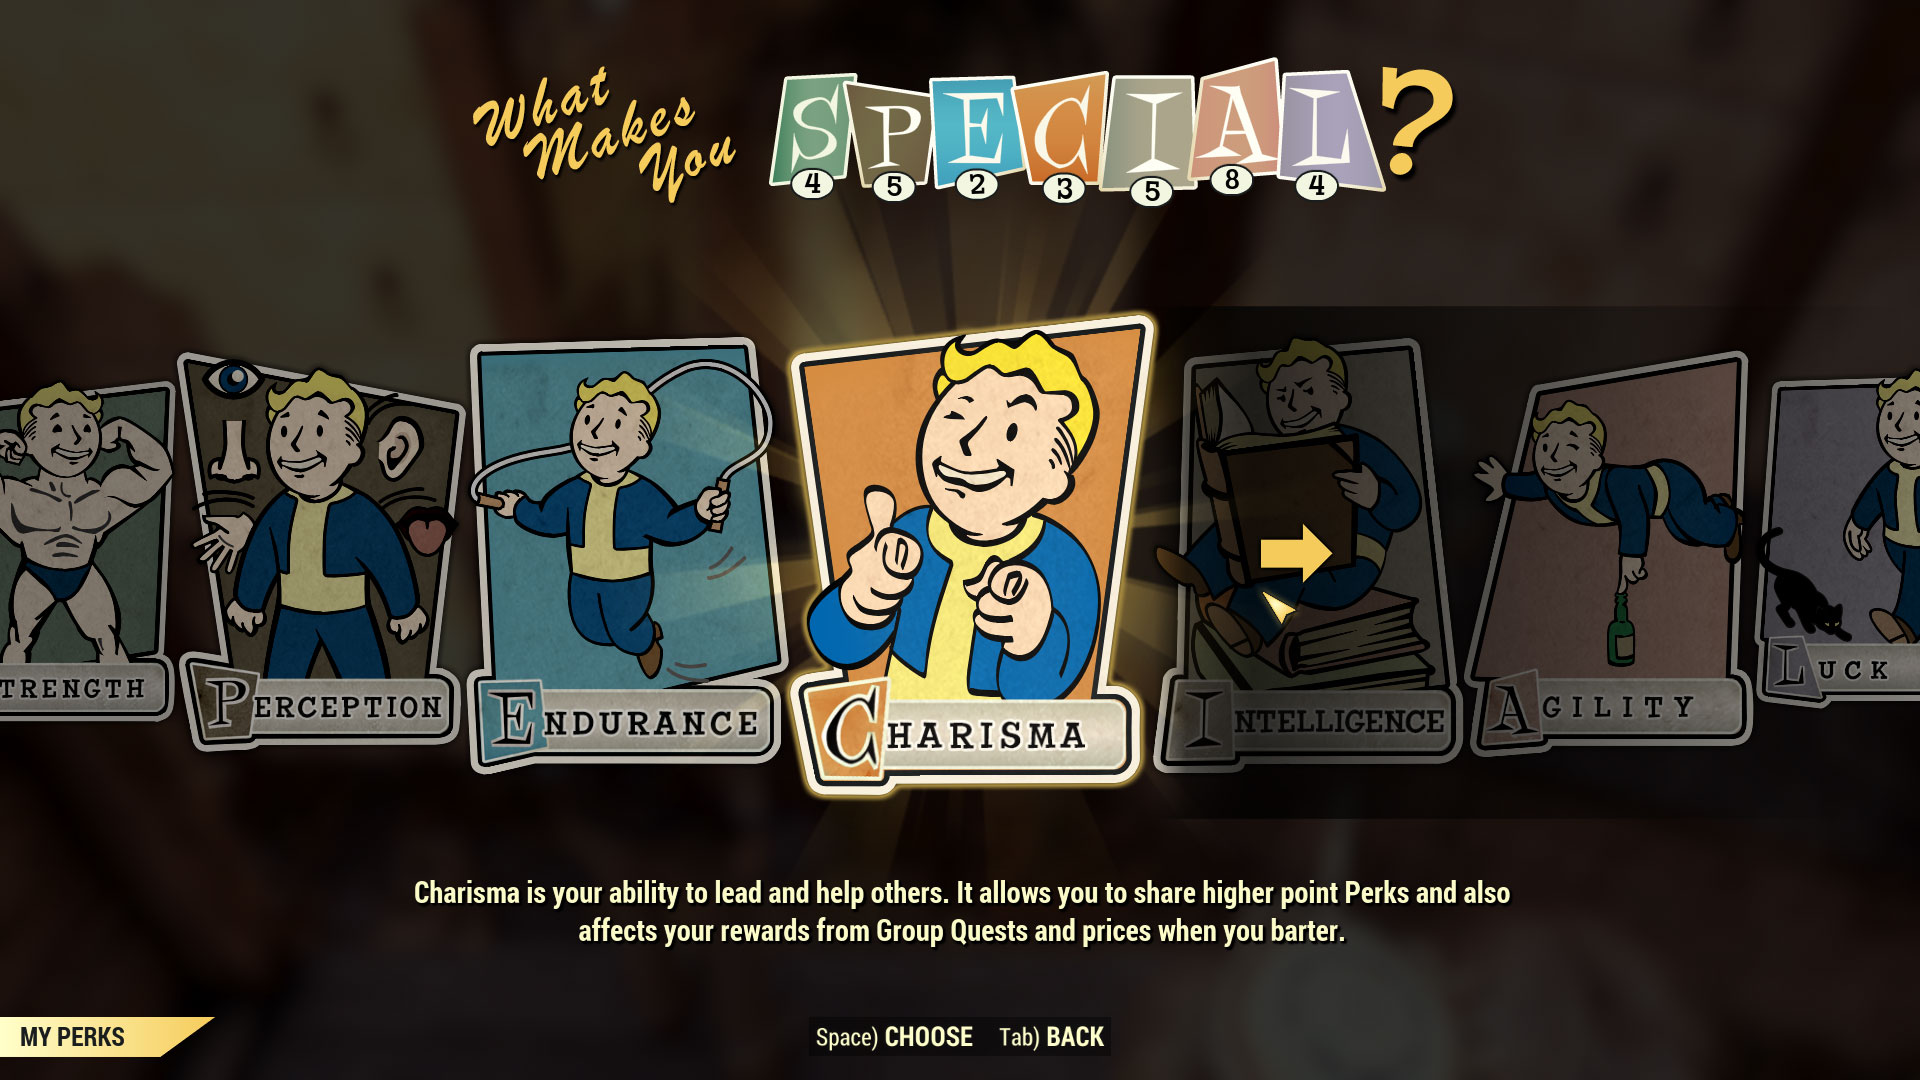
In several sections I mentioned perks. Now I will explain how they work to make your character special by choosing perk cards from the following categories:
- S - Strength
- P - Perception
- E - Endurance
- C - Charisma
- I - Intelligence
- A - Agility
- L - Luck
You get to add one perk card per level. At various levels you will also gain a new pack of perk cards. Depending on where you put your cards will determine what your character is good at. Perks are how you build your character in this game.
When you level up, you will get a splash notice across your screen. Open your Pipboy by pressing Tab and then pressing T. Whether you have leveled up or not, T will take you to the perk cards anytime. If you go in at a time you leveled up and it said you get new perk cards to open, you will get to see what these are. You will also get a stick of gum along with a bad joke or pun from the wrapper. Be sure to read them, and at my age some of them are probably funnier than they should be. I got reminded of baseball card collecting I did for a couple years growing up. That gum was terrible, but the gum in this game has some short term buffs to it and will show in your inventory in the Aid section.
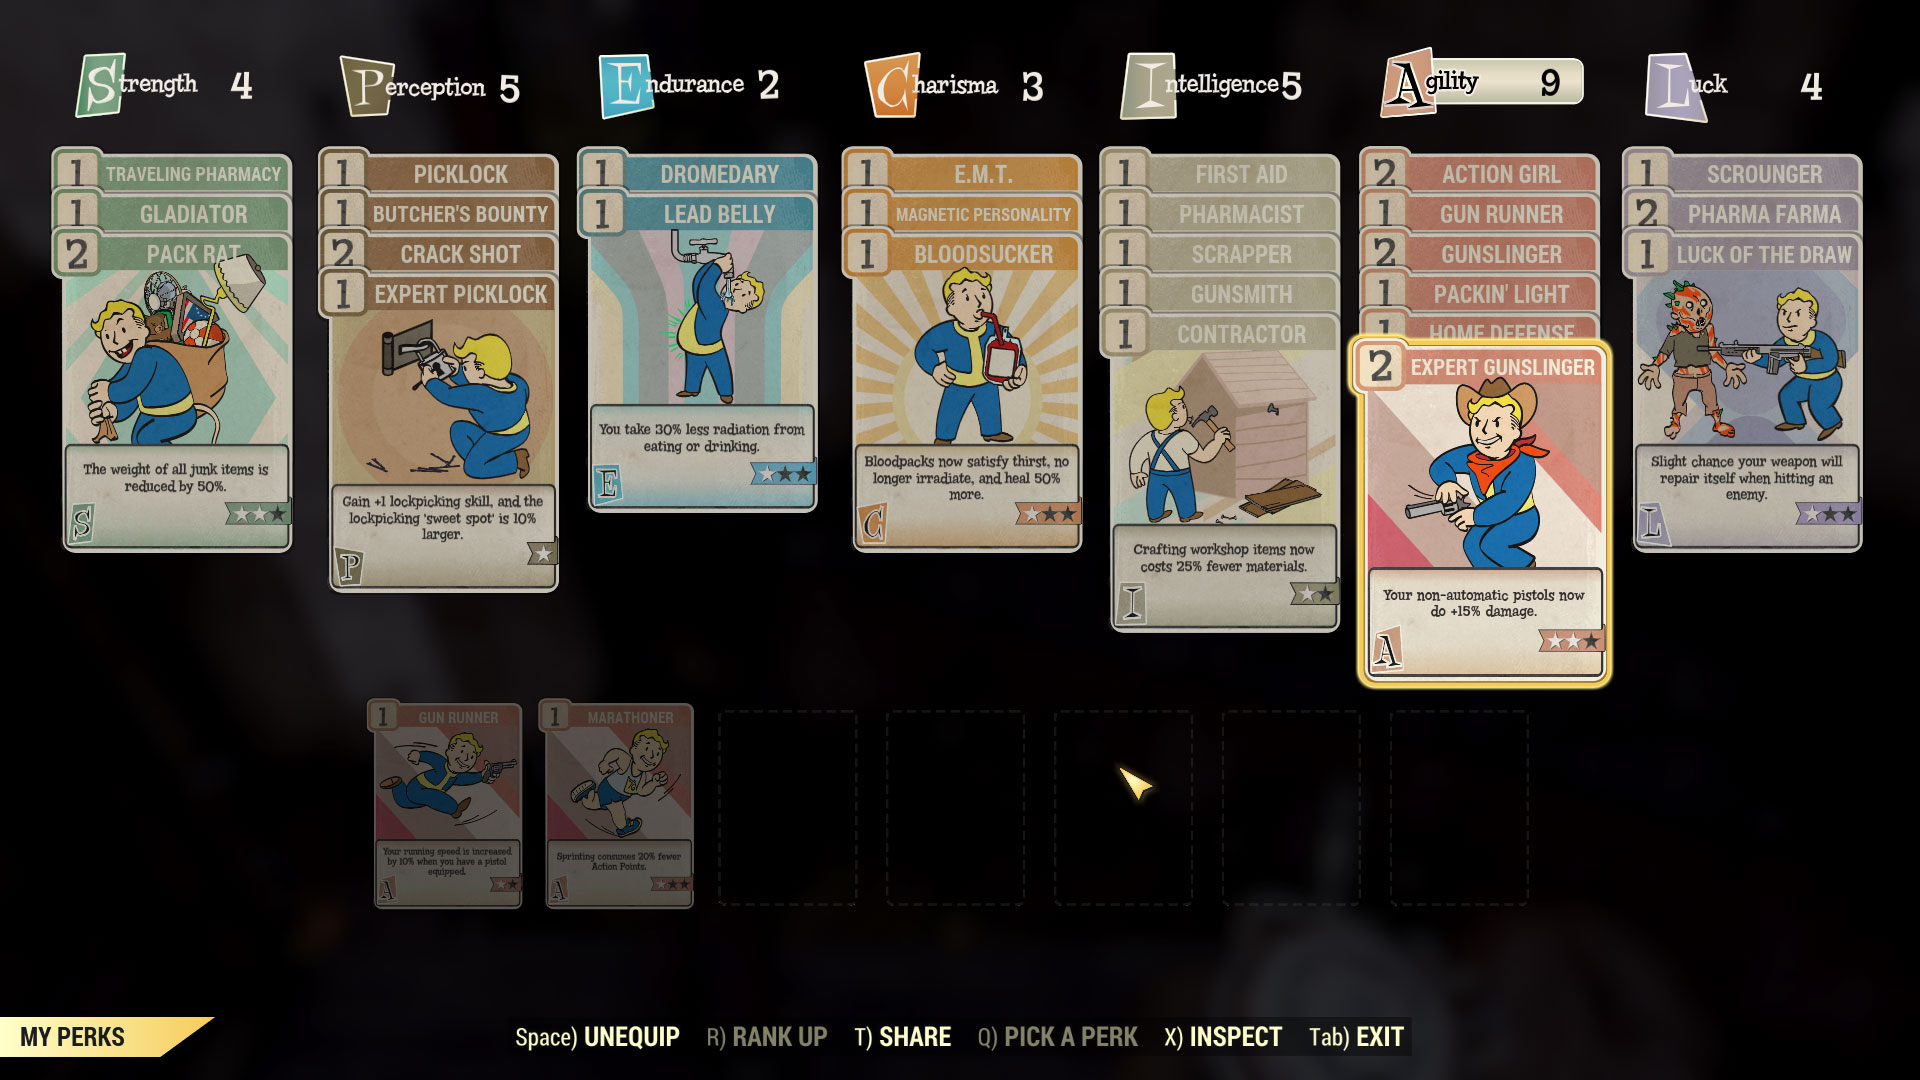
Some of my initial card picks on my main were to help me lighten my load, with Strength perks to make junk and pharma items way less to carry. A lot of my perks are in gunslinger, aiming for a non-automatic pistol oriented character. I may have to clean this up some as I level up. I’m no build expert, but thankfully there are those fast leveling types that have figured out how to build different types of characters in this game. All you have to do is google and you will find some good resources out there for builds.
So how do you equip your perks? In any of the screens showing multiple cards you can use the arrow keys to move through them, including new perk card packs, or you can left click on any to highlight it. If you click on an equipped card, it will brighten to show it is highlighted and other card options will be shown in the bottom for the SPECIAL associated.
If you have room to equip a card in any of the SPECIAL slots, a number of available cards or ranks you can equip will show directly under the title. For instance, if you have one slot/rank free under Charisma, it will note that in yellow. You will be able to put a card worth one slot/rank there. Another option is you can upgrade an equipped card up one rank if you have a matching card to it. The total of the points (ranks) of the cards to equip under each SPECIAL is noted next to its name, and the numbers on the cards cannot exceed this number when added up. As you can see in my screen shot, I have more perk cards available than I do slots.
You can change out cards at any time. First, if no slots available, you will have to unequip cards you don’t want at the time in order to put in the ones you want. When highlighting an equipped card the menu at the bottom of the screen will give you the option to unequip it. It will then show up on the bottom row of cards, which are the unequipped options you have. You can click any of these, and if the required number of slots are available, you will get the option to equip it.
At any time you can also check out the current information of the highlighted card by pressing X. This will bring up a screen that lists the stats for each rank available and will note with x# which level of perk you have for the card. It will also tell you if you have a rank up available due to having a duplicate card as in my example below for expert gunslinger.
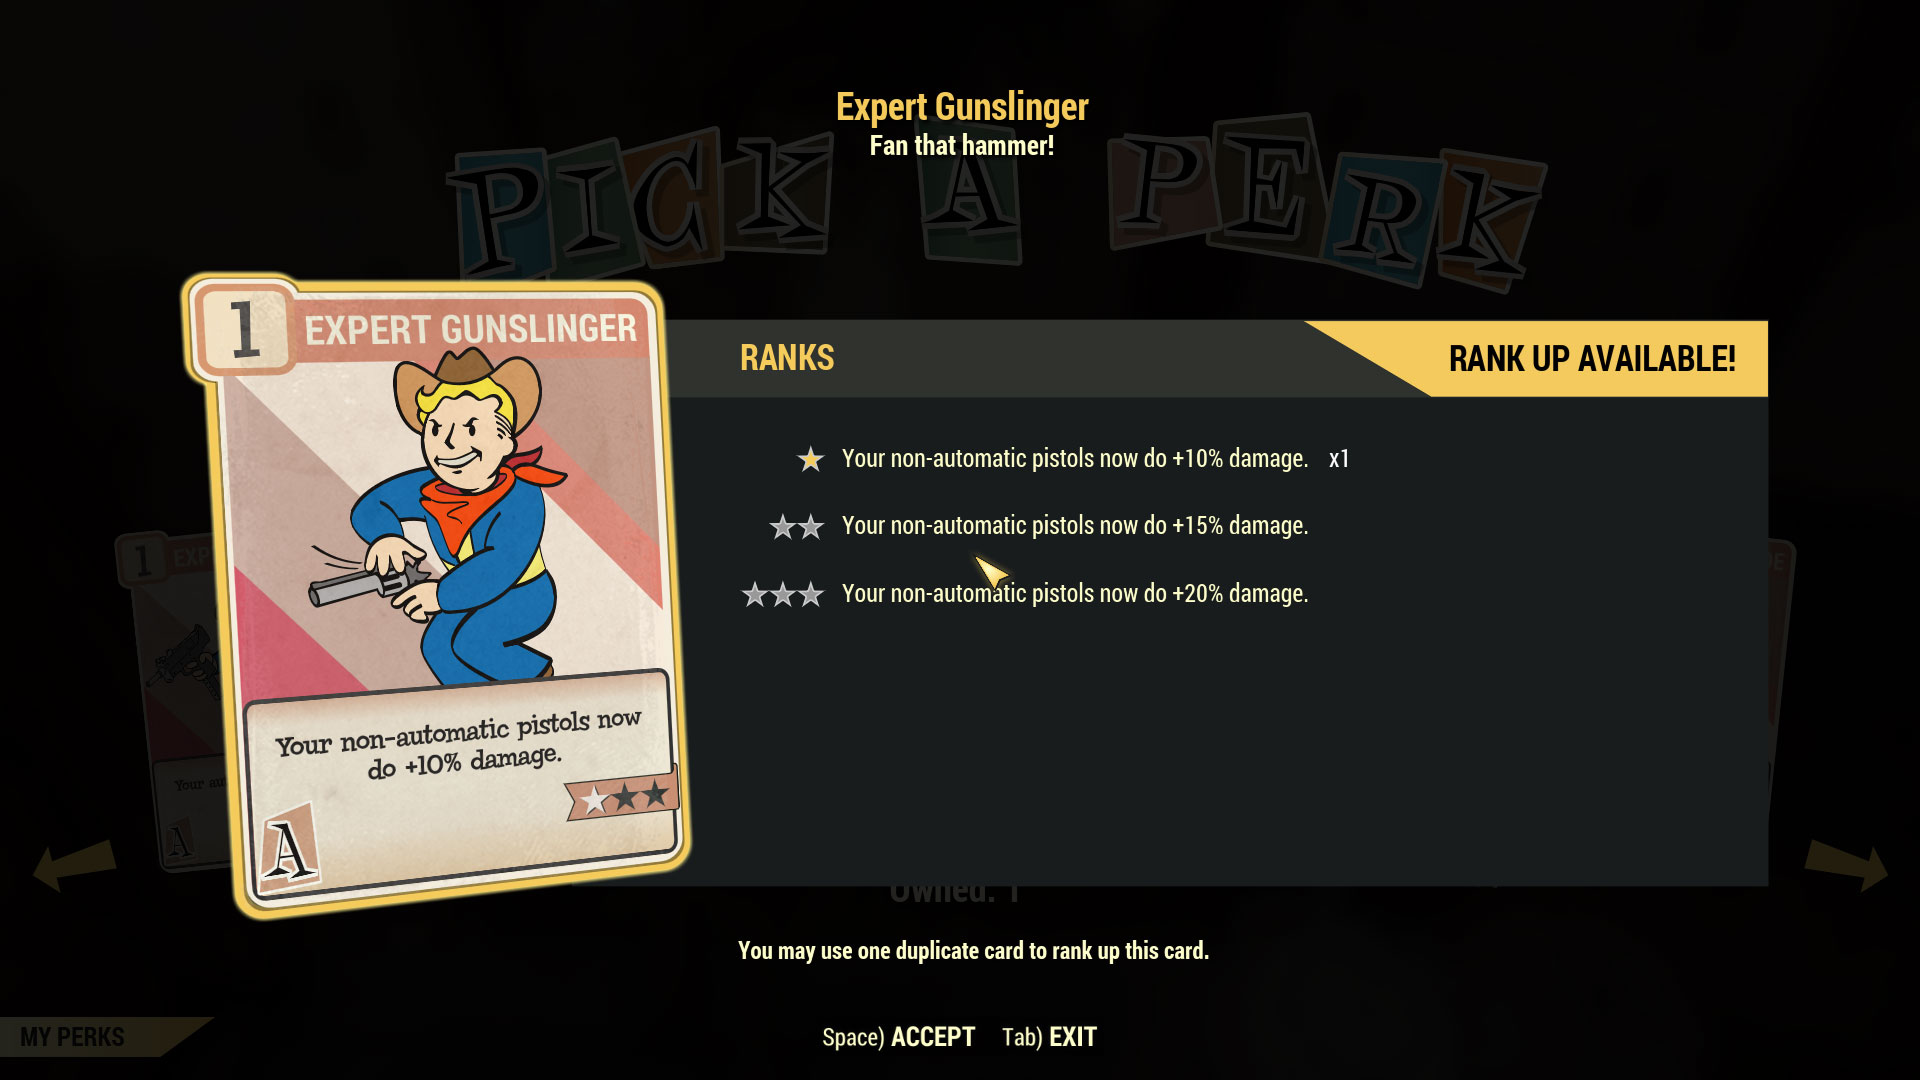
When in the card stat view, you will get the option to use Space to accept if you want to rank up a card, or to equip it if you have the slots for it. In the above example, after I hit Space, it combined my two rank 1 cards for Expert Gunslinger into one rank 2 card. So a rank 2 card really means you combined two identical rank 1 cards, which will take two card slots to equip. Hence, my using slot and rank together at times to show it works for adding up your cards.
The fun thing you can do is share perk cards with your team. If you can share the highlighted card with your team, the option in the menu at the bottom of the screen will not be grayed out. Pressing T will share it.
So how does sharing work? For every three points you have in Charisma, you can share one rank. So at Charisma total of 3 you can share cards of rank 1 only. Once your Charisma total is 6 you can share a rank 2 card. At 9 points, you can share a rank 3 card. You can work with your team to determine who will share what to help out. The shared card can be changed at any time based on the needs of the team.
I know this sounds a bit clunky and convoluted, but my suggestion is to just get used to using the arrows, left clicking and the menu options by equipping and unequipping cards. I did mention that the UI does remind me of using an old mainframe computer terminal in a lot of places, and perk cards are no exception even if you have a visual of your cards.
There will always be more options than you can use so be sure to do deeper research on build ideas when you have leveled up some. The great thing is you can swap things around to change up your character, however, I would look into build ideas once you have a handle on how the perk cards flow and what weapons and other options you like best in the game. And if you want to try something different, this game allows you to have up to five characters to help fill your need of exploring different builds.
The Social Side of the Game
This game does have a social side I will explain, but in many ways it feels more antisocial than other games. It has no built in text chat system, though it does have a built in voice system. I usually have this turned off because my crew is usually in Discord, a nice voice and text chat program we have used for awhile now with Gaiscioch. If you use both at the same time for voice, you will hear an echo as one will lag after the other and it is quite annoying. You will have to decide about the voice on or off option based on who you play with. If you start off without any friends, you might want it on for those in the area that may be using the voice option. You can set this in your game settings and the default is that the voice is on.
To see your friends and team information you press CTRL+TAB. This opens up a social window on the left hand side of your screen. To add a friend you need to know what they have set as their username, not character name, for the game. You will see if they are on regardless of what character they are playing. Click on the box at the bottom of the menu, type in the username exactly as they give it to you, and then press enter. This sends a friend invite to them and they will show on your friends list.
You want your friends on the list for two reasons: to join the same world and to invite to a team. To accept a team invite, you hover over the person’s name on your friends list to pop up another menu. Move the mouse onto this new menu and click ‘Accept Team Invite’ to be added to the team. Teams can be only four people at once, but your friends list can be quite huge. I have not found the limit to it yet. Once in a team you can see your team members listed when you click on the Team tab.
The other option I mentioned was joining your friends on the same world. You can not team up if not on the same world, or even meet up with each other. To be sure you are on the same map as a friend, hover the mouse pointer over their name on the friends list, and if Join is an option you can left click it and the game will move you to their world.
The crew I play with may have two teams running on the same world at the same time, but we can interact with each other as long as we are friends. You can fast travel to anyone on the world with you that is part of your friends list. It helps to be in a team because you can use each others’ camps for free fast travel, too.
Another reason for friends, you can not swap gear from one of your characters to another without working out trading it with a friend. There is no way to guarantee you will get it back otherwise. Thankfully there are a couple ways to trade in the game. One is to target the player and then select the trade option by popping up a menu when right clicking on them. You can make the cost of the trade to them require caps or be for free. It takes a couple steps to do this. My crew uses this option only if we need to move caps around because someone has the option to buy something they want and at a better price. Vendors can be pretty random on what they want to sell to or buy from you, so having friends that can look helps in case there are differences in the listings and prices.
The unsecure, and easiest, way is to put the items in a container near where you are that is open to all or simply do the drop item which puts a paper bag on the ground at your feet. Usually we use a low cost item to drop to produce the paper bag, then we can interact with the bag by pressing R to transfer more items from the inventory to the bag. Anyone else around can interact with the bag to add and remove things. It disappears when it is empty. We usually do such transfers where several of us are or at one of our personal camps for security reasons.
Conclusion
This turned out to be as long as some of my other new player guides for games, but I hope it helps you figure out some of the interesting ways this UI works. I like it for its flavor even if it is rather clunky to use compared to a lot of other games. I want to help people enjoy the game and not feel lost in the basics. Here’s to you staying alive in the harsh land of post apocalyptic Appalachia.
About the Author

Althea "Briseadh" Damgaard
Senior Editor
Althea joined Gaiscioch back in October of 2009 and has been here ever since with only a few month hiatus between Warhammer and Rift. As soon as she knew they were in Rift, she jumped ship to Faeblight and has followed them onward through every chapter since with a few side games thrown in for spice.
She has been an avid player of RPG style games since 1980 when she first played Dungeons and Dragons. Since then she has created her own tabletop gaming world used with various rule sets as D&D progressed. Once she could get online she played MUDs. Her MMO days started with Everquest and have moved through over a dozen games with some lasting only a month's time in her life and others going for years. She has tested several games from the perspective of a disabled gamer with hand issues due to her multiple sclerosis.
When not writing about or playing games, she can be found writing novels, reading and doing various art projects. She also writes items based on her faith and is working on publishing a novel. She also does editing for a gaming developer.
About Fallout 76
Welcome to Fallout 76, the online prequel where every surviving human is a real person. Work together, or not, to survive. Under the threat of nuclear annihilation, you’ll experience the largest, most dynamic world ever created in the legendary Fallout universe.